thermoadvanced minilandbaby.com plus · 2018-11-22 · dispositivos inalámbricos. 16. no guarde el...
TRANSCRIPT

thermoadvancedplus
10
23
39
52
Español
English
Português
Français
65
79
92
105
Deutsch
Italiano
Polski
Русский
minilandbaby.com


2
3
1
Figura · Figure · AbbildungZdjęcie · Рисунок A

ÍNDICE1. Introducción2. Contenido3. Instrucciones de seguridad4. Características del producto5. Instrucciones de uso6. Mantenimiento7. Especificaciones técnicas8. Información sobre desecho de las baterías y el producto
1. INTRODUCCIÓNLe felicitamos por la compra de este termómetro clínico infrarrojo con voz.
Antes de usar este dispositivo, le rogamos que lea atentamente todas las instrucciones en este manual. Le rogamos que lo conserve en lugar seguro porque contiene información importante.
Las características descritas en este manual de usuario están sujetas a modificaciones sin previo aviso.
2. CONTENIDO - 1 termómetro sin contacto- 1 bolsa de almacenaje y transporte- 2 pilas AAA - 1 Manual de instrucciones y garantía
Si faltase algún elemento de los anteriormente mencionados, le rogamos que se ponga en contacto con el vendedor. 3. INSTRUCCIONES DE SEGURIDAD 1. Este dispositivo no es un juguete. No permita que los niños jueguen con él.2. Mantenga el termómetro fuera del alcance de los niños.3. Lea atentamente las instrucciones antes del uso y guárdelas para consultas posteriores.4. El uso de este termómetro no sustituye la consulta con su médico. Los resultados de la medición pueden usarse solamente como referencia. Póngase en contacto con su médico si tiene o sospecha que pueda tener problemas de salud.5. Asegúrese de que las pilas están colocadas con la polaridad correcta.6. Retire las pilas cuando estén agotadas.7. No tire las pilas al fuego. Es probable que las pilas exploten al entrar en contacto con el fuego.8. No intente abrir ninguna parte del aparato ni desmontar los mandos. No se aceptará responsabilidad alguna si se ignoran estas instrucciones.9. No retire, repare o cambie piezas de la unidad en ningún momento.10. No use el termómetro si el cuerpo principal está deteriorado (por ejemplo, el
ESPAÑOL

sensor infrarrojo está roto). El uso continuado de una unidad deteriorada puedeprovocar lesiones, resultados incorrectos o grave peligro.11. No agite ni golpee el termómetro. No lo deje caer.12. El sensor infrarrojo se debe mantener limpio, seco y sin deterioro en todo momento para garantizar mediciones precisas.13. No utilice el sistema cerca de transmisores intensos como aparatos de microondas y de onda corta.14. Este producto necesita precauciones especiales relativas a la CEM ynecesita ser instalado y puesto en servicio con arreglo a la información deCEM suministrada, y esta unidad puede verse afectada por equipos de comunicaciones de RF portátiles y móviles.15. Para estar seguro de que las temperaturas registradas en la aplicación eMyBaby son exactas, mantenga una distancia mínima de unos 30 cm a otros dispositivos inalámbricos.16. No guarde el termómetro a temperaturas extremas, (inferiores a -20 ºC/-4 ºF o superiores a 55 ºC/131 ºF) o humedad extrema (inferior al 15% HR o superior al 90% HR). No hacerlo así puede provocar inexactitudes.17. El dispositivo está destinado a la lectura y control ocasionales de la temperatura corporal o de objetos, en un entorno doméstico. NO usar el producto para otros fines.
Los cambios y modificaciones en el equipo no realizados por el servicio técnico de MINILAND no están cubiertos por la garantía del producto.
4. CARACTERÍSTICAS DEL PRODUCTO 4.1. DESCRIPCIÓN DE LAS PARTES4.1.1. TERMÓMETRO
1. Medición de temperatura en la frente2. Sensor infrarrojo3. Luz focal4. Tapa de las pilas5. Botón de Ajuste / Memoria
6. Altavoz7. Botón de voz8. Medición de temperatura de objetos9. LCD
9
8

4.1.2. PANTALLA LCDA. TemperaturaB. PM (formato de hora)C. Símbolo memoriaD. Símbolo pilas agotadasE. Símbolo medición de temperatura ambienteF. Símbolo medición de temperatura de objetosG. Símbolo medición de temperatura en la frenteH. Símbolo fiebre
5. INSTRUCCIONES DE USO5.1. ANTES DEL USO5.1.1. RECOMENDACIONES1. Para conseguir mediciones exactas, es muy importante comprobar la limpieza del sensor infrarrojo antes del uso.2. Si la temperatura del lugar donde se guarda es muy diferente a la del lugar de medición, esperar a que la temperatura del termómetro se equilibre con la temperatura ambiente durante unos 30 minutos antes de medir.3. No tocar ni soplar el sensor infrarrojo. Un sensor infrarrojo sucio puede producir inexactitud en las medidas.4. Recuerde que en el modo espera, el LCD muestra alternativamente la información de la hora, fecha y temperatura ambiente.
5.1.2. COLOCACIÓN / RETIRADA DE LAS PILASCuando el indicador de pilas agotadas (D) aparece en la pantalla LCD, o el termómetro deja de funcionar, deben colocar pilas nuevas lo antes posible.Este producto usa dos pilas AAA de 1,5 V; realice el procedimiento siguiente para cambiar o colocar las pilas:1. Abra la tapa de las pilas siguiendo la dirección de la flecha.2. Retire las pilas viejas y luego coloque las pilas nuevas en el compartimento de las pilas. Asegúrese de colocar las pilas correctamente; de que los polos positivo y negativo de la pila coinciden con la marca en el compartimento de las pilas del termómetro.3. Vuelva a colocar la tapa del compartimento de las pilas y haga presión para cerrar.
5.2. MEDICIÓN DE LA TEMPERATURA EN LA FRENTE· Asegúrese de que la sonda está limpia antes de medir.· La grasa de la frente puede dar lugar a una medición inexacta, así que asegúrese de que la frente está limpia. Si limpia la frente, espere 5-10 minutos antes de medir.· Factores externos pueden influir en la temperatura de la frente, particularmente cuando una persona ha estado expuesta a temperaturas muy calientes o muy frías o ha estado nadando o bañándose hace poco tiempo. En estos casos, la persona debe permanecer en reposo y en un entorno adecuado, durante al menos 30 minutos antes de tomar la temperatura.
A
B C D
EFG
FE
H

· La temperatura de la frente y de la sien son diferentes de la temperatura interna que se toma oral o rectalmente. Se puede producir vasoconstricción, un efecto que contrae los vasos sanguíneos y enfría la piel, durante las primeras fases de la fiebre. En este caso, la temperatura medida empleando este termómetro puede ser anormalmente baja. Si la medida no concuerda con la percepción propia del paciente, repita la medición cada 15 minutos. Como referencia, también puede medir la temperatura interna del cuerpo usando un termómetro oral o rectal convencional.· La piel de los bebés reacciona muy rápidamente a la temperatura ambiente. Por ello no tome su temperatura con el termómetro durante o después de mamar, porque la temperatura de la piel puede ser inferior a la temperatura corporal interna.
1. Coloque el termómetro en la mano con el dedo en el botón de medida en la frente (1).
2. Sujete el termómetro de modo que el sensor frontal quede situado sobre la parte central de la frente, a una distancia aproximada de 3-5 cm, a mitad de camino entre las cejas y el nacimiento del pelo.
3. Mantenga pulsado el botón de medida en la frente (1), la luz focal se encenderá de modo que pueda localizar la posición correcta para la medición en la frente. Mantenga pulsado el botón de medida en la frente mientras desee que la luz focal permanezca encendida. Si la posición es correcta, suelte el botón de medida en la frente para empezar la medición y, entonces, el termómetro pitará una vez.
4. Mantenga el termómetro en la misma posición hasta que escuche dos pitidos y aparezca la temperatura. Luego, el display se retroiluminará en un color u otro, en función del valor de la temperatura obtenida.
5. El proceso de toma de temperatura se da por finalizado y puede retirar el termómetro de la posición de medida.
6. Lea la temperatura en la pantalla
7. Puede pulsar el botón de medida en la frente (1) para empezar una nueva medición o pulsar el botón Ajuste / Memoria (5) para volver al modo espera.
36.6c

NOTA La luz focal permanecerá encendida mientras esté pulsado el botón de medida en la frente. La luz focal se apagará después de soltar dicho botón o se apagará automáticamente si el botón de medida en la frente (1) permanece oprimido durante más de 1 minuto. Después de que suelte el botón, el dispositivo vuelve al modo espera.
La temperatura corporal normal no es un valor concreto, sino un intervalo. El rango de temperaturas normal de una persona tiende a disminuir con la edad.La siguiente tabla muestra los intervalos de temperatura normales con la edad:
0-2 años 36.4ºC-38.0ºC 97.5ºF-100.4ºF
3-10 años 36.1ºC-37.8ºC 97.0ºF-100.0ºF
11-65 años 35.9ºC-37.6ºC 96.6ºF-99.7ºF
> 65 años 35.8ºC-37.5ºC 96.4ºF-99.5ºF
Este intervalo también varía de una persona a otra y puede verse influenciado por muchos factores como la hora del día, el nivel de actividad, la medicación, las emociones, etc.Así pues, le recomendamos que practique con el termómetro sobre usted mismo y los miembros de su familia cuando estén sanos. De esta forma sabrá cómo funciona el termómetro y podrá estar más seguro de las mediciones que haga cuando un miembro de la familia esté enfermo.
NOTA: Si la temperatura medida es igual o superior a 38 ºC, la pantalla mostrará el indicador fiebre y se retroiluminará en rojo.
5.2.1. RETROILUMINACIÓN DE INDICACIÓN DE TEMPERATURA La pantalla se iluminará después de que termine la medición de la temperatura corporal como sigue:Retroiluminación azul: inferior a 37,9 ºC (100,3 ºF)Retroiluminación roja: 38,0 ºC-42,9 ºC (100,4 ºF-109,3 ºF)
5.3. MEDICIÓN DE LA TEMPERATURA DE OBJETOS· Asegúrese de que la sonda está limpia antes de medir.· No utilice este modo para medir la temperatura corporal.· Al medir la temperatura de objetos, se visualiza la temperatura actual de la superficie del objeto. Puede ser diferente de su temperatura interna, especialmente si la superficie está expuesta a la luz solar directa o a corrientes de aire.

1. Coloque el termómetro en su mano con el dedo en el botón para medida en objetos (8).
2. Sujete el termómetro de modo que el sensor esté a una distancia de 3-5 cm del líquido y/o de la superficie cuya temperatura quiere medir.
3. Pulse el botón de medida en objetos (8) para empezar la medición, y entonces el termómetro pitará una vez.
4. Retire el termómetro del objeto. El LCD mostrará la temperatura medida.
5. Puede pulsar el botón de medida en objetos (8) para empezar una nueva medición o pulsar el botón Ajuste / Memoria (5) para volver al modo espera. 52.7c5.4. COMPROBACIÓN DE LA MEMORIAEste termómetro permite memorizar hasta 9 mediciones de temperatura en la frente.La medición actual siempre se memoriza en la última posición de memoria. Cuando la memoria está llena, siempre se borra de la memoria la medición más antigua.
8 36.4c 12.23 2-14
1. Pulsando el botón Ajuste / Memoria (5) accederá a la memoria, podrá ver el nº de memorización, la temperatura, la hora y la fecha.2. Pulse el botón Ajuste / Memoria (5) para acceder a la siguiente temperatura memorizada.3. Mantenga pulsado el botón Ajuste / Memoria (5) para desplazarse rápidamente entre las temperaturas memorizadas.4. Pulse a la vez el botón medición en objetos (8) y frente (1); el dispositivo volverá al modo espera.
Nº dememorización
Temperatura Hora Fecha

1. Mantenga pulsado el botón Ajuste / Memoria (5) unos 2 segundos para entrar al modo ajuste desde el modo espera.
2. Vuelva a pulsar el botón Ajuste / Memoria (5) para seleccionar entre el ajuste de modo horario (12 h o 24 h, “PM” se mostrará en el LCD cuando se seleccione el modo 12 h), hora, minuto, año (2001-2099), mes, día y modo suspensión (ON u OFF).
3. Pulse el botón voz (7) para confirmar los ajustes y pasar al siguiente ajuste.
5.5 AJUSTE DE FECHA Y HORA
12
off
Cuando está activo el modo suspensión, el termómetro se apagará automáticamente tras unos 3 minutos; cuando está desactivado el modo suspensión, el termómetro permanece encendido. Para ahorrar energía recomendamos activar el modo suspensión.
5.6. MENSAJE DE VOZEn modo reposo, pulse el botón voz (7) para que el termómetro comunique con voz la temperatura medida, la hora actual o la temperatura ambiente.Después de cada medición en la frente, el termómetro comunicará la temperatura obtenida en el idioma escogido.
Este termómetro comunica la temperatura mediante un mensaje de voz en 6 idiomas: español, inglés, alemán, francés, italiano y ruso.
AudioFunción Inglés Español Alemán Francés Italiano Ruso
Temperatura (ºC)
Temperatura (ºF)
Hora
Temperaturaambiente (ºC)
Temperaturaambiente (ºF)

5.7. CAMBIO ENTRE FAHRENHEIT O CELSIUSCuando el LCD muestre una medición o la temperatura en memoria, mantega pulsado el botón voz (7) unos 3 segundos; esto cambiará el modo a ºF o ºC.
5.8. CONTROL DE TEMPERATURA DEL BEBÉEste termómetro tiene un módulo de comunicaciones especial que le permite conectarse con su smartphone o tablet, enviando automáticamente los resultados de cada medición, para mantener un registro de temperaturas.
5.8.1. RECOMENDACIONES1. Asegúrese de que su smartphone está funcionando con el sistema operativo más reciente. Para información acerca de las actualizaciones del software, consulte las instrucciones de su dispositivo.2. Asegúrese de que el software eMyBaby (aplicación) se actualiza a intervalos regulares. Para información acerca de las actualizaciones de la aplicación, consulte las instrucciones de su dispositivo.3. Para que el módulo de comunicaciones funcione correctamente, el dispositivo móvil tiene que tener carga suficiente. Tenga a mano el cargador del dispositivo por si fuese necesaria su carga.4. Asegúrese de que siempre se disponga de memoria suficiente para guardar los datos leídos en su smartphone o tablet.5. Si recibe una llamada o un mensaje de texto durante una lectura, la lectura podría cancelarse o puede proporcionar una medición inexacta. Recomendamos cambiar su dispositivo al modo avión cuando realice las tomas de temperatura.
PRECAUCIÓN:Este aparato no se debe usar al lado de otro equipo y, si fuese estrictamente necesario, se deben observar los dispositivos para verificar que el funcionamiento es normal según la configuración utilizada.
5.8.2. Aplicación eMyBaby (FIGURA A)Este termómetro conecta con el smartphone o tablet para registrar y controlar las temperaturas del bebé.Para utilizar su nuevo termómetro infrarrojo con el smartphone o tablet, primero póngalo en modo Silencio para que la comunicación entre el dispositivo y su smartphone o tablet sea óptima. Para ello, mantenga pulsado el botón voz (7) unos 2 segundos, el termómetro irá cambiando de un idioma a otro cada vez que presione este botón hasta llegar al modo silencio .Además de esto, también necesitará instalar la aplicación gratuita eMyBaby. Para ello siga las instrucciones que se indican al principio de este manual.
· Para seleccionar el idioma deseado o el modo silencio, en el modo espera mantenga pulsado el botón voz (7) unos 2 segundos para seleccionar el idioma de expresión que desee, cambiará a otro idioma o a al modo silencio automáticamente.
1

PROBLEMAS POSIBLES CAUSAS SOLUCIONES
No hay respuesta / Restauración automática cuando se extrae el adaptador
Pilas agotadas
Pilas con polaridad errónea
Mal contacto de las pilas
Cambiar a pilas nuevas
Retirar las pilas, volver a colocarlas correctamente
5.10. INVESTIGACIÓN DE AVERÍAS
Una vez instalado satisfactoriamente el software, aparecerá en el dispositivo el icono de eMyBaby .Acceda a la aplicación y siga los siguientes pasos para registrar una medida con su termómetro:
1. Si no lo ha hecho anteriormente, tendrá que crear el perfil del bebé sobre el que quiere tomar las medidas. Para ello, vaya al apartado "Mi Bebé" desde el menú principal de la app eMyBaby y siga los pasos allí indicados para crear su ficha.2. Entre ahora en el apartado "Termómetro" desde el menú principal y seleccione el perfil del bebé sobre el que se va a realizar la medida. 3. Seleccione "Nueva Medida" y seleccione la opción de añadir utilizando el termómetro. 4. Tome ahora la medida al bebé tal y como se indica en el apartado 5.2 de este manual .5. Tras el segundo pitido que indica la finalización de la toma de temperatura, coloque el altavoz del termómetro (6) directamente frente al micrófono de su móvil o tablet. Tenga en cuenta que la comunicación se realiza mediante ultrasonidos, por tanto, ambos dispositivos deben estar lo más cerca posible el uno del otro .6. Automáticamente su smartphone o tablet recogerá la medida tomada por el termómetro. 7. Pulse sobre "Registrar temperatura" para registrar la medida y que quede guardada en el Historial de temperaturas de su bebé.
Tenga en cuenta que puede consultar el Registro de temperaturas del bebé tanto desde la app eMyBaby como desde la página web www.emybaby.com, accediendo al apartado "Termómetro".
NOTALa conexión con el dispositivo móvil puede no ser satisfactoria en entornos ruidosos.
5.9. CALIBRACIÓNEl termómetro se calibra inicialmente en el momento de su fabricación. Si el termómetro se usa con arreglo a las instrucciones, no se requieren recalibraciones periódicas. Si en algún momento tiene dudas acerca de la exactitud de la medida, le rogamos que se ponga en contacto inmediatamente con el vendedor.
2
3

Asegúrese de que el termómetro y el paciente han reposado en el lugar donde se va a realizar la medición durante al menos 30 minutos
Símbolo pilas enel LCD
Otras anomalías
Pilas agotadas o a punto de agotarse
Cambie las pilas por unas nuevas
Póngase en contacto con el servicio técnico de MINILAND
¿Está usando el termómetro en el exterior?
Por favor, realice la medida en un entorno interior
La medida no es exacta o hay dudas en el resultado dela medición
Recuerde que el termómetro y el paciente deben permanecer en el lugar donde se va a realizar la medición al menos 30 minutos antes del uso
“ErrP” o “ErrH” en lapantalla
La medida no es exacta o hay dudas en el resultado de la medición
La temperatura medida es inferior a 32,0 ºC/89,6 ºF.Por favor compruebe que ha realizado correctamente la medida
“Hi” en la pantalla La temperatura medida es superior a 42,9 ºC/109,3 ºF. Por favor compruebe que ha realizado correctamente la medida
Problema de hardware
Compruebe si el sensor infrarrojo está limpio
Limpie el sensor infrarrojo con bastoncillo de algodón con arreglo al manual del usuario
Compruebe si la forma de medición es correcta o no
Asegúrese de que ha leído el manual y sabe cómo usar el termómetro correctamente
Para una medición correcta siga los pasos indicados en el manual del usuario
Para una medición correcta siga los pasos indicados en el manual del usuario
Póngase en contacto con el fabricante o el distribuidor
"ErrE" en la pantalla La temperaturaambiente está fuera del intervalo de 10°C~40°C (50.0°F~104.0°F) para objetos; 15°C~40°C (59.0°F~104.0°F) para la frente
Realice las tomas de temperaturas en un entorno con una temperatura ambiente adecuada
“Lo” en la pantalla
PROBLEMAS POSIBLES CAUSAS SOLUCIONES

Precisión de temperatura ambiente
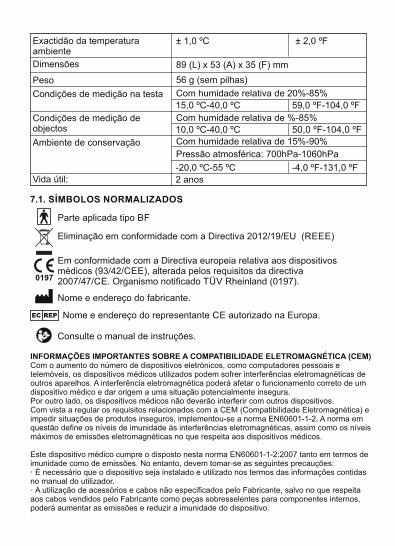
Dimensiones 89 (L) x 53 (A) x 35 (F) mm
Rango de temperatura ambiente
5,0 ºC-59,9 ºC 41,0 ºF-139,8 ºF
± 1,0 ºC ± 2,0 ºF
Precisión de la medición de objetos
± 1,0 ºC ± 2,0 ºF
Precisión de la medición en la frente
Para otro intervalo ± 0,3 ºC± 0,5 ºF
Rango de medida de objetos 20,0 ºC-60,0 ºC 68,0 ºF-140,0 ºF
Precisión de la medición en la frente
En el intervalo de 35,5 ºC-42,0 ºC95,9 ºF-107,6 ºF
± 0,2 ºC± 0,4 ºF
Rango de medición corporal
6. MANTENIMIENTO· Colóquelo en una corriente de aire para medir la exactitud.· Evite que el producto se moje. Si se moja séquelo inmediatamente. Los líquidos corrosivos pueden dañar el dispositivo.· Utilice y guarde el termómetro a temperatura normal; la vida útil del productose acortará si las temperaturas son excesivamente altas o bajas.· Si no usa su termómetro de forma regular, retire las pilas para evitar posibles daños debidos a las fugas de productos químicos. Si las pilas tienen fugas, retírelas con cuidado. No permita que dicho líquido entre en contacto con la piel.
6.1. CUIDADO Y LIMPIEZA· Para garantizar mediciones exactas, mantenga el extremo de la sonda limpioy sin rayar. Las huellas dactilares o la suciedad afectarán a la exactitud del termómetro.· Para obtener una medición exacta rogamos limpiar el sensor.· Para limpiar el sensor, frote suavemente su superficie con un bastoncillo de algodón ligeramente humedecido con alcohol y séquelo inmediatamente con un bastoncillo limpio.· Use un paño seco y suave para limpiar el cuerpo del termómetro. No limpie nunca el termómetro con limpiadores abrasivos, disolventes, benceno o sumergiendo el termómetro en agua u otros líquidos.· Después de limpiar, dejar secando al menos 20 minutos antes de realizar nuevas tomas de temperatura. Coloque el termómetro en su bolsa protectora. Guárdelo en un lugar limpio y seco a temperatura ambiente.
Alimentación 3 VCC (2 pilas de 1,5 AAA)
32,0 ºC-42,9 ºC 89,6 ºF-109,3 ºF
7. ESPECIFICACIÓNES TÉCNICAS
Modo de operación
Sitio de referencia del cuerpo
Modo ajustado
Corazón
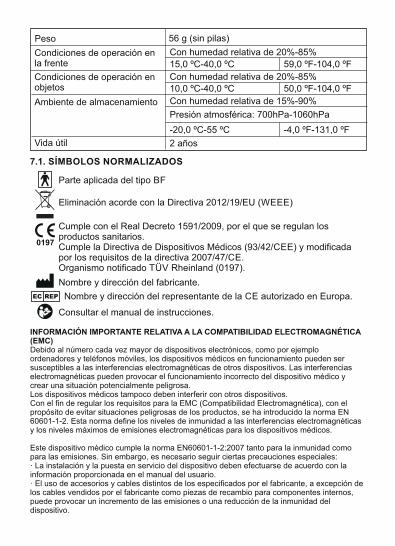
Con humedad relativa de 15%-90%
-4,0 ºF-131,0 ºF-20,0 ºC-55 ºC
Ambiente de almacenamiento
Parte aplicada del tipo BF
Eliminación acorde con la Directiva 2012/19/EU (WEEE)
7.1. SÍMBOLOS NORMALIZADOS
Cumple con el Real Decreto 1591/2009, por el que se regulan losproductos sanitarios.Cumple la Directiva de Dispositivos Médicos (93/42/CEE) y modificadapor los requisitos de la directiva 2007/47/CE.Organismo notificado TÜV Rheinland (0197).
Nombre y dirección del fabricante.
Nombre y dirección del representante de la CE autorizado en Europa.
Consultar el manual de instrucciones.
0197
Vida útil 2 años
59,0 ºF-104,0 ºFCondiciones de operación en la frente
Con humedad relativa de 20%-85%
15,0 ºC-40,0 ºC
Con humedad relativa de 20%-85%
50,0 ºF-104,0 ºF10,0 ºC-40,0 ºCCondiciones de operación en objetos
Peso 56 g (sin pilas)
Presión atmosférica: 700hPa-1060hPa
INFORMACIÓN IMPORTANTE RELATIVA A LA COMPATIBILIDAD ELECTROMAGNÉTICA (EMC)Debido al número cada vez mayor de dispositivos electrónicos, como por ejemplo ordenadores y teléfonos móviles, los dispositivos médicos en funcionamiento pueden ser susceptibles a las interferencias electromagnéticas de otros dispositivos. Las interferencias electromagnéticas pueden provocar el funcionamiento incorrecto del dispositivo médico y crear una situación potencialmente peligrosa.Los dispositivos médicos tampoco deben interferir con otros dispositivos.Con el fin de regular los requisitos para la EMC (Compatibilidad Electromagnética), con el propósito de evitar situaciones peligrosas de los productos, se ha introducido la norma EN 60601-1-2. Esta norma define los niveles de inmunidad a las interferencias electromagnéticas y los niveles máximos de emisiones electromagnéticas para los dispositivos médicos.
Este dispositivo médico cumple la norma EN60601-1-2:2007 tanto para la inmunidad como para las emisiones. Sin embargo, es necesario seguir ciertas precauciones especiales:· La instalación y la puesta en servicio del dispositivo deben efectuarse de acuerdo con la información proporcionada en el manual del usuario.· El uso de accesorios y cables distintos de los especificados por el fabricante, a excepción de los cables vendidos por el fabricante como piezas de recambio para componentes internos, puede provocar un incremento de las emisiones o una reducción de la inmunidad del dispositivo.

· Los dispositivos médicos no deben instalarse junto a otros equipos o encima de ellos. En el caso de que fuera necesario instalar un dispositivo médico junto a otros equipos o encima de ellos, es necesario observarlo con el fin de verificar su funcionamiento normal en la configuración en la que vaya a utilizarse.· Consulte la información adicional que se ofrece a continuación sobre el entorno EMC en el que debe utilizarse el dispositivo.
Los equipos de comunicaciones inalámbricas, como por ejemplo dispositivos de redes inalámbricas domésticas, teléfonos móviles, teléfonos inalámbricos y sus bases de carga y walkie-talkies, pueden afectar al funcionamiento de este equipo y deben mantenerse a una cierta distancia de él. La distancia d la calcula el FABRICANTE a partir de la columna 800 MHz a 2,5 GHz de la Tabla 6 de la norma IEC 60601-1-2,
Distancia de separación recomendada entre los equipos de comunicaciones de RFportátiles y móviles y el termómetro
El termómetro está diseñado para utilizarse en un entorno electromagnético en el que las alteraciones de RF radiadas están controladas. El cliente o el usuario del producto de este termómetro pueden ayudar a evitar las interferencias electromagnéticas manteniendo una distancia mínima entre los equipos de comunicación de RF portátiles y móviles (transmisores) y el termómetro que se recomienda a continuación, en función de la potencia de salida máxima del equipo de comunicación.
Potencia de salida del transmisor en W
Distancia de separación en función de la frecuencia del transmisor en m
150 kHz a80 MHz
d = 1,2 √P
80 MHz a800 MHz
d = 1,2 √P
800 MHz a2,5 GHz
d = 2,3 √P
0.01 0.12 0.12 0.23
0.1 0.38 0.38 0.78
1 1.2 1.2 2.3
10 3.8 3.8 7.3
100 12 12 23
8. INFORMACIÓN SOBRE DESECHO DE LAS BATERÍAS Y EL PRODUCTO· Recuerde quitar las pilas y deshacerse de ellas de forma responsable al desechar el vigilabebés.· No debe mezclar productos que lleven el símbolo del cubo de basura tachado con su basura doméstica.· Para el correcto tratamiento de este tipo de productos, llévelos a los puntos de recogida designados por las autoridades locales. Alternativamente puede contactar con el punto de venta donde adquirió el producto.
Para los transmisores con una potencia de salida máxima nominal no indicada en la tabla de arriba, la distancia de separación recomendada d en metros (m) puede determinarse utilizando la ecuación aplicable a la frecuencia del transmisor, donde P es la potencia de salida nominal máxima del transmisor en vatios (W) de acuerdo con el fabricante del transmisor.Nota: A 80 MHz y 800 MHz se aplica la distancia de separación el rango de frecuencia más alto.Nota: Esta guía podría no ser aplicable en todas las situaciones.La propagación electromagnética se ve afectada por la absorción y la reflexión de estructuras, personas y objetos.

INDEX 1. Introduction2. Contents3. Safety instructions4. Quick start guide5. Product features6. Normal body temperature ranges 7. Instructions for use8. Advanced settings9. Smartphone & tablet connectivity10. Product care11. Troubleshooting12. Specifications & symbols13. Information on the disposal of the batteries and the product
1. INTRODUCTIONCongratulations on the purchase of this infrared, non contact, clinical speaking thermometer. Before using this device, please read all the instructions in this manual carefully. Please keep in a safe place as it contains important information.The features described in this user’s guide are subject to modifications without prior notice.
2. CONTENTS1 Infrared non contact speaking thermometer.1 Storage and travel bag.2 AAA Batteries.1 Instruction manual and guarantee.If any of the above is missing, please contact your retailer.
3. SAFETY INSTRUCTIONSFEVER! If the reading exceeds 38°C (100.4°F) and / or the patient feels uncomfortable, the user should get in contact with a doctor.1. This device is not a toy; do not allow children to play with it.2. Keep the thermometer out of the reach of children.3. Read the instructions carefully before use and save them for future reference.4. Use of this thermometer is not intended as a substitution for consultation withyour physician. Reading results are for reference only. Contact a medical professional if you have or suspect any health concerns.5. Make sure the batteries are inserted with the correct polarity.6. Consumed batteries should be removed.7. Don't throw battery into a fire, the battery is likely to explode.8. Never attempt to open any part or dismantle the controls. Responsibility forfailure cannot be accepted if these instructions have been ignored.9. Don't take apart, repair or change any parts of the unit at any time.
ENGLISH

IMPORTANT• Changes and modifications carried out by anyone other than the MINILAND technical service will not be covered by the product guarantee.• The warranty excludes misuse:- Unauthorized disassembly and modification of the product.- If the product is dropped during application or transportation.- An incorrect use of the product.
10. Don't use the thermometer if the casing is damaged (for example, the infrared casing is broken). The use of a damaged unit may cause injury, erroneous results or serious danger.11. Do not shake, tap or drop the thermometer.12. The infrared sensor must be kept clean, dry and undamaged at all times toensure accurate readings.13. Do not operate the system in the vicinity of strong transmitter such as amicrowave oven and shortwave appliances. 14. This product needs special precautions regarding EMC (Electromagnetic Compatibility) and needs to be installed and put into service according to the EMC information provided, and this unit can be afected by portable and mobile RF (Radio-Frequency) communications equipment.15. To ensure eMyBaby app readings are accurate, keep the thermometer at leastof 30 cm from other wireless devices.16. Don't store the thermometer in extreme temperatures below -20ºC/-4ºF orover 55ºC/131ºF) or extreme humidity (below 15%RH or over 90%RH). Thiscould cause inaccurate readings.17. This device is intended for occasional reading and monitoring the temperature of the human body or objects, in a domestic environment. Do not use the productfor other purposes.18. This machine should not be used adjacent to or stacked with other electrical equipment and that if adjacent or stacked use is necessary, this machine should be observed to verify normal operation in the configuration in which it will be used.

4. QUICK START GUIDE4.1. FOREHEAD TEMPERATURE MEASUREMENT1. If the display is in standby, press any button to wake it up.
2. Hold the thermometer over the center of the forehead, at a distance approximately 3-5 cm midway between eyebrow and hairline.
3. Press and hold the forehead button [ ], the spotlight will come ON.
4. Hold the forehead button as long as you want the spotlight to stay on. Once the spotlight is over the area you wish to measure, release the forehead button, the thermometer will beep once and to start the reading and will beep twice more once the reading has been taken. The LCD will display the temperature. You will also hear the result via the speaker if the TALK function is enabled.
• FEVER! If the reading exceeds 38°C (100.4°F) and / or the patient feels uncomfortable, the user should get in contact with a doctor.
5. You can press the forehead button [ ] to start a new reading or press Set/Mem button [ ] to return to standby mode.
4.2. OBJECT TEMPERATURE READING (E.G. WARM MILK)1. If the display is in standby, press any button to wake it up.
2. Hold the thermometer so that the probe’s position is at a distance between 3-5 cm from the liquid and/or surface you want to take the temperature of.
3. Press and release the object button [ ] to take a reading. The thermometer will beep once and then twice again indicating the reading is finished. The LCD will display the temperature. You will also hear the result via the speaker if the TALK function is enabled (see section 12.2. LANGUAGE SUPPORT).
4. Press the object button [ ] to start a new reading or press Set/Mem button [ ] to return to standby mode.

5. PRODUCT FEATURES5.1. PARTS1. Forehead temperature measurement button2. Infrared sensor3. Spotlight4. Battery cover5. Set/Memory button6. Loudspeaker7. Talk button8. Object temperature measurement button9. LCD
13
2
4
9
58
7
6
5.2. LCD DISPLAYA. Temperature displayB. PM (time format)C. Memory iconD. Low battery iconE. Room temperature measurement iconF. Object temperature measurement iconG. Forehead temperature measurement icon
H. Fever symbol
A
B C D
EFG
FE
H

5.3. FEATURES5.3.1. ROOM TEMPERATURE, DATE & TIME DISPLAYThe LCD display will alternate between showing the time, date and then the room temperature.
5.3.2. READING OF TEMPERATURE RANGES
5.3.3. MEMORYMaximum of 9 sets of temperature records can be stored in the device’s memory.
5.3.4. AUDIOTemperature, time and records can be heard using the TALK function (see section 12.2. LANGUAGE SUPPORT).
5.3.5. SPOTLIGHTThe spotlight is used to pinpoint the area where a temperature measurement is to be taken. The spotlight will stay on whilst the forehead button (1) is being pressed. The spotlight turns off after you release the button. The spotlight will automatically turn off if you press the forehead button (1) for more than 1 minute; after you release the button, the device reverts back to standby mode.
5.3.6 TEMPERATURE BACKLIGHT INDICATIONThe display backlight will light up after a human body temperature reading hasfinished, as follows:Blue backlight: below 32ºC-37.9ºC (89.6ºF-100.3ºF)Red backlight: FEVER! 38.0ºC-42.9ºC (100.4ºF-109.3ºF)
6. NORMAL BODY TEMPERATURE RANGESNormal body temperature is within a set range. A person’s normal temperaturerange tends to decrease with age. The following table shows a list of normaltemperature ranges against four age groups:
The range varies from person to person and can be influenced by many factorssuch as the time of day, the level of activity, medication, emotion and so on.So we recommend that you practice with the thermometer on yourself and familymembers when you are healthy. This way you know how the thermometer worksand can feel more confident of the readings you take when a family member is ill.
0-2 years 36.4ºC-38.0ºC 97.5ºF-100.4ºF
3-10 years 36.1ºC-37.8ºC 97.0ºF-100.0ºF
11-65 years 35.9ºC-37.6ºC 96.6ºF-99.7ºF
> 65 years 35.8ºC-37.5ºC 96.4ºF-99.5ºF
Range in Celsius Range in Fahrenheit
Room 5.0°C to 59.9°C 41.0°F to 139.8°F
Object 20.0°C to 60.0°C 68.0°F to 140.0°F
Body 32.0°C to 42.9°C 89.6°F to 109.3°F

7. INSTRUCTIONS FOR USE7.1. LANGUAGE SETUP
For body temperature readings between 32ºC and 37ºC (100.3ºF-89.6ºF), the display will be backlit in blue and display the temperature.
FEVER: If the measured temperature is between 38ºC and 42ºC (100.4ºF-109.3ºF), the display will show the fever indicator (FE) and will be backlit in RED.
Whilst in standby mode, press the talk buttonto report the temperature, [ ] current time or room temperature.After each forehead reading, the thermometer reports the temperature obtained in the language chosen.Whilst in standby mode, press and hold the talk button [ ] for 2 seconds and release. Repeat to step through Spanish, English, German, French, Italian, Russian or mute function.Remember that in waiting mode, the LCD alternatively displays time, date androom temperature.
7.2.2. PREPARATIONS
• Avoid using in a draught to assure an accurate reading.• If there is a difference in temperature between the storage area and the place where the reading is to take place, leave the thermometer at room temperature for approximately 30 minutes, failure to do so may cause an inaccurate reading.• Don’t touch or blow the infrared sensor. A dirty infrared sensor may cause aninaccurate reading.
• To achieve an accurate reading, it is very important to check the infrared sensoris clean before using.
7.2.3. FOREHEAD TEMPERATURE MEASUREMENT
Make sure that the patient's forehead is clean before taking a reading to assurethat it is accurate. If it is necessary to wipe the patient's forehead, please wait for5-10 minutes after wiping it, before taking their temperature.- External factors may afect the patient's forehead temperature, particularly whenan individual has been exposed to very hot or very cold temperatures or hasrecently been swimming or bathing. If necessary, wait 30 minutes before takingthe patient's temperature.- A forehead and temple temperature differs from an internal temperature, which is taken orally or rectally. Vasoconstriction, an effect which constricts the bloodvessels and cools the skin, can occur during the early stages of a fever. In thiscase, the temperature taken may be unusually low. If the reading does not matchthe patient's perception of his own body temperature, repeat the reading every 15minutes. As a reference point, you can also measure the internal body temperature using a conventional oral or rectal thermometer.- The baby's skin reacts very quickly to the ambient temperature. Therefore, donot take a baby's temperature with the thermometer during or after breast-feeding,because their skin temperature may be lower than the internal body temperature.

3. Hold the thermometer over the center of the forehead, at a distance approximately 3-5 cm midway between eyebrow and hairline.
4. Press and hold the forehead button [ ], the spotlight will come ON allowing you to locate the correct position for a forehead reading. Hold the forehead button as long as you want the spotlight to stay on. If the position is correct, release the forehead button to start the reading and then the thermometer beeps once.
5. Keep the thermometer steady until you hear two beeps and the temperature is given. The backlight will light up blue or red according to the temperature taken.
6. The reading is complete and the thermometer may be removed from the head.
7. Read the temperature on the display.
8. You can press the forehead button [ ] to start a new reading or press Set/Mem button [ ] to return to standby mode.
2. Place the thermometer in your hand with your finger resting on the forehead button [ ].
1. If the display is in standby, press any button to wake it up.
7.2.4. OBJECT TEMPERATURE READING• Don’t use this mode to take someone’s body temperature.• When reading the temperature of an object, the current surface temperature isdisplayed. It can be different from the internal temperature, especially if thesurface is exposed to direct sunlight or a draught.

2. Place the thermometer in your hand with your thumb resting on the object button [ ].
1. If the display is in standby, press any button to wake it up.
6. Press the object button [ ] to start a new reading or press Set/Mem button [ ] to return to standby mode.
5. Remove the thermometer from the object. The LCDdisplays the temperature.
4. Press and release the object button [ ] to take a reading. The thermometer will beep once and then twice again indicating the reading is finished.
3. Hold the thermometer so that the probe’s position is at a distance between 3-5 cm from the liquid and/or surface you want to take the temperature of.
7.2.5. ROOM TEMPERATURE READING• The thermometer is constantly reading the room temperature.• The room temperature can be viewed when in standby mode.• Press the Set/Mem button [ ] to return to standby mode.
7.3. MEMORY MODEEach forehead temperature result will automatically be stored in the memory. Once the 9th temperature has been taken the first set of data will be removed and the new recording will take the top position.
1. Press Set/Mem button [ ] to check the memory number, temperature and date.“-- -” will be displayed if no data is stored.
2. Press the Set/Mem button [ ] again whilst in memory mode to step between stored data. Press and hold Set/Mem button [ ] to scroll quickly between stored data.
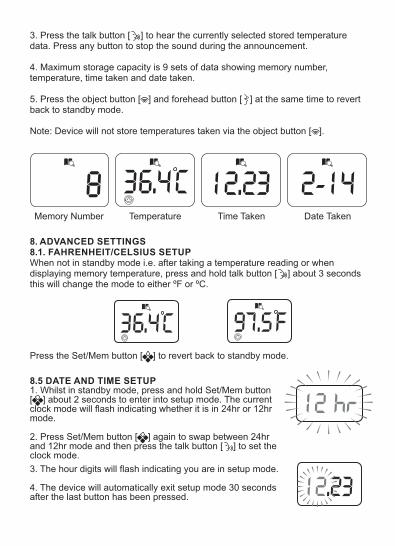
3. The hour digits will flash indicating you are in setup mode.
4. The device will automatically exit setup mode 30 seconds after the last button has been pressed.
8.5 DATE AND TIME SETUP 1. Whilst in standby mode, press and hold Set/Mem button [ ] about 2 seconds to enter into setup mode. The current clock mode will flash indicating whether it is in 24hr or 12hr mode.
2. Press Set/Mem button [ ] again to swap between 24hr and 12hr mode and then press the talk button [ ] to set the clock mode.
8. ADVANCED SETTINGS 8.1. FAHRENHEIT/CELSIUS SETUP When not in standby mode i.e. after taking a temperature reading or when displaying memory temperature, press and hold talk button [ ] about 3 seconds this will change the mode to either ºF or ºC.
Press the Set/Mem button [ ] to revert back to standby mode.
Memory Number Temperature Time Taken Date Taken
4. Maximum storage capacity is 9 sets of data showing memory number, temperature, time taken and date taken.
5. Press the object button [ ] and forehead button [ ] at the same time to revert back to standby mode.
Note: Device will not store temperatures taken via the object button [ ].
3. Press the talk button [ ] to hear the currently selected stored temperature data. Press any button to stop the sound during the announcement.

8.5 SLEEP MODE SETUP It is recommended that you use sleep mode as this will prolong the battery life. In sleep mode the display will automatically turn off after 3 minutes to save battery power if sleep mode is set to “ON”.
1. Whilst in standby mode, press and hold Set/Mem button [ ] about 2 seconds to enter into setup mode. The current clock mode will flash indicating whether it is in 24hr or 12hr mode.
2. Press the talk button [ ] to step through the HOUR, MINUTE, YEAR, MONTH, DAY functions till you reach the SLEEP function (SLP).
3. Press the Set/Mem button [ ] to modify the function.
4. Press the talk button [ ] to confirm the settings and exit setup.
thermometer remains permanently switched on until the battery runs out. To save power, we recommend to set sleep mode on.
When the sleep mode is activated, the thermometer will turn off automaticallyafter approximately 3 min; when the sleep mode is deactivated, the
6. Press the object button [ ] at any time to exit setup.
7. Press the Set/Mem button [ ] to modify the selected function. Pressing and holding the Set/Mem button [ ] will scroll through the digits more quickly.
8. Press the talk button [ ] to confirm the settings and go to the next function.
MINUTE YEAR MONTH DAY
5. Press the talk button [ ] to select between setting the HOUR, MINUTE, YEAR, MONTH, DAY and SLEEP functions.

9. SMARTPHONE & TABLET CONNECTIVITY9.1. BABY TEMPERATURE CONTROL
smartphone or tablet device
This Thermoadvance has a special communications module that lets you connect to your device (smartphone or tablet), automatically sending the results of each reading to keep track of temperatures.The Thermoadvanced plus is currently compatible with a number of modern devices but we cannot guarantee compatibility with all devices.
9.2. USING THE eMyBaby App (FIGURE A)To use your new infrared thermometer with a smartphone ortablet, first set it to silent mode to optimize the communicationbetween the device and your smartphone or tablet. To do this,press down the voice button (7) for around 2 seconds andthe thermometer will change to a different language eachtime you press this button until it reaches the silent mode .You will also need to install the free eMyBaby application. To do so, follow the instructions provided at the start of this manual. Once the software has been installed correctly the eMyBaby icon will appear on the device.Access the application and take the following steps to take a reading with your thermometer:
1. If you have not already done so, you will need to create a profile for the baby whose temperature is to be read. To do so, go to the “My Baby” section on the main menu of the eMyBaby app and follow the steps provided to create your file.2. Now access the “Thermometer” section on the main menu and select the profile for the baby whose temperature is due to be read. 3. Select “New measure” and select the add option using the thermometer. 4. Now take the baby´s temperature as instructed in item 7.2.3 of this manual .5. After the second beep indicating the end of the temperature reading, place the thermometer loudspeaker (6) directly in front of your mobile or tablet microphone. Take into account that the communication is conducted using ultrasound, and as such the two devices should be as close to each other as possible .6. Your tablet or smartphone will automatically register the reading taken by the thermometer. 7. Press the “Save temperature” button to register the reading and store it in your baby´s temperature records.
Remember you can access your baby's temperature records from both the eMyBaby app and the www.emybaby.com website from the “Thermometer” section.
1
2
3
9.3. TIPS FOR USING THE eMyBaby App
10. PRODUCT CARE
10.1. CARE AND MAINTENANCE
• Prevent the product getting wet, if it does get wet please dry thoroughly. Pleasenote that corrosive liquids may cause damage.• Please use and preserve at a normal temperature, the product life will beshortened if temperatures are excessively high or low.• To ensure accurate measurements, keep the probe tip clean and free ofscratches. Finger prints or dirt will affect the accuracy of the thermometer.• In order to get an accurate reading, please clean the probe tip.• To clean the sensor, gently wipe is surface with a cotton swab slightly moistenedwith alcohol and immediately wipe dry with a clean cotton swab.
1. Make sure that your smartphone or tablet is running on the latest operating system. For information about software updates, see the instructions for your device.2. Make sure that your eMyBaby app is updated at regular intervals.For information about app updates, see the instructions for your device.3. For the communications module to function correctly, the mobile device has to be the sufficiently charged. Users should have a power supply unit or a charging device to hand.4. Make sure that there is always enough memory available to back up the reading data on your smartphone or tablet.5. If you receive a call or a text message during a reading, the reading could be cancelled or it can provide an inaccurate information. We recommend switching your device to flight mode.6. If you are in a noisy environment hold the Thermoadvance speaker as close as you can to your smartphone device. Under normal quiet use the Thermoadvance and smartphone device can be 30cm (12”) apart.7. There is always the possibility that future updates to the eMyBaby app may render this guide outdated.
After cleaning, allow at least 20 minutes drying time before taking temperatures.Place the thermometer in the protective case or table stand holder. Store it in adry, clean place at room temperature
• Use a soft dry cloth to clean the body of the thermometer. Never clean thethermometer with abrasive cleanser, thinner, benzene or submerge thethermometer into water or other liquids.
10.2. CALIBRATION
The thermometer is initially calibrated at the time of manufacture. If thethermometer is used according to the instructions, periodic recalibration is notrequired. If any time you question the accuracy of the reading, please contact theretailer immediately.Don’t attempt to modify or reassemble the thermometer.

10.3. BATTERY & PRODUCT DISPOSAL INFORMATION
If your thermometer will not be used on a regular basis, remove thebattery to prevent possible damage due to chemical leakage. If batterydoes leak, removecarefully. Do not allow bare skin to come in contactwith the leaking fluid.
Remember to dispose of the product responsibly.Don’t throw battery into a fire, the battery is likely to explode.Do not mix products bearing the crossed out bin symbol with your generalhousehold waste.For the correct collection and treatment of these products take them to thecollection points designated by your local authority. Alternatively contact theretailer who sold you the product.
10.4. INSTALLATION/REMOVAL OF BATTERIES
When the low battery indicator [ ] appears on the LCD, or the thermometer doesnot function at all, you should replace the old batteries with new ones as soon aspossible. This product uses two AAA 1.5V batteries, use the following procedure to replace or insert batteries:1. Open the battery cover following the direction of the arrow.2. Remove the old batteries and then insert the new batteries into the batterycompartment. Make sure you install the new batteries properly; be sure to matchthe positive and negative ends of the battery to the marking in the batteriescompartment of the thermometer.3. Replace the battery compartment cover and press to close.
11. TROUBLESHOOTING
PROBLEMS CHECKLIST SOLUTIONS
No response/Automatic reset when pull out insulator.
Battery used up. Change new battery.
Battery in wrong polarity. Remove battery, turn it over and re-insert.
Poor battery contact. Remove battery, clean contacts and re-insert.
Battery symbolon LCD.
Low battery. Replace with new battery.
Lo” on screen. The measured temperature is lower than 32.0ºC/89.6ºF.Please check the operation
Follow the steps in the user manual for proper reading.
method.
“Hi” on screen. The measuredtemperature is higher than 42.9ºC/109.3ºF.Please check the operation method.
Follow the steps in the user manual for proper reading.
“ErrP” or “ErrH” on screen.
Hardware problem. Contact the manufacturer or distributor.
Used batteries should be removed.

“ErrE” on screen. Environment temperature beyond the scope of: 10°C~40°C (50.0°F~104.0°F) for Objects. 15°C~40°C (59.0°F~104.0°F) for Forehead.
Condition the thermometer until it reaches environment temperature: 10°C~40°C (50.0°F~104.0°F) for Objects. 15°C~40°C (59.0°F~104.0°F) for Forehead.
The reading is notaccurate or if there is any doubt with the result.
Please check if theinfrared sensor is cleanor not.
Clean the infrared sensor with cotton swab according to user manual.
Please check if thereading mode is correct ornot.
Ensure you have read the manual and know how to use the thermometer properly.
Please check if you havelet the thermometer and patient stabilize in the room for at least 30 minutes.
Please keep thethermometer and patient in the room where the tempera-ture is to be taken at least 30 minutes before using.
Are you using thethermometer indoor.
Please take the readingindoor.
Other malfunctions
Contact the MINILAND technical service.
12. SPECIFICATIONS & SYMBOLS12.1 TECHNICAL SPECIFICATION
Body reading range 32.0ºC-42.9ºC 89.6ºF-109.3ºF
Forehead readingaccuracy
In range of 35.5ºC-42.0ºC95.9ºf-107.6ºF
± 0.2 ºC± 0.4 ºF
For other range ± 0.3 ºC± 0.5 ºF
Object measure range 20.0 ºC-60.0 ºC 68.0 ºF-140.0 ºF
Object measureaccuracy
± 1.0 ºC ± 2.0 ºF
PROBLEMS CHECKLIST SOLUTIONS
Dimension 89 (L) x 53 (A) x 35 (F) mm
Weight 56 g (without battery)
Room temperaturerange
5.0 ºC-59.9 ºC 41.0 ºF-139.8 ºF
Room temperatureaccuracy
± 1.0 ºC ± 2.0 ºF
Power supply DC 3V (2 x 1.5 AAA batteries)
Mode of operation Ajusted mode
Reference body site Core

12.2 LANGUAGE SUPPORT
English Spanish German French Italian Russian
Temperature (ºC) ü ü ü ü ü ü
Temperature (ºF) ü û û û û û
Time ü ü ü û ü û
Environmental Temperature(ºC)
ü ü ü û ü û
Environmental Temperature(ºF)
ü û û û û û
AudioFunction
12.3. NORMALIZED SYMBOLSThe following is a list of symbols that can be found on the product, packaging and instructions.
• Attention: Read the operating Instructions for use!
•
• Disposal in accordance with Directive 2012/19/EU (WEEE)
• Complies with the European Medical Device Directive (93/42/EEC)and amended by directive 2007/47/EC requirements. Notified body TÜV Rheinland (CE0197)
• The name and the address of the manufacturer.
•
0197
Type BF Applied Part.
Name and adress of the Authorized Representativein the European Community.
Shelf life: 2 years
Object operationcondition
With relative humidity 20%-85%
10.0 ºC-40.0 ºC 50.0 ºF-104.0 ºF
Storage environment With relative humidity 15%-90%
-20.0 ºC-55 ºC -4.0 ºF-131.0 ºF
With relative humidity of 20%-85%
15.0 ºC-40.0 ºC 59.0 ºF-104.0 ºFForehead operationcondition
Atmospheric pressure: 700hPa-1060hPa
IMPORTANT INFORMATION REGARDING ELECTRO MAGNETIC COMPATIBILITY (EMC)With the increased number of electronic devices such as PC's and mobile (cellular) telephones, medical devices in use may be susceptible to electromagnetic interference from other devices. Electromagnetic interference may result in incorrect operation of the medical device and create a potentially unsafe situation.Medical devices should also not interfere with other devices.In order to regulate the requirements for EMC (Electro Magnetic Compatibility) with the aim to prevent unsafe product situations, the EN60601-1-2 standard has been implemented. This standard defines the levels of immunity to electromagnetic interferences as well as maximum levels of electromagnetic emissions for medical devices.

The thermometer are intended for use in an electromagnetic environment in which radiated RF disturbances are controlled. The customers or the users of these thermometer can help prevent electromagnetic interference by maintaining a minimum distancebetween portable and mobile RF communications equipment (transmitters) and the thermometer as recommended below, according to the maximum ouptut power of the communications equipment.
Recommended separation distance between portable and mobile RF communicationsequipment and the thermometer
0.01 0.12 0.12 0.23
0.1 0.38 0.38 0.78
1 1.2 1.2 2.3
10 3.8 3.8 7.3
100 12 12 23
Output Powerof Transmitterin Watt
Separation distance according to frequency of transmitter in meter
150 kHz to80 MHz
d = 1,2 √P
80 MHz to800 MHz
d = 1,2 √P
800 MHz to2,5 GHz
d = 2,3 √P
For transmitters rated at a maximum output power not listed above, the recommended separation distance d in meters (m) can be estimated using the equation applicable to the frequency of the transmitter, where P is the maximum output power rating of the transmitter in watts (W) according to the transmitter manufacturer.Note: At 80MHz and 800MHz, the separation distance for the higher frequency range appliesNote: These guidelines may not apply in all situations. Electromagnetic propagation is affected by absorption and reflection from structures, objects, and people.
This medical device conforms to this EN60601-1-2:2007 standard for both immunity and emissions. Nevertheless, special precautions need to be observed:· The device needs to be installed and put into service in accordance with the information provided in the user manual.· The use of accessories and cables other than those specified by Manufacturer, with the exception of cables sold by Manufacturer as replacement parts for internal components, may result in increased emission or decreased immunity of the device.· The medical devices should not be used adjacent to or stacked with other equipment. In case adjacent or stacked use is necessary, the medical device should be observed to verify normal operation in the configuration in which it will be used.· Refer to further guidance below regarding the EMC environment in which the deviceshould be used.
Wireless communications equipment such as wireless home network devices, mobile phones, cordless telephones and their base stations, walkie-talkies can affect this equipment and should be kept at least a distance d away from the equipment. The distance d is calculated by the MANUFACTURER from the 800 MHz to 2,5 GHz column of Table 6 of IEC 60601-1-2,
13. INFORMATION ON THE DISPOSAL OF THE BATTERIES AND THE PRODUCT· Remember to remove the batteries and dispose of them in a responsible manner when disposing of the baby monitor.· You should not mix products bearing the crossed-out rubbish bin symbol with your domestic rubbish.· These products should be taken to the collection points allocated by the local authorities for appropriate treatment. Alternatively you may contact the point of sale where you purchased the product.
ÍNDICE1. Introdução 2. Conteúdos 3. Instruções de segurança 4. Características do produto 5. Instruções de utilização 6. Manutenção 7. Especificações técnicas 8. Informações sobre descarte das pilhas e do produto
1. INTRODUÇÃOFelicitamo-lo pela compra deste termómetro clínico de infravermelhos com voz.
Antes de utilizar o termómetro, deverá ler cuidadosamente e na íntegra o presente manual de instruções. Guarde-o num local seguro, pois contém informação importante.
As características descritas neste manual de utilização estão sujeitas a alterações sem aviso prévio.
2. CONTEÚDOS - 1 termómetro de infravermelhos com voz para medição sem contacto- 1 estojo para viagem e para guardar o termómetro- 2 Pilhas AAA- 1 Manual de instruções e garantia
Caso algum destes artigos esteja em falta, deverá contactar o seu vendedor.
3. INSTRUÇÕES DE SEGURANÇA1. O termómetro não é um brinquedo. Não deixe que as crianças brinquem com ele.2. Mantenha o termómetro fora do alcance das crianças.3. Leia as instruções cuidadosamente antes de utilizar o termómetro e guarde-as para consulta futura.4. A utilização deste termómetro não substitui a consulta do seu médico.2. Os resultados das medições têm apenas um fim informativo. Contacte o seu médico no caso de problemas de saúde ou suspeitas de problemas de saúde. 5. Certifique-se de que insere as pilhas com a polaridade correcta.6. Deverá remover as pilhar gastas.7. Não atire as pilhas para o fogo. As pilhas poderão explodir em contacto com o fogo.8. Nunca tente abrir qualquer peça ou desmontar os comandos.4. Caso estas instruções sejam ignoradas, não poderá ser aceite qualquer responsabilidade em caso de avaria.9. Não desmonte, repare ou substitua quaisquer peças da unidade em nenhuma circunstância.10.Não utilize o termómetro se o corpo principal estiver danificado (por exemplo,
PORTUGUÊS

se o sensor de infravermelhos estiver partido). A utilização continuada de uma unidade danificada poderá causar ferimentos, resultados incorrectos ou perigo grave.11.Não agite nem bata com o termómetro. Não deixe cair o termómetro.12. O sensor de infravermelhos deverá ser mantido limpo, seco e sem danos em todas as circunstâncias de modo a assegurar medições correctas.13.Não utilize o sistema na proximidade de transmissores de grande potência, como dispositivos de microondas e ondas curtas.14.Este produto requer precauções especiais relativamente à compatibilidade electromagnética, precisando de ser instalado e colocado em serviço em conformidade com a informação de compatibilidade electromagnética disponibilizada. Este produto pode ser afectado por equipamento de comunicações portátil e móvel de radiofrequência.15. Para se assegurar de que as medições da eMyBaby App são exactas, mantenha-o a uma distância de cerca de 30 cm em relação a outros dispositivos wireless.16. Não conserve o termómetro a temperaturas extremas, abaixo de -20ºC/-4ºF ou acima de 55ºC/131ºF) ou extremos de humidade (abaixo de 15%RH ou acima de 90%RH). A não observância desta instrução poderá causar medições inexactas.17.O termómetro destina-se à medição e controlo ocasional da temperatura do corpo humano ou de objectos em ambiente doméstico. Não utilize o produto para quaisquer outras finalidades.
Quaisquer alterações ou modificações efectuadas ao equipamento por qualquer pessoa que não os técnicos da MINILAND não estão cobertas pela garantia do produto.
4. CARACTERÍSTICAS DO PRODUTO 4.1. DESCRIÇÃO DAS PEÇAS4.1.1. TERMÓMETRO1. Medição da temperatura na testa2. Sensor de infravermelhos3. Foco4. Tampa de bateria5. Definição/Memória
6. Coluna de som7. Botão de voz8. Medição de temperatura de objectos9. Ecrã de cristais líquidos
9
8

4.1.2. ECRÃ DE CRISTAIS LÍQUIDOSA. TemperaturaB. PM (formato de hora)C. Ícone de memóriaD. Ícone de pilha fracaE. Ícone de medição de temperatura ambienteF. Ícone de medição de temperatura de objectosG. Ícone de medição da temperatura na testaH.Ícone febre
5. INSTRUÇÕES DE UTILIZAÇÃO5.1. ANTES DE UTILIZAR5.1.1. RECOMENDAÇÕES1. Para assegurar medições exactas, é muito importante que verifique se o sensor de infravermelhos está limpo antes de utilizar o termómetro.2. Se a temperatura da área de conservação do termómetro for muito diferente da temperatura da área de medição, aguarde que a temperatura do termómetro se ajuste à temperatura ambiente durante cerca de trinta minutos, antes de iniciar a medição da temperatura.3. Não toque no sensor infravermelho nem sopre no mesmo. Um sensor infravermelho sujo poderá causar leituras inexactas. 4. Lembre-se que, no modo de espera, o ecrã de cristais líquidos exibe de forma sucessiva e contínua a hora, a data e a temperatura ambiente.
5.1.2. INSTALAÇÃO/REMOÇÃO DAS BATERIASSempre que o indicador de pilhas fracas (D) surgir no visor, ou o termómetro deixe de funcionar, deverá substituir as pilhas usadas por pilhas novas o quanto antes.Este produto utiliza duas pilhas AAA de 1,5V. Proceda da seguinte forma para substituir ou inserir as pilhas:1. Abra a tampa do compartimento das pilhas seguindo a direcção da flecha.2. (Retire as pilhas usadas e depois) insira as pilhas novas no compartimento das pilhas. Certifique-se de que instala as pilhas de forma correcta; confirme que o pólo positivo e negativo da pilha correspondem às marcas existentes no compartimento das pilhas.3. Volte a colocar a tampa do compartimento das pilhas e prima para fechar.
5.2. MEDIÇÃO DA TEMPERATURA NA TESTA· Certifique-se de que a sonda está limpa antes de iniciar a medição.· Gorduras na testa poderão causar uma medição incorrecta, pelo que deverá certificar-se de que a testa está limpa. Se limpar a testa, deverá aguardar cerca de 5-10 minutos antes da medição.· A temperatura da testa poderá ser influenciada por factores externos, sobretudo quando um indivíduo esteve exposto a temperaturas muito quentes ou frias ou esteve recentemente a nadar ou a tomar banho. Nestes casos, retire o indivíduo
A
B C D
EFG
FE
H

da situação em causa e aguarde cerca de 30 minutos antes de medir a temperatura.· A temperatura na testa e nas têmporas difere da temperatura interna, medida de forma oral ou rectal. Durante as fases iniciais da febre poderá ocorrer vasoconstrição, que contrai os vasos sanguíneos e causa o arrefecimento da pele. Neste caso, a temperatura medida pelo termómetro poderá ser invulgarmente baixa. Se os resultados da medição não estiverem de acordo com a percepção do doente, deverá repetir a medição a cada 15 minutos. Como referência, poderá medir igualmente a temperatura interna do corpo com um termómetro oral ou rectal convencional.· A pele dos bebés reage muito rapidamente à temperatura ambiente. Por esta razão, não deverá medir a temperatura com o termómetro durante ou após a amamentação, pois a temperatura da pele poderá ser mais baixa do que a temperatura interna do corpo.
1. Coloque o termómetro na sua mão com o dedo no botão da testa (1).
2.Segure o termómetro de modo que o sensor esteja sobre o centro da testa, a uma distância aproximadamente de 3-5 cm, à mesma distância da linha do cabelo e da sobrancelha. 3. Prima sem soltar o botão da testa (1), o foco está LIGADO, podendo localizar a posição correcta para a medição da temperatura na testa. Continue a premir o botão da testa enquanto desejar que o foco continue ligado. Se a posição for a correcta, solte o botão da testa para iniciar a medição. O termómetro emitirá um sinal sonoro.
4. Mantenha o termómetro direito até ouvir dois sinais sonoros e ser indicada a temperatura. A retroiluminação acender-se-á de acordo com a temperatura.
5. A medição está terminada e pode retirar o termómetro da posição sobre a testa.
6. Leia a temperatura no visor. 7.Poderá premir o botão da testa (1) para iniciar uma nova medição ou premir o botão Definição/Memória (5) para regressar ao modo de espera. 36.6c

NOTA O foco permanece ligado enquanto estiver a premir o botão de medição e desliga após soltar o botão. O foco desliga automaticamente se premir o botão da testa (1) durante mais de 1 minuto; após soltar o botão, o termómetro regressa ao modo de espera.
A temperatura normal do corpo constitui uma amplitude térmica. A amplitude térmica normal de um indivíduo tende a diminuir com a idade. A tabela seguinte indica as amplitudes térmicas normais consoante a idade:
0-2 anos 36.4ºC-38.0ºC 97.5ºF-100.4ºF
3-10 anos 36.1ºC-37.8ºC 97.0ºF-100.0ºF
11-65 anos 35.9ºC-37.6ºC 96.6ºF-99.7ºF
> 65 anos 35.8ºC-37.5ºC 96.4ºF-99.5ºF
A amplitude térmica normal varia de pessoa para pessoa e pode ser influenciada por vários factores como a hora do dia, o nível de actividade, a medicação, o estado emocional, entre outros.Recomenda-se assim que meça a sua temperatura e a dos membros da sua família quando estiver num estado saudável. Desta forma, saberá como funciona o termómetro e sentir-se-á mais confiante quando tiver de medir a temperatura de um membro da sua família que esteja doente.
NOTA: Se a temperatura medida for igual ou superior a 38ºC, o visor exibirá o ícone de febre e uma retroiluminação vermelha.
5.2.2. RETROILUMINAÇÃO INDICADORA DE TEMPERATURAO visor retroilumina-se após a medição da temperatura do corpo humano, da seguinte forma:Retroiluminação azul: abaixo de 37,9ºC (100,3ºF)Retroiluminação vermelha: 38,0ºC-42,9ºC (100,4ºF-109,3ºF)
5.3. MEDIÇÃO DA TEMPERATURA DE OBJECTOS· Certifique-se de que o sensor está limpo antes de iniciar a medição.· Não utilize este modo para medir a temperatura do corpo.· Na medição de objectos, é indicada a temperatura actual da superfície do objecto. Esta poderá ser diferente da temperatura interna, especialmente se a superfície estiver exposta à luz directa do sol ou a uma corrente de ar.

1. Coloque o termómetro na sua mão com o dedo no botão de objecto (8).
2. Segure no termómetro de modo a que o sensor esteja a uma distância de 3-5 cm do líquido e/ou superfície cuja temperatura pretende medir.
3. Prima o botão de objecto (8) para iniciar a medição. O termómetro emitirá um sinal sonoro.
4. Retire o termómetro da posição sobre o objecto. O ecrã de cristais líquidos indica a temperatura medida.
5. Poderá premir o botão de objecto (8) para iniciar uma nova medição ou premir o botão Definição/Memória (5) para regressar ao modo de espera. 52.7c5.4. VERIFICAR A MEMÓRIAA memória do termómetro dispõe de espaço para o total de 9 registos de medições de temperatura da testa.A medição actual é sempre guardada no espaço do último registo. Quando todos os espaços de memória tiverem sido ocupados, o registo mais antigo é apagado.
8 36.4c 12.23 2-14
1. Prima o botão Definição/Memória (5) para verificar o número, temperatura e data do registo de memória.2. Prima o botão Definição/Memória (5) para verificar a temperatura do registo de memória.3. Prima o botão Definição/Memória (5) sem o soltar para verificar os dados da memória rapidamente.4. Prima o botão de medição de objecto (8) e o botão de medição de testa (1) ao mesmo tempo. O termómetro regressa ao modo de espera.
Número dememória
Temperatura Hora Data

1. Prima o botão Definição/Memória (5) e mantenha-o premido durante 2 segundos para entrar no modo de definição no modo de espera.
2.Prima de novo o botão Definição/Memória (5) para escolher uma definição de hora (12h ou 24h, “PM” surge no ecrã de cristais líquidos se seleccionar a configuração 12h), hora, minutos, ano (2001-2099), mês, dia, ano e modo de temporização (ON ou OFF).
3.Carregue no botão de voz (7) para confirmar as definições e ir para a próxima definição
5.5 DEFINIÇÃO DA DATA E HORA
12
off
Quando o modo de temporização está activo, o termómetro desliga automaticamente depois de 3 minutos; quando o modo de temporização está desactivado, o termómetro permanece sempre ligado. Para poupar energia, recomenda-se que deixe o modo de temporização ligado.
5.6. ACTIVAÇÃO DE VOZCarregue no botão de voz (7) para reportar a temperatura medida, a hora actual ou a temperatura ambiente.Após cada medição da temperatura na testa, o termómetro comunica a temperatura medida na língua escolhida.
O termómetro comunica a temperatura através de uma mensagem de voz em 6 línguas: espanhol, inglês, alemão, francês, italiano e russo.
AudioFunção Inglês Espanhol Alemão Francês Italiano Russo
Temperatura (ºC)
Temperatura (ºF)
Hora
Temperaturaambiente (ºC)
Temperaturaambiente (ºF)

5.7. ESCOLHER ENTRE FAHRENHEIT OU CELSIUSQuando visor exibir uma medição ou uma temperatura em memória, prima o botão de voz (7) sem o soltar durante 3 segundos. Alterará assim o modo de exibição para ºF ou para ºC.
5.8. CONTROLAR A TEMPERATURA DO BEBÉO termómetro possui um módulo de comunicações especial que lhe permiteconectar-se ao seu Smartphone ou tablet, enviando automaticamente os resultados de cada medição, de modo a controlar as temperaturas.
5.8.1. RECOMENDAÇÕES1. Certifique-se de que o seu smartphone possui o sistema operativo mais recente. Para mais informação sobre as actualizações de software, consulte as instruções do seu aparelho.2. Certifique-se de que o software (aplicação) eMyBaby é actualizado regularmente. Para mais informação sobre as actualizações da aplicação, consulte as instruções do seu aparelho.3. Para que o módulo de comunicações funcione correctamente, o aparelho móvel precisa de ter carga suficiente. Os utilizadores deverão ter uma unidade de alimentação ou um carregador à mão.4. Certifique-se de que existe sempre memória suficiente no seu smartphone ou tablet para suportar os dados de leitura.5. Se receber uma chamada ou uma mensagem de texto durante uma leitura, esta pode ser cancelada ou a medição poderá ser inexacta. Recomenda-se que mude o seu dispositivo para modo de voo.
ATENÇÃO:O equipamento não deve ser usado adjacente a outro equipamento ou empilhado noutro equipamento. Se for necessária a utilização adjacente ou empilhada, o utilizador deverá certificar-se do funcionamento normal durante a configuração em que será utilizado.
5.8.2. Aplicação eMyBaby (FIGURA A)Este termómetro conecta com o Smartphone ou o Tablet para registar e controlar as temperaturas do bebé.Para utilizar o seu novo termómetro de infra-vermelhos com o Smartphone ou o Tablet, em primeiro lugar ponha-o no modo de Silêncio para que a comunicação entre o dispositivo e o seu telemóvel ou Tablet seja óptima. Para isso, mantenha premido o botão de voz (7) uns 2 segundos, o termómetro mudará de um idiomapara outro de cada vez que pressionar este botão até chegar ao modo de silêncio .
· Para escolher a língua desejada ou a opção sem voz, prima sem soltar o botão de voz (7) durante 2 segundos para seleccionar a língua que pretende. O termómetro muda para outra língua ou para a função sem voz automaticamente.
1

PROBLEMAS LISTA DE VERIFICAÇÃO SOLUÇÕES
Sem resposta /Reinicialização automática quando o isolador é retirado
Pilha gasta
Substitua por pilhas novas
Maus contacto da pilha
Substitua por pilhas novas
Retire a pilha, recoloque correctamente a pilha
5.10. RESOLUÇÃO DE PROBLEMAS
Além disto, também irá precisar de instalar a aplicação gratuita eMyBaby. Para isso siga as instruções que se indicam no princípio deste manual. Uma vez instalado de modo satisfatório o software, aparecerá no dispositivo o ícone do eMyBaby .Aceda à aplicação e siga os seguintes passos para registar uma medida com o seu termómetro:
1. Se não o fez anteriormente, terá que criar o perfil do bebé sobre o qual quer tirar as medições. Para isso, vá à secção "My Baby" (Mi bebé) a partir do menu principal da aplicação eMyBaby e siga os passos ali indicados para criar a sua ficha.2. Entre agora na secção "Thermometer" (Termómetro") a partir do menu principal e seleccione o perfil do bebé sobre o qual se vai realizar a medição. 3. Seleccione "New measure" (Nova Mediçao) e seleccione a opção de adicionar utilizando o termómetro. 4. Tire agora a medição ao bebé tal como se indica na secção 5.2 deste manual .5. Após o segundo som que indica a finalização da tomada de temperatura, coloque a alta-voz do termómetro (6) directamente em frente ao microfone do seu telemóvel ou Tablet. Tenha em conta que a comunicação se realiza por meio de ultra sons, portanto, ambos os dispositivos devem estar o mais perto possível um do outro .6. Automaticamente o seu Tablet ou telemóvel colherá a medição tirada pelo termómetro. 7. Prima em "Save temperature" (Registar a temperatura) para registar a medição e que fique guardada no Histórico de temperaturas do seu bebé.
Tenha em conta que pode consultar o Registo de temperaturas do bebé quer seja a partir da aplicação eMyBaby quer a partir da página Web www.emybaby.com, acedendo à secção "Termómetro".
NOTA: A ligação ao dispositivo móvel poderá não ser bem-sucedida em condições de ruído.
5.9. CALIBRAÇÃOO termómetro é objecto de uma calibração inicial na data de fabrico. Se o termómetro for utilizado de acordo com as instruções, a calibração periódica não é necessária. Se, a qualquer altura, tiver dúvidas sobre a exactidão da medição, deverá contactar imediatamente o vendedor.Não tente modificar ou voltar a montar o termómetro.
2
3

Símbolo da bateria no visor
Outras avarias
Pilha com pouca carga Substitua por pilha nova
Contacte a assistência técnica MINILAND
Está a utilizar o termómetro dentro de casa?
Deverá fazer a medição dentro de casa
A medição é incorrecta ou tem dúvidas sobre o resultado da medição
Confirme que a forma de medição é a correcta
Asegúrese de que ha leído el manual y sabe cómo usar el termómetro correctamente.
Verifique que o termómetro e o doente estabilizaram na sala durante pelo menos 30 minutos
Mantenha o termómetro e o doente na sala de medição durante pelo menos 30 minutos antes de utilizar
A medição é incorrecta ou tem dúvidas sobre o resultado da medição
Certifique-se de que leu o manual e sabe como utilizar o termómetro de forma correcta.
Verifique se o sensor de infravermelhos está limpo
“ErrP” ou “ErrH” no visor
“Hi” no visor A temperatura medida é acima de 42,9°C / 109,3ºF. Por favor, verifique se você fez a medida corretamente
Problema de hardware
Seguir o manual doutilizador para umamediação correcta.
Consulte o seu agente
"ErrE" no visor Temperatura ambiente além do escopo de 10°C~40°C(50.0°F~104.0°F) Para objetos 15°C~40°C (59.0°F~104.0°F) Para testa
Aclimatar o termómetro até à temperatura ambiente 10°C~40°C (50.0°F~104.0°F) Para objetos 15°C~40ºC(59.0°F~104.0°F) Para testa
PROBLEMAS LISTA DE VERIFICAÇÃO SOLUÇÕES
“Lo” no visor A temperatura medida é inferior a 42,9°C / 109,3ºF. Por favor, verifique se você fez a medida corretamente
Seguir o manual doutilizador para uma mediação correcta

Amplitude da temperatura ambiente
5,0 ºC-59,9 ºC 41,0 ºF-139,8 ºF
Exactidão da medição de objectos ± 1,0 ºC ± 2,0 ºF
Amplitude de medição de objectos
Exactidão da medição na testa Na amplitude 35,5 ºC-42,0 ºC95,9 ºF-107,6 ºF
± 0,2 ºC± 0,4 ºF
Para outras amplitudes ± 0,3 ºC± 0,5 ºF
20,0 ºC-60,0 ºC 68,0 ºF-140,0 ºF
Alimentação CC 3V (2 x pilhas 1,5 AAA)
Amplitude de medição corporal 32,0 ºC-42,9 ºC 89,6 ºF-109,3 ºF
7. ESPECIFICACIÓNES TÉCNICAS
6. MANUTENÇÃO· Coloque numa corrente de vento para medir a exactidão.· Tome providências para que o termómetro não se molhe. Se o termómetro se molhar, seque-o completamente. Note que os líquidos corrosivos poderão danificar o termómetro.· Deverá utilizar e conservar o termómetro a uma temperatura normal. Temperaturas demasiado altas ou demasiado baixas diminuirão a vida do produto.· Se não utilizar o termómetro regularmente, retire as pilhas para prevenir eventuais danos devidos a derrame. Em caso de derrame da pilha, remova-a cuidadosamente. Não deixe que o líquido derramado entre em contacto com a pele.
6.1. CUIDADO E LIMPEZA· Para assegurar medições exactas, mantenha o sensor limpo e livre de arranhões. As marcas dos dedos ou a sujidade afectam a exactidão do termómetro.· Para obter uma medição exacta, deverá limpar o sensor.· Para limpar o sensor, esfregue a superfície com um cotonete ligeiramente molhado com álcool e seque imediatamente esfregando com um cotonete limpo.· Utilize um pano de algodão seco e macio para limpar o corpo do termómetro. Nunca limpe o termómetro com detergente abrasivo, diluente, benzina, nem mergulhe o termómetro em água ou noutros líquidos.· Depois de limpar, espere pelo menos 20 minutos antes de medir a temperatura. Coloque o termómetro no estojo protector ou no suporte de mesa. Guarde-o num local limpo e seco à temperatura ambiente. Guárdelo en un lugar limpio y seco a temperatura ambiente.
Modo de operação
Site do corpo de referência Coração
Modo de ajuste
Com humidade relativa de %-85%
50,0 ºF-104,0 ºF10,0 ºC-40,0 ºC
Com humidade relativa de 15%-90%
-4,0 ºF-131,0 ºF-20,0 ºC-55 ºC
Condições de medição de objectos
Ambiente de conservação
Parte aplicada tipo BF
Eliminação em conformidade com a Directiva 2012/19/EU (REEE)
7.1. SÍMBOLOS NORMALIZADOS
Em conformidade com a Directiva europeia relativa aos dispositivosmédicos (93/42/CEE), alterada pelos requisitos da directiva2007/47/CE. Organismo notificado TÜV Rheinland (0197).
Nome e endereço do fabricante.
Nome e endereço do representante CE autorizado na Europa.
Consulte o manual de instruções.
0197
Vida útil: 2 anos
Peso 56 g (sem pilhas)
59,0 ºF-104,0 ºFCondições de medição na testa Com humidade relativa de 20%-85%
15,0 ºC-40,0 ºC
Exactidão da temperatura ambiente
Dimensões 89 (L) x 53 (A) x 35 (F) mm
± 1,0 ºC ± 2,0 ºF
Pressão atmosférica: 700hPa-1060hPa
INFORMAÇÕES IMPORTANTES SOBRE A COMPATIBILIDADE ELETROMAGNÉTICA (CEM)Com o aumento do número de dispositivos eletrónicos, como computadores pessoais e telemóveis, os dispositivos médicos utilizados podem sofrer interferências eletromagnéticas de outros aparelhos. A interferência eletromagnética poderá afetar o funcionamento correto de um dispositivo médico e dar origem a uma situação potencialmente insegura.Por outro lado, os dispositivos médicos não deverão interferir com outros dispositivos.Com vista a regular os requisitos relacionados com a CEM (Compatibilidade Eletromagnética) e impedir situações de produtos inseguros, implementou-se a norma EN60601-1-2. A norma em questão define os níveis de imunidade às interferências eletromagnéticas, assim como os níveis máximos de emissões eletromagnéticas no que respeita aos dispositivos médicos.
Este dispositivo médico cumpre o disposto nesta norma EN60601-1-2:2007 tanto em termos de imunidade como de emissões. No entanto, devem tomar-se as seguintes precauções:· É necessário que o dispositivo seja instalado e utilizado nos termos das informações contidas no manual do utilizador.· A utilização de acessórios e cabos não especificados pelo Fabricante, salvo no que respeita aos cabos vendidos pelo Fabricante como peças sobresselentes para componentes internos, poderá aumentar as emissões e reduzir a imunidade do dispositivo.

O termômetro destina-se a ser utilizado num ambiente eletromagnético no qual são controladas as perturbações de RF por radiação. Os clientes ou utilizadores deste termômetro podem ajudar a impedir a interferência eletromagnética com a manutenção de uma distância mínima entre os equipamentos de comunicações RF portáteis e móveis (transmissores) e o termômetro, tal como recomendado a seguir, nos termos da potência de saída máxima dos equipamentos de comunicações.
· Os dispositivos médicos não devem ser utilizados perto de outros equipamentos nem armazenado com estes. No caso de ser necessário armazená-los ou utilizá-los perto daqueles equipamentos, deve verificar-se se os dispositivos médicos funcionam normalmente com a configuração na qual serão utilizados.· A seguir, apresenta-se informações adicionais sobre o ambiente de CEM no qual o dispositivodeverá ser utilizado.
Os equipamentos de comunicações sem fios, como dispositivos de rede doméstica sem fios, telemóveis, telefones sem fios e a sua estação base, walkie-talkies, etc., podem afetar estes equipamentos e, por isso, devem ficar com o afastamento d relativamente aos referidos equipamentos. O FABRICANTE calcula o afastamento d de 800 MHz a 2,5 GHz coluna da Tabela 6 da IEC 60601-1-2,
Afastamento recomendado entre os equipamentos de comunicações portáteise móveis RF e o termômetro
0.01 0.12 0.12 0.23
0.1 0.38 0.38 0.78
Potência de Saída do Transmissor em Watt
Afastamento de acordo com a frequência do transmissor em metros
150 kHz a80 MHz
d = 1,2 √P
80 MHz a800 MHz
d = 1,2 √P
800 MHz a2,5 GHz
d = 2,3 √P
10 3.8 3.8 7.3
100 12 12 23
1 1.2 1.2 2.3
No que respeita aos transmissores com uma potência de saída máxima nominal não indicada anteriormente, pode calcular-se o afastamento d recomendado em metro(s) recorrendo à equação aplicável à frequência do transmissor em Watts (W) de acordo com o fabricante do transmissor.Nota: A 80 MHz e 800 MHz, aplica-se o afastamento para a gama de frequências mais altasNota: As presentes orientações poderão não se aplicar a todos os casos. A propagação eletromagnética é afetada pela absorção e reflexão.
8. INFORMAÇÕES SOBRE DESCARTE DAS PILHAS E DO PRODUTO· Lembre-se de retirar as pilhas e de se desfazer delas de forma responsável ao descartar o vigia-bebés.· Não deve misturar produtos que tenham o símbolo do contentor de lixo cruzado com o seu lixo doméstico.· Para o tratamento correto deste tipo de produtos, leve-os aos pontos de recolha designados pelas autoridades locais. Como alternativa, poderá contactar o ponto de vendas onde o produto foi adquirido.

SOMMAIRE1. Introduction 2. Contenu 3. Consignes de sécurité 4. Caractéristiques du produit 5. Mode d'emploi 6. Entretien 7. Spécifications techniques 8. Informations sur l'élimination des piles et du produit
1. INTRODUCTIONFélicitations pour votre achat du thermomètre parlant à infrarouges.
Avant d'utiliser l'appareil, veuillez lire attentivement la présente notice. La conserver soigneusement, car elle contient des informations importantes.
Les caractéristiques décrites dans cette notice d'utilisation sont susceptibles d'être modifiées sans avis préalable.
2. CONTENU- 1 thermomètre parlant sans contact à infrarouges- 1 étui de stockage et de voyage- 2 piles AAA- 1 notice d'instructions et une carte de garantie
Si l'un de ces éléments manque, veuillez contacter votre revendeur.
3. CONSIGNES DE SÉCURITÉ1. Cet appareil n'est pas un jouet ; ne pas laisser les enfants jouer avec.2. Tenir le thermomètre hors de portée des enfants.3. Lire attentivement la notice avant d'utiliser l'appareil et la conserver soigneusement.4. L'emploi de ce thermomètre ne saurait remplacer une consultation chez un médecin. Les relevés n'ont qu'une valeur indicative. En cas de doute ou si vous êtes malade, consultez votre médecin. 5. Veillez à respecter la polarité des piles.6. Les piles usagées doivent être retirées de l'appareil.7. Ne pas mettre les piles au feu, elles risqueraient d'exploser.8. Ne jamais essayer d'ouvrir l'appareil ni de démonter les commandes. Le non-respect de ces instructions entraînerait l'invalidité de la garantie.9. Ne jamais enlever, réparer ni changer les pièces de l'appareil.10. Ne pas utiliser le thermomètre si son boîtier est endommagé (si l'émetteur à infrarouges est cassé, par exemple). L'emploi prolongé d'un appareil endommagé peut provoquer des blessures, fausser les résultats ou représenter des risques importants.11. Ne pas secouer ni tapoter le thermomètre. Ne pas le laisser tomber.
FRANÇAIS

12. Pour garantir la précision des mesures, le capteur à infrarouges doit rester propre et sec ; il ne doit pas être endommagé.13. Ne pas utiliser l'appareil à proximité d'un émetteur puissant comme un four micro-ondes ou un appareil à ondes courtes.14. Ce produit doit faire l'objet de précautions spéciales en termes de compatibilité électromagnétique et doit donc être installé et mis en service conformément aux instructions fournies ; son bon fonctionnement peut être remis en cause par la présence d'équipements de communication RF mobiles et portables.15. Pour garantir la précision des relevés de l'application eMyBaby, tenir le thermomètre à environ 30 cm minimum des autres appareils sans fil.16. Ne pas stocker le thermomètre à des températures extrêmes inférieures à -20ºC ou supérieures à 55ºC, ni dans des conditions d'humidité extrêmes (moins de 15% HR ou plus de 90% HR). Il risquerait de donner des mesures imprécises.17. L'appareil est conçu pour des relevés occasionnels de la température du corps humain ou d'objets dans un environnement domestique. Il ne doit pas être utilisé à d'autres fins.
Tout changement ou modification de l'appareil qui ne serait pas effectué par le service technique de MINILAND annule la garantie du produit.
4. CARACTÉRISTIQUES DU PRODUIT 4.1 DESCRIPTION DES PIÈCES4.1.1 THERMOMÈTRE1. Prise de la température frontale2. Capteur à infrarouges3. Point lumineux4. Couvercle du logement de piles5. Réglage/mémoire6. Haut-parleur7. Bouton Communication8. Mesure de la température de l'objet9. LCD
9
8

4.1.2. PANTALLA LCDA. Affichage de la températureB. PM (format horaire)C. Symbole mémoireD. Symbole de batterie faibleE. Symbole de mesure de la température ambianteF. Symbole de mesure de la température d'un objetG. Symbole de mesure de la température frontaleH. Symbole de la fièvre
5. MODE D'EMPLOI5.1 AVANT TOUTE UTILISATION5.1.1 RECOMMANDATIONS1. Pour obtenir une mesure précise, il est très important se vérifier la propreté du capteur à infrarouges avant d'utiliser l'appareil.2. Si la température du lieu de stockage diffère beaucoup de celle du local où s'effectue la mesure, attendre environ 30 minutes que le thermomètre atteigne la température ambiante avant de réaliser la mesure.3. Ne pas toucher ni souffler sur le capteur à infrarouges. Un capteur à infrarouges sale est cause d'imprécision.4. Ne pas oublier qu'en mode veille, l'écran affiche alternativement l'heure, la date et la température ambiante.
5.1.2 MISE EN PLACE/RETRAIT DES PILESLorsque l'indicateur de batterie faible (D) apparaît à l'écran ou que le thermomètre ne fonctionne pas du tout, remplacer les piles par des neuves le plus rapidement possible.Pour mettre en place les deux piles AAA 1,5V, procéder comme suit :1. Ouvrir le couvercle du compartiment des piles dans le sens de la flèche.2. (Retirer les piles usagées) et introduire les neuves dans le compartiment. Veiller à bien respecter la polarité en alignant le + et le - des piles sur ceux du compartiment.3. Remettre le couvercle en place et appuyer dessus pour le fermer.
5.2 MESURE DE LA TEMPÉRATURE FRONTALE· Avant de procéder à la mesure, vérifier que la sonde est propre.· Nettoyer le front avant de prendre la température, car la graisse peut fausser la mesure. Après avoir nettoyé le front, attendre 5 à 10 minutes avant de prendre la température.· La température frontale est soumise à divers facteurs extérieurs, comme l'exposition du sujet à des températures extérieures très chaudes ou très froides ou la prise d'un bain en baignoire ou en piscine, par exemple. Dans ce cas, mettre fin à la situation perturbatrice et attendre 30 minutes avant de prendre la température.· La température prise sur le front et la tempe diffère de la température interne orale ou rectale. La vasoconstriction, phénomène de contraction des vaisseaux
A
B C D
EFG
FE
H

sanguins et de refroidissement de la peau, peut survenir dans la toute première phase de la fièvre. Dans ce cas, il se peut que la température prise par ce thermomètre soit anormalement basse. Si la mesure ne correspond pas à la perception du patient, reprendre la température toutes les 15 minutes. À titre de référence, vous pouvez aussi prendre la température corporelle à l'aide d'un thermomètre oral ou rectal classique.· La peau du bébé réagit très rapidement à la température ambiante. En conséquence, ne pas prendre la température avec le thermomètre pendant ou après l'allaitement, parce que la température de la peau risque d'être inférieure à la température corporelle interne.
1. Placez le thermomètre dans votre main, doigt sur le bouton "front" (1).
2. Tenez le thermomètre à environ 3-5 cm de la peau, au milieu du front, à mi-chemin entre la naissance des cheveux et les sourcils.
3. Appuyez sur le bouton (1) et maintenez-le enfoncé : la lumière s'allume et vous pouvez ajuster la position pour une mesure correcte. Maintenez le bouton enfoncé aussi longtemps que vous souhaitez que la lumière reste allumée. Lorsque la position est correcte, relâchez le bouton pour commencer la mesure; le thermomètre émet un bip.
4. Laissez le thermomètre à plat jusqu'à ce que deux bips retentissent et que la température s'affiche. Le rétroéclairage s'allume en fonction de la température.
5. La prise est terminée et vous pouvez éloigner le thermomètre du front.
6. Lire la température à l'écran.
7. Vous pouvez rappuyer sur le bouton (1) pour prendre une nouvelle fois la température ou appuyer sur Réglage/Mem (5) pour remettre l'appareil en veille. 36.6cREMARQUE:La lumière reste allumée tant que vous appuyez sur le bouton de prise de température et s'éteint dès que vous le relâchez. Le point lumineux s'éteint automatiquement si vous gardez le bouton (1) enfoncé pendant plus d'une minute ; lorsque vous relâchez le bouton, l'appareil revient en mode veille.

La température corporelle normale s'exprime par une plage de valeurs. La plage de températures d'une personne a normalement tendance à diminuer avec l'âge. Ci-joint un dessous le tableau des plages de températures normales en fonction de l'âge.
0-2 ans 36.4ºC-38.0ºC 97.5ºF-100.4ºF
3-10 ans 36.1ºC-37.8ºC 97.0ºF-100.0ºF
11-65 ans 35.9ºC-37.6ºC 96.6ºF-99.7ºF
> 65 ans 35.8ºC-37.5ºC 96.4ºF-99.5ºF
La plage des normales varie d'une personne à l'autre et peut varier en fonction de nombreux facteurs comme l'heure du jour, le niveau d'activité, les médicaments pris, l'émotion, etc.C'est la raison pour laquelle nous vous recommandons de vous exercer sur vous-même et votre famille lorsque vous n'êtes pas malade. Ainsi, vous vous familiariserez avec le fonctionnement du thermomètre et serez plus sûr du résultat quand l'un de vos proches sera malade.
OBSERVATION: Si la température relevée est égale ou supérieure à 38ºC, le symbole de fièvre s'affiche rétroéclairé de rouge.
5.2.1 CORRESPONDANCE DES COULEURS DE RÉTROÉCLAIRAGELorsque la prise de température est terminée, le rétroéclairage s'allume dans l'une des couleurs suivantes :Bleu : température inférieure à 37,9ºCRouge : température entre 38,0ºC et 42,9ºC
5.3 MESURE DE LA TEMPÉRATURE D'UN OBJET· Avant de procéder à la mesure, vérifier que la sonde est propre.· Ne pas choisir ce mode pour prendre la température humaine.· La température qui s'affiche est celle qui est relevée à la surface de l'objet. Elle peut être différente de la température interne, en particulier si la surface est exposée au soleil ou dans les courants d'air.
1. Placez le thermomètre dans votre main, doigt sur le bouton "objet" (8).

2. Tenir le thermomètre de sorte que la sonde se situe à 3-5 cm du liquide et/ou de la surface dont vous souhaiter mesurer la température.
3. Appuyer sur le bouton (8) pour commencer la mesure ; le thermomètre émet un bip.
4. Éloigner le thermomètre de l'objet. La température relevée s'affiche.
5. Vous pouvez rappuyer sur le bouton (8) pour effectuer une nouvelle mesure ou appuyer sur Réglage/Mem (5) pour remettre l'appareil en veille. 52.7c5.4 VÉRIFICATION DE LA MÉMOIREIl est possible de mémoriser au total 9 mesures de température frontale.La mesure en cours est toujours stockée dans le dernier emplacement mémoire. Lorsque tous les emplacements sont occupés, c'est toujours la mesure la plus ancienne qui est effacée en premier.
8 36.4c 12.23 2-14
1. Appuyer sur le bouton (5) pour vérifier le numéro de l'emplacement mémoire, la température et la date.2. Rappuyer sur le bouton (5) pour vérifier la température en mémoire.3. Appuyer sur le bouton (5) pour vérifier brièvement les emplacements mémoire.4. Appuyer simultanément sur les boutons objet (8) et front (1) pour ramener l'appareil en mode veille.
12
5.5 RÉGLAGE DE LA DATE ET DE L'HEURE1. Appuyer sur le bouton réglage/mem (5) et le maintenir enfoncé durant environ 2 secondes pour passe en mode réglage depuis le mode veille.
2. Rappuyer sur le bouton (5) pour sélectionner le mode horaire (12 h ou 24 h – "PM" (après midi) s'affiche si vous choisissez le mode 12 h), l'heure, les minutes, l'année (2001-2099), le mois, le jour, l'année et le mode Sommeil (marche ou arrêt) .
Numéro del'emplacement
mémoire
Température Heure Date

3. Appuyer sur le bouton Communication (7) pour confirmer les réglages et passer au réglage suivant.
off
· Pour choisir la langue ou l'option silence, appuyer en mode veille sur le bouton (7) et le maintenir enfoncé pendant 2 secondes environ jusqu'à afficher l'option désirée.
Quand le mode sommeil est activé, le thermomètre s'arrêteautomatiquement au bout de 3 minutes ; s'il n'est pas activé,il reste allumé en permanence. Pour économiser l'énergie,nous conseillons d'activer le mode sommeil.
5.6 MESSAGE VOCALAppuyer sur le bouton Communication (7) pour que l'appareil annonce la température mesurée, l'heure ou la température de la pièce.Après chaque prise de température frontale, le thermomètre annonce la valeur relevée dans la langue choisie.
Ce thermomètre annonce la température par un message vocal disponible en 6 langues: espagnol, anglais, allemand, français, italien et russe.
AudioFonction Anglais Espagnol Allemand Français Italien Russe
Température (ºC)
Température (ºF)
Heure
Température dela pièce (ºC)
Température dela pièce (ºF)
5.7 SÉLECTION DES DEGRÉS CELSIUS OU FAHRENHEITLorsqu'une température mesurée ou mémorisée s'affiche à l'écran, appuyer sur le bouton (7) et le maintenir enfoncé pendant 3 secondes environ pour basculer entre °F et °C..

5.8.1 RECOMMANDATIONS1. Assurez-vous que votre smartphone ou tablette tourne sur le dernier système d'exploitation en date. Pour connaître les mises à jour logicielles, voir le mode d'emploi de votre appareil.2. Veillez à mettre régulièrement à jour le logiciel (application) eMyBaby. Pour plus d'informations sur les mises à jour de l'application, voir le mode d'emploi de votre appareil.3. Pour que le module de communications fonctionne correctement, il faut que le niveau de charge du mobile soit suffisant. L'utilisateur doit toujours avoir une alimentation ou un chargeur à portée de main.4. Assurez-vous de toujours disposer de suffisamment de mémoire pour sauvegarder les relevés dans votre smartphone ou votre tablette.5. Si vous recevez un appel ou un texto durant la lecture, il se peut que celle-ci soit annulée ou que la mesure soit inexacte. Nous vous conseillons de mettre votre appareil en mode avion.
ATTENTION:Cet appareil ne doit pas être utilisé à côté ou en conjonction avec d'autres équipements. Si tel est le cas, vérifier son bon fonctionnement dans la configuration choisie.
5.8.2. Application eMyBaby (FIGURE A)Ce thermomètre est connecté au Smartphone ou à la tablette pour enregistrer et contrôler les températures du bébé.Pour utiliser votre nouveau thermomètre à infrarouges avec le Smartphone ou la tablette, mettez-le d'abord en mode Silence, pour que la communication entre l'appareil et votre portable ou tablette soit optimale. Pour cela, laissez appuyé le bouton voix (7) environ 2 secondes, le thermomètre passera d'une langue à une autre chaque fois que vous appuierez sur ce bouton, jusqu'au moment où le mode silence sera atteint . De plus, vous devrez aussi installer l'application gratuite eMyBaby. Pour cela, suivez les instructions qui sont indiquées au début de ce manuel. Après avoir installé le logiciel de façon satisfaisante, l'icone eMyBaby apparaîtra sur l'appareil .Accédez à l'application et suivez les étapes suivantes pour enregistrer une mesure avec votre thermomètre.
1. Si vous ne l'avez pas déjà fait, vous devrez créer le profil du bébé dont vous souhaitez prendre la température. Pour cela, consultez le chapitre "My Baby" (Mon bébé) à partir du menu principal de l'application eMyBaby et suivez les étapes qui vous seront indiquées pour créer votre fiche.
5.8 CONTRÔLE DE LA TEMPÉRATURE DU BÉBÉLe thermomètre est équipé d'un module spécial qui vous permet de le connecter à votre Smartphone ou votre tablette pour recevoir automatiquement les résultatsde chaque prise de température, et les stocker.
1

PROBLÈME CAUSE SOLUTIONS
Pas de réponse/initialisation automatique lors du retrait de l'isolant.
“Lo” s'affiche.
Piles usagées.
Mauvaise polarité des piles.
Mauvais contact desbatteries.
Remplacer par des piles neuves.
Sortir les piles et les remettre en place correctement.
La température mesurée est inférieure à 32,0°C.Vérifier les conditions d'utilisation.
“Hi” s'affiche. La température mesurée est supérieure à 42,9°C.Vérifier les conditions d'utilisation.
Suivre les instructions de la notice pour effectuer une mesure correcte.
Suivre les instructions de la notice pour effectuer une mesure correcte.
5.10 DÉPANNAGE
2. Entrez maintenant dans le chapitre "Thermometer" (Thermomètre) à partir du menu principal et sélectionnez le profil du bébé dont vous allez prendre la température. 3. Sélectionnez "New measure" (Nouvelle mesure) et l'option d'ajouter en utilisant le thermomètre. 4. Prenez maintenant la température du bébé en suivant les indications du chapitre 5.2 de ce manuel .5. Après le deuxième signal sonore qui indique la fin de la prise de température, placez le haut-parleur du thermomètre (6) directement en face du micro de votre portable ou de votre tablette. N'oubliez pas que la communication se fait par ultrasons et que les deux appareils doivent donc être le plus près possible l'un de l'autre .6. Votre tablette ou votre portable enregistrera automatiquement la température prise par le thermomètre. 7. Appuyez sur "Save temperature" (Enregistrer température) pour enregistrer la mesure et la conserver dans l'historique des températures de votre bébé.
N'oubliez pas que vous pouvez consulter l'enregistrement des températures du bébé, à la fois depuis l'application eMyBaby et sur la page web www.emybaby.com, en accédant au chapitre "Thermomètre".
REMARQUE:Il se peut que la connexion à un appareil mobile échoue en conditions bruyantes.
5.9 CALIBRAGELe thermomètre est calibré en usine. S'il est utilisé conformément aux instructions fournies, il n'est pas utile de le recalibrer. Si vous avez un doute concernant la précision de la mesure, contactez immédiatement votre vendeur.N'essayez jamais de modifier ou de démonter vous-même le thermomètre.
2
3

6. ENTRETIEN· Placer l'appareil dans un courant d'air pour en mesurer la précision.· Éviter de mouiller l'appareil. En cas d'humidité, l'essuyer soigneusement.Des liquides corrosifs risquent d'endommager l'appareil.· Utiliser et stocker l'appareil à température normale. Des températures excessives risquent de réduire la durée de vie de l'appareil.· Si vous n'utilisez pas régulièrement le thermomètre, retirez les piles afin d'éviter tout risque de fuite de produits chimiques. En cas de fuite des piles, les enlever avec précaution. La peau ne doit pas entrer en contact avec les produits qui fuient.
PROBLÈME CAUSE SOLUTIONS
Message d'erreur “ErrP” ou “ErrH”.
Mesure imprécise ou doute sur le résultat de la mesure.
Problème matériel
ifier que le capteur à infrarouges est propre.
Nettoyer le capteur avec un coton-tige comme indiqué dans la notice.
Vérifier que le mode opératoire est correct.
Assurez-vous d'avoir bien lu la notice et d'utiliser le thermomètre correctement.
Vérifier que le thermomètre et le patient sont exposés depuis 30 minutes au moins à la température de la pièce.
Le thermomètre et le patient doivent être à température ambiante pendant au moins 30 minutes avant la prise de température.
Le thermomètre est-il bien utilisé à l'intérieur ?
La prise de température doit toujours être effectuée à l'intérieur.
Contacter le fabricant ou le distributeur.
Message d'erreur“ErrE"
Température ambiante Inférieure à 10°C~40°C (50.0°F~104.0°F) pour les objets; 15°C~40°C (59.0°F~104.0°F) pour le front
Réchauffez le thermomètre jusqu'à ce que la température ambiante atteigne 10°C~40°C (50.0°F~104.0°F) pour les objets; 15°C~40~ (59.0°F~104.0°F) pour le front
Affichage du symbole Piles
Autres dysfonctionnements
Piles faibles. Les remplacer par des piles neuves.
Contacter le service technique MINILAND.

Poids 56 g (sans les piles)
59,0 ºF-104,0 ºF
Conditions de fonctionnement pour la mesure frontale
avec une humidité relative de 20%-85%
15,0 ºC-40,0 ºC
avec une humidité relative de 20%-85%
50,0 ºF-104,0 ºF10,0 ºC-40,0 ºC
Conditions de fonctionnement pour la mesure d'objet
Précision de la température ambiante
Dimensions 89 (L) x 53 (A) x 35 (F) mm
Plage de température ambiante 5,0 ºC-59,9 ºC 41,0 ºF-139,8 ºF
± 1,0 ºC ± 2,0 ºF
6.1. ENTRETIEN ET NETTOYAGE· Pour que la mesure soit précise, la pointe de la sonde doit être propre et sans rayures. La présence de traces de doigts ou de poussière peut influer sur la précision du thermomètre.· Pour obtenir une mesure précise, nettoyer soigneusement la pointe de la sonde.· Pour cela, utiliser un coton-tige humecté d'alcool et sécher avec un coton-tige propre.· Nettoyer le corps de l'appareil avec un chiffon doux et sec. Ne jamais nettoyer le thermomètre avec des détergents agressifs, des solvants ou du benzène et ne pas l'immerger dans l'eau ni aucun autre liquide.· Après nettoyage, attendre au moins 20 minutes avant de prendre la température. Placer le thermomètre dans son étui ou dans son support de table. Le ranger dans un endroit propre et sec, à température ambiante.
7. SPÉCIFICATIONS TECHNIQUES
Alimentation 3V cc (2 piles 1,5 V AAA)
Plage de mesure corporelle 32,0 ºC-42,9 ºC 89,6 ºF-109,3 ºF
Précision de la mesure frontale Plage 35,5 ºC-42,0 ºC95,9 ºF-107,6 ºF
± 0,2 ºC± 0,4 ºF
Autre plage ± 0,3 ºC± 0,5 ºF
Plage de mesure d'objet
Précision de mesure d'objet
20,0 ºC-60,0 ºC 68,0 ºF-140,0 ºF
± 1,0 ºC ± 2,0 ºF
avec une humidité relative de 15%-90%Température de stockage
Durée de vie
-4,0 ºF-131,0 ºF-20,0 ºC-55 ºC
2 ans
Mode de fonctionnement Mode reglé
Site de corps de référence coeur
Pression atmosphérique: 700hPa-1060hPa

Pièce appliquée de type BF
Mise au rebut en conformité avec la Directive 2012/19/EU (WEEE)
7.1. SYMBOLES
Conforme à la directive européenne sur les dispositifs médicaux(93/42/CEE) amendée par la directive 2007/47/CE.Organisme : TÜV Rheinland (0197).
Nom et adresse du fabricant.
Nom et adresse du représentant CE agréé en Europe
Voir la notice d'instructions.
0197
INFORMATIONS IMPORTANTES CONCERNANT LA COMPATIBILITE ELECTROMAGNETIQUE (CEM)Avec l'accroissement du nombre d'appareils électroniques tels que les PC et les téléphones portables (cellulaires), les appareils médicaux utilisés sont susceptibles de subir des interférences électromagnétiques occasionnées par d'autres appareils. Les interférences électromagnétiques peuvent provoquer un fonctionnement incorrect de l'appareil médical et engendrer une situation potentiellement dangereuse.Les appareils médicaux ne doivent pas interférer avec d'autres appareils.La norme EN60601-1-2 a été mise en œuvre dans le but de régir les exigences pour la CEM (compatibilité électromagnétique) et de prévenir les situations dangereuses pour le produit. Cette norme définit les niveaux d'immunité aux interférences électromagnétiques ainsi que les niveaux maximum d'émissions électromagnétiques des appareils médicaux.
L'appareil medical est en conformité avec cette norme EN60601-1-2:2007 à la fois pour l'immunité et les émissions. Des précautions spéciales doivent toutefois être observées:· L'appareil doit être installé et mis en service conformément aux informations fournies dans le mode d'emploi.· L'usage d'accessoires et de câbles autres que ceux spécifiés par le fabricant, à l'exception des câbles vendus par le fabricant comme pièces de rechange pour des composants internes, peuvent conduire à des émissions accrues ou à une baisse de l'immunité de l'appareil.· Les appareils médicaux ne doivent pas être utilisés à côté d'autres équipements ou empilés sur d'autres équipements. Si un usage adjacent ou empilé est nécessaire, l'appareil médical doit faire l'objet d'une observation pour s'assurer qu'il fonctionne normalement dans la configuration dans laquelle il sera utilisé.· Reportez-vous plus bas pour davantage d'informations concernant l'environnement CEM dans lequel l'appareil doit être utilisés.
Les équipements de communication sans fil tels que les appareils domestiques de réseau sans fil, les téléphones portables, les téléphones sans fil et leurs stations de base, les talkiewalkies peuvent affecter cet équipement et doivent être tenus éloignés de l'équipement à une distance minimale d. La distance d est calculée par le FABRICANT à partir de la colonne de 800 MHz à 2,5 GHz du tableau 6 de la norme IEC 60601-1-2,

Distance de séparation recommandée entre des équipements decommunication RF portables et mobiles et le stimulateur électrique
Le thermomètre est destiné à un usage dans un environnement électromagnétique dans lequel des perturbations RF rayonnées sont contrôlées. Les clients ou les utilisateurs de ces thermomètre peuvent contribuer à empêcher les interférences électromagnétiques en maintenant une distance minimale entre les équipements de communication RF portables et mobiles (émetteurs) et le thermomètre comme conseillé ci-dessous, d'après la puissance maximale de sortie des équipements de communication.
Distance de séparation en fonction de la fréquence de l'émetteur en mètres
150 kHz à80 MHz
d = 1,2 √P
80 MHz à800 MHz
d = 1,2 √P
800 MHz à2,5 GHz
d = 2,3 √P
0.01 0.12 0.12 0.23
0.1 0.38 0.38 0.78
1 1.2 1.2 2.3
10 3.8 3.8 7.3
100 12 12 23
Pour les émetteurs dont la puissance maximale de sortie n'est pas énumérée ci-dessus, la distance de séparation recommandée d en mètres (m) peut être estimée en utilisant l'équation applicable à la fréquence de l'émetteur, où P est la puissance maximale de sortie de l'émetteur en watts (W) d'après le fabricant de l'émetteur.Note : la distance de séparation pour la plage de fréquences plus élevée s'applique à 80 MHz et à 800MHzNote : ce guide est susceptible de ne pas s'appliquer dans toutes les situations. La propagation électromagnétique est affectée par l'absorption et la réflexion de structures, d'objets, et de personnes.
8. INFORMATIONS SUR L'ELIMINATION DES PILES ET DU PRODUIT· Rappelez-vous d'ôter les piles et de vous en défaire de manière responsable lors de l'élimination de l'écoute-bébé.· Vous ne devez pas mélanger les produits portant le symbole de la poubelle barrée avec vos ordures ménagères.· Pour le traitement approprié de ce type de produits, portez-les aux points de collecte désignés par les autorités locales. A défaut, vous pouvez contacter le point de vente où vous avez acheté le produit.
Puissance de sortie de l'émetteur en Watt

ÍNDEX1. Einführung 2. Inhalt 3. Sicherheitshinweise 4. Produkteigenschaften 5. Gebrauchsanweisungen 6. Wartung 7. Technische daten 8. Information über die entsorgung der batterien und des produktes
1. EINFÜHRUNGHerzlichen Glückwunsch zum Kauf dieses klinischen, sprechenden Infrarot-Thermometers.
Bevor Sie das Gerät benutzen, lesen Sie sich bitte Anweisungen in diesem Handbuch durch. Dieses Handbuch an einem sicheren Ort aufbewahren, es enthält wichtige Informationen.
Änderungen an den Funktionen und Eigenschaften, die in diesem Benutzerhandbuch beschrieben werden, vorbehalten.
2. INHALT - 1 Berührungsloses, sprechendes Infrarot-Thermometer- 1 Aufbewahrungs- und Reisebeutel- 2 AAA-Batterien- 1 Benutzerhandbuch und Garantie
Sollte einer der genannten Gegenstände fehlen, kontaktieren Sie bitte Ihren Händler.
3. SICHERHEITSHINWEISE1. Dieses Gerät ist kein Spielzeug, Kinder dürfen damit nicht spielen.2. Thermometer außerhalb der Reichweite von Kindern aufbewahren.3. Anweisungen vor der Benutzung aufmerksam durchlesen und für spätere Einsichtnahme aufbewahren.4. Die Benutzung dieses Thermometers ersetzt keinen Arztbesuch. Messergebnisse dienen nur zu Orientierungszwecken. Bei gesundheitlichen Bedenken kontaktieren Sie Ihren Hausarzt.5. Darauf achten, dass die Batterien mit der richtigen Polung eingesetzt sind.6. Verbrauchte Batterien sind zu entsorgen.7. Batterien nicht ins Feuer werfen. Dort können diese explodieren.8. Niemals versuchen, das Gerät zu öffnen oder die Steuerung zu zerlegen. Wir übernehmen keine Haftung, wenn die obigen Anweisungen nicht befolgt wurden.9. Keine Teile des Geräts zerlegen, reparieren oder irgendwie verändern.10. Das Thermometer nicht benutzen, wenn das Gehäuse beschädigt ist (wenn zum Beispiel das Infrarotgehäuse kaputt ist). Die Weiterverwendung eines beschädigten Geräts kann zu Verletzungen, ungenauen Ergebnissen oder
DEUTSCH

schwerer Gefährdung führen.11. Thermometer nicht schütteln oder darauf schlagen. Thermometer nicht fallenlassen.12. Der Infrarotsensor muss immer sauber, trocken und unbeschädigt sein, um genaue Messergebnisse zu erhalten.13. Das Gerät nicht in der Nähe starker Kurzwellentransmitter wie Mikrowellen benutzen.14. Dieses Produkt bedarf gemäß EMV-Richtlinie spezieller Vorkehrungen, d. h., es muss gemäß den beiliegenden EMV-Informationen installiert und in Betrieb genommen werden. Außerdem kann dieses Gerät durch mobile Funkgeräte gestört werden.15. Um sicherzustellen, dass die Messungen der eMyBaby App genau sind, das Gerät mindestens 30 cm von anderen Funkgeräten entfernt halten.16. Das Thermometer nicht bei extremen Temperaturen unter -20ºC oder über 55ºC oder bei extremer Luftfeuchtigkeit (unter 15 % rF oder über 90 % rF) lagern. Wenn dies nicht befolgt wird, kann es zu ungenauen Messergebnissen kommen.17. Das Gerät ist für die gelegentliche Messung und Überwachung von Temperaturen menschlicher Körper oder Gegenstände im häuslichen Umfeld ausgelegt. Benutzen Sie das Produkt nicht für andere Zwecke.
Wir weisen Sie darauf hin, dass Änderungen und Umbauten, die nicht vom technischen Service von MINILAND vorgenommen werden, nicht unter die Produktgarantie fallen.
4. PRODUKTEIGENSCHAFTEN 4.1. BESCHREIBUNG DER TEILE4.1.1. THERMOMETER
9
8
1. Stirntemperaturmesser2. Infrarotsensor3. Taschenlampe4. Batteriefach5. Set/Memory
6. Lautsprecher7. Sprechtaste8. Objekttemperaturmesser9. LCD

4.1.2. LCD-DISPLAYA. TemperaturanzeigeB. PM (Uhrformat)C. Memory-AnzeigeD. BatteriestandswarnungE. RaumtemperaturmessanzeigeF. ObjekttemperaturmessanzeigeG. StirntemperaturmessanzeigeH.Symbol-Fieber
5. GEBRAUCHSANWEISUNGEN5.1. VOR DEM GEBRAUCH5.1.1. EMPFEHLUNGEN1. Um genaue Messergebnisse zu erzielen, ist es sehr wichtig, die Sauberkeit des Infrarotsensors vor der Benutzung sicherzustellen.2. Wenn sich die Temperatur des Lagerbereichs start von der Temperatur des Messbereichs unterscheidet, sollten Sie dem Thermometer 30 Minuten Zeit zum Anpassen an die Raumtemperatur geben, bevor Sie mit der Messung beginnen.3. Den Infrarotsensor nicht berühren oder hineinpusten. Ein verschmutzter Infrarotsensor misst ungenau.4. Denken Sie daran, dass das LCD im Wartemodus Zeit, Datum und Raumtemperatur im Wechsel anzeigt.
5.1.2. BATTERIEN EINSETZEN/ENTNEHMENWenn die Batteriestandswarnung (D) auf dem LCD angezeigt wird oder das Thermometer nicht mehr funktioniert, sollten Sie schnellstmöglich die Batterien wechseln.Dieses Produkt benötigt zwei AAA 1,5 V-Batterien, die folgendermaßen eingesetzt oder entnommen werden:1. Das Batteriefach in Pfeilrichtung öffnen.2. (Die alten Batterien herausnehmen und anschließend) die neuen Batterien in das Batteriefach einsetzen. Darauf achten, dass die Batterien richtig eingesetzt werden. Die Plus- und Minuspole der Batterien müssen mit den Markierungen im Batteriefach des Thermometers übereinstimmen.3. Die Abdeckung des Batteriefachs wieder auflegen und zum Schließen fest eindrücken.
5.2. STIRNTEMPERATURMESSER· Darauf achten, dass die Sonde vor dem Messen sauber ist.· Fett auf der Stirn kann zu ungenauen Messergebnissen führen, deshalb darauf achten, dass die Stirn sauber ist. Bei Reinigung der Stirn 5 - 10 Minuten warten, bevor Sie mit dem Messvorgang beginnen.· Externe Faktoren können die Stirntemperatur beeinflussen, insbesondere wenn jemand sehr hohen oder niedrigen Temperaturen ausgesetzt war oder schwimmen oder baden war. In diesen Fällen müssen Sie die Person in einen normal klimatisierten Raum bringen und 30 Minuten warten, bevor sie eine
A
B C D
EFG
FE
H

Temperatur messen.· Die Temperatur auf der Stirn und an den Schläfen unterscheidet sich von der Innentemperatur, die oral oder rektal gemessen wird. In den Frühphasen eines Fiebers kann Gefäßverengung auftreten, die für die Verengung von Blutgefäßen und somit für die Kühlung der Haut sorgt. In diesem Fall kann die mit dem Thermometer gemessene Temperatur ungewöhnlich niedrig sein. Wenn das Messergebnis der Wahrnehmung des Patienten nicht entspricht, die Messung alle 15 Minuten wiederholen. Zur Orientierung können Sie auch die Körperinnentemperatur mit einem handelsüblichen Oral- oder Rektalthermometer prüfen.· Die Haut von Babys reagiert sehr schnell auf Veränderungen der Umgebungstemperatur. Deshalb sollten Sie die Temperatur nicht während oder nach dem Stillen messen, denn dann kann die Hauttemperatur niedriger liegen als die Körperinnentemperatur.
1. Das Thermometer in die Hand nehmen und den Finger auf die Stirntaste (1) legen.
2. Das Thermometer so halten, dass es etwa mittig auf der Stirn positioniert ist, ca. 3 - 5 cm von der Stirn entfernt und mittig zwischen Augenbrauen und Haaransatz.
3. Die Stirntaste (1) drücken und gedrückt halten. Nun geht die Taschenlampe AN und Sie können nach der entsprechenden Position für eine Stirnmessung suchen. Die Stirntaste so lange gedrückt halten, wie die Taschenlampe an bleiben soll. Wenn Sie die Position gefunden haben, die Stirntaste loslassen, um die Messung zu beginnen. Das Thermometer piept einmal.
4. Das Thermometer flach halten, bis Sie zwei Pieptöne und das Messergebnis hören. Der Bildschirm wird dann entsprechend der Temperatur beleuchtet.
5. Die Messung ist nun abgeschlossen und das Thermometer kann von der Stirn genommen werden.
6. Die Temperatur auf dem Display ablesen.
7. Sie können die Stirntaste (1) erneut drücken, um eine weitere Messung zu beginnen, oder die Taste Set/Mem (5) drücken, um in den Wartemodus zurückzukehren.
36.6c

HINWEIS Die Taschenlampe bleibt immer so lange an, wie die Messtaste gedrückt wird. Wenn Sie die Messtaste loslassen, schaltet sich die Taschenlampe ab. Die Taschenlampe schaltet sich automatisch aus, wenn Sie die Stirntaste (1) länger als 1 Minute drücken. Wenn Sie die Taste dann loslassen, kehrt das Gerät in den Wartemodus zurück.
Die normale Körpertemperatur bewegt sich in einem bestimmten Bereich. Der Bereich der normalen Körpertemperatur einer Person verkleinert sich mit zunehmendem Alter. Folgende Tabelle zeigt normale Temperaturbereiche entsprechend dem jeweiligen Alter:
0-2 Jahre 36.4ºC-38.0ºC 97.5ºF-100.4ºF
3-10 Jahre 36.1ºC-37.8ºC 97.0ºF-100.0ºF
11-65 Jahre 35.9ºC-37.6ºC 96.6ºF-99.7ºF
> 65 Jahre 35.8ºC-37.5ºC 96.4ºF-99.5ºF
Der Normalbereich variiert von Mensch zu Mensch und kann von vielen Faktoren wie Tageszeit, Aktivität, Medikamenteneinnahmen, Emotionen, etc. beeinflusst werden.Wir empfehlen daher, das Thermometer an Ihnen selbst und an Familienmitgliedern auszuprobieren, wenn Sie gesund sind. So lernen Sie, wie das Thermometer funktioniert, und können sich bei Messungen, die Sie an einem kranken Familienmitglied vornehmen, sicher sein.
HINWEIS: Wenn das Messergebnis mindestens 38 °C beträgt, leuchtet im Display die Fieberanzeige auf und das Display wird rot beleuchtet.
5.2.1. TEMPERATUR-BELEUCHTUNGSANZEIGEDie Display-Beleuchtung wechselt mit der gemessenen Körpertemperatur wie folgt:Blaue Beleuchtung: unter 37,9 °CRote Beleuchtung: 38,0 ºC - 42,9 ºC
5.3. OBJEKTTEMPERATURMESSUNG· Darauf achten, dass die Sonde vor dem Messen sauber ist.· Diesen Modus nicht zur Messung der Körpertemperatur benutzen.· Bei der Objekttemperaturmessung wird die aktuelle Oberflächentemperatur des gemessenen Gegenstands angezeigt. Diese kann sich sehr von der Innentemperatur unterscheiden, insbesondere wenn die Oberfläche dem direkten Sonnenlicht oder einem Luftzug ausgesetzt ist.

1. Das Thermometer in die Hand nehmen und den Finger auf die Objekttaste (8) legen
2. Das Thermometer so halten, dass die Sonde 3 - 5 cm von der Flüssigkeit und/oder der Oberfläche entfernt ist, deren Temperatur gemessen werden soll.
3. Die Objekttaste (8) drücken, um die Messung zu beginnen. Das Thermometer piept einmal.
4. Das Thermometer vom Gegenstand wegnehmen. Das LCD zeigt nun das Messergebnis an.
5. Sie können die Objekttaste (8) erneut drücken, um eine weitere Messung zu beginnen, oder die Taste Set/Mem (5) drücken, um in den Wartemodus zurückzukehren. 52.7c5.4. SPEICHER PRÜFENInsgesamt sind 9 Speicherplätze zum Speichern von Stirntemperatur-Messergebnissen vorhanden.Das aktuelle Messergebnis wird immer auf dem letzten Speicherplatz gesichert. Wenn alle Speicherplätze belegt sind, wird automatisch das älteste Messergebnis aus dem Speicher gelöscht.
8 36.4c 12.23 2-14
1. Die Taste Set/Mem (5) drücken, um die Speichernummer, die Temperatur und das Datum zu prüfen.2. Die Taste Set/Mem (5) wiederholt drücken, um die gespeicherten Temperaturen zu prüfen.3. Die Taste Set/Mem (5) drücken und gedrückt halten, um die Speicherdaten schnell zu prüfen.4. Die Tasten Objekt (8) und Stirn (1) gleichzeitig drücken, um zum Wartemodus zurückzukehren.
Speichernummer Temperatur Zeiteinstellung Datum

1. Die Taste Set/Mem (5) etwa 2 Sekunden lang gedrückt halten, um aus dem Wartemodus in den Einstellmodus zu wechseln.
2. Die Taste Set/Mem (5) erneut drücken, um zwischen einer Einstellung für Uhr (12 Std. oder 24 Std., bei Auswahl von 12 Std. wird auf dem LCD "PM" angezeigt), Stunden, Minuten, Jahren (2001 - 2099), Monat, Tag, Jahr und Ruhemodus (AN oder AUS) zu wechseln.
3. Die Taste Sprache (7) drücken, um die Einstellungen zu bestätigen und zur nächsten Einstellung zu gehen.
5.5 DATUMS- UND ZEITEINSTELLUNG
12
off
Wenn der Ruhemodus aktiviert ist, schaltet sich das Thermometer nach ca. 3 Minuten automatisch ab. Bei deaktiviertem Ruhemodus bleibt das Thermometer ständig an. Zum Energie sparen empfehlen wir die Aktivierung des Ruhemodus.
5.6. SPRACHAUSGABEDie Taste Sprache (7) drücken, um das Messergebnis, die aktuelle Uhrzeit oder die Raumtemperatur auszugeben.Nach jeder Stirntemperaturmessung meldet das Thermometer die gemessene Temperatur in der gewählten Sprache.
Dieses Thermometer teilt die Temperatur mittels Sprachnachricht in 6 Sprachen mit: Spanisch, Englisch, Deutsch, Französisch, Italienisch und Russisch.
AudioFunktion Englisch Spanisch Deutsch Französisch Italienisch Russisch
Temperatur (ºC)
Temperatur (ºF)
Uhrzeit
Raumtemperatur (ºC)
Raumtemperatur (ºF)

5.7 ZWISCHEN FAHRENHEIT UND CELSIUS WECHSELNWenn das LCD ein Messergebnis oder eine gespeicherte Temperatur anzeigt, die Taste Sprache (7) etwa 3 Sekunden lang drücken, um zwischen °F und °C zu wechseln.
5.8. BABY-TEMPERATURKONTROLLEDieses Thermometer verfügt über ein spezielles Kommunikationsmodul, über dasSie es an Ihr Smartphone oder Tablet anschließen können. Das Thermometer sendet dann jedes Messergebnis an das Mobilgerät, um die Messergebnisse zu verfolgen.
5.8.1. EMPFEHLUNGEN1. Darauf achten, dass Ihr Smartphone oder Tablet mit dem aktuellsten Betriebssystem läuft. Informationen zu Software Updates erhalten Sie im Handbuch für Ihr Gerät.2. Darauf achten, dass die eMyBaby-Software (App) regelmäßig aktualisiert wird. Informationen zu App Updates erhalten Sie im Handbuch für Ihr Gerät.3. Das Mobilgerät muss ausreichend aufgeladen sein, damit das Kommunikationsmodul ordnungsgemäß funktioniert. Sie sollten immer ein Stromversorgungsgerät oder ein Ladekabel zur Hand haben.4. Darauf achten, dass auf Ihrem Smartphone oder Tablet immer genug Speicherplatz verfügbar ist, um die Messergebnisse zu speichern.5. Wenn Sie beim Lesen einen Anruf oder eine Textnachricht erhalten, kann der Lesevorgang abgebrochen werden oder die Messergebnisse können verzerrt werden. Wir empfehlen, das Gerät in den Flugmodus zu schalten.
ACHTUNG:Dieses Gerät sollte nicht in der Nähe von oder auf anderen Geräten benutzt werden. Sollte dies doch der Fall sein, muss dieses Gerät beobachtet werden, um sicherzustellen, dass das Gerät in der gewünschten Konfiguration ordnungsgemäß funktioniert.
5.8.2. Anwendung eMyBaby (ABBILDUNG A)Dieses Thermometer kann an das Smartphone oder den Tablet angeschlossen werden, um die Körpertemperaturen des Babys aufzuzeichnen. Um Ihr neues Infrarot-Thermometer mit Ihrem Smartphone oder Tablet benutzen zu können, stellen Sie es zuerst auf den Lautlos-Modus, um eine optimale Kommunikation zwischen dem Thermometer und IhremTelefon oder Tablet zu erzielen. Halten Sie zu diesem Zweck die Tontaste (7) ca. 2 Sekunden lang
· Zur Auswahl der gewünschten Sprache oder zur Aktivierung des stillen Modus im Wartemodus die Taste Sprache (7) etwa 2 Sekunden lang gedrückt halten, um die gewünschte Sprache einzustellen. Das Thermometer wechselt automatisch zwischen den Sprachen und dem stillen Modus.

gedrückt. Das Thermometer wird dann jedes Mal, wenn Sie auf diese Taste drücken, von einer Sprache zur nächsten wechseln, bis schließlich der Lautlos-Modus erreicht wird . Außerdem müssen Sie die kostenlose Anwendung eMyBaby installieren. Befolgen Sie dafür die Anleitungen, die Sie am Beginn dieses Handbuches finden können . Wenn die Software einmal richtig installiert ist, erscheint auf dem Display das Symbol von eMyBaby.Starten Sie dann die Anwendung und befolgen Sie die erforderlichen Schritte für die Aufzeichnung der mit Ihrem Thermometer gemessenen Temperatur:
1. Wenn Sie es nicht schon zuvor getan haben, so müssen Sie jetzt das Profil des Babys, dessen Körpertemperatur Sie aufzeichnen möchten, einrichten. Gehen Sie zu diesem Zweck vom Hauptmenü der Anwendung eMyBaby aus zum Bereich „My Baby" (Mein Baby) und befolgen Sie die Anleitungen, die Sie dort vorfinden, um ein Datenblatt zu erstellen. 2. Gehen Sie dann vom Hauptmenü aus zum Bereich „Thermometer" und wählen Sie das Profil des Babys an, dessen Temperatur Sie messen möchten. 3. Wählen Sie „New measure" (Neues Messergebnis) und dann die Option Zufügen, während Sie das Thermometer benutzen. 4. Messen Sie nun die Körpertemperatur Ihres Babys gemäß den Anleitungen im Abschnitt 5.2 dieses Handbuches .5. Nach dem zweiten Pfeifton, der angibt, dass der Messvorgang beendet ist, halten Sie den Lautsprecher des Thermometers (6) direkt vor das Mikrofon Ihres Mobiltelefons oder Tablets. Bedenken Sie, dass die Kommunikation über Ultraschall erfolgt. Daher müssen sich die beiden Geräte so nah wie möglich aneinander befinden . 6. Ihr Tablet oder Mobiltelefon wird die mit dem Thermometer gemessene Temperatur automatisch erfassen. 7. Drücken Sie auf „Save temperature" (Temperatur aufzeichnen), um die gemessene Temperatur aufzuzeichnen und im Bereich der Aufzeichnung des Temperaturverlaufs Ihres Babys zu speichern.
Sie haben die Möglichkeit, die Aufzeichnungen der Körpertemperatur Ihres Babys sowohl über die Anwendung eMyBaby als auch von der Webseite www.emybaby.com abzurufen, indem Sie Zugriff auf den Bereich "Thermometer" ausüben.
HINWEISDie Verbindung mit Mobilgeräten kann fehlschlagen, wenn in der Umgebung Störgeräusche vorhanden sind.
5.9. KALIBRIERUNGDas Thermometer ist bereits ab Werk vorkalibriert. Wenn das Thermometer gemäß den Anweisungen dieses Handbuchs benutzt wird, ist keine erneute Kalibrierung nötig. Wenn Sie Zweifel an der Messgenauigkeit des Thermometershaben, kontaktieren Sie Ihren Händler.Versuchen Sie nicht, dass Thermometer umzubauen oder zu zerlegen.
2
3
1

PROBLEME CHECKLISTE LÖSUNGEN
Keine Antwort/automatischer Reset, wenn der Isolator gezogen wird
"ErrP" oder "ErrH" werden auf dem Display angezeigt
"Lo" wird auf dem Display angezeigt
Das Messergebnis ist nicht genau oder Sie haben Zweifel an der Richtigkeit des Messergebnisses
Batterie verbraucht
Batterie falsch gepolt
Batterie hat Wackelkontakt
Neue Batterie einsetzen
Batterie herausnehmen, Batterie korrekt einsetzen.
Die gemessene Temperatur liegt unter 32,0 °C/89,6 °F.Betriebsmodus überprüfen.
"Lo" wird auf dem Display angezeigt
Die gemessene Temperatur liegt über 42,9 °C/109,3 °F.Betriebsmodus überprüfen.
Hardware-Problem
Prüfen, ob der Infrarotsensor sauber ist
Den Infrarotsensor gemäß dem Benutzerhandbuch mit einem Wattestäbchen säubern.
Die Schritte im Benutzerhandbuch für ordnungsgemäße Messung befolgen.
Die Schritte im Benutzerhandbuch für ordnungsgemäße Messung befolgen.
Hersteller oder Händler kontaktieren
5.10. FEHLERBEHEBUNG
"ErrE" wird auf demDisplay angezeigt
Umgebungstemperatur über den Rahmen 10°C~40°C(50.0°F~104.0°F) Für Objekte 15°C~40°C(59.0°F~104.0°F) Für die Stirn
Zustand des Thermometers bis Umwelt Temperatur 10°C~40°C (50.0°F~104,0°F) Für Objekte 15°C~40º C (59.0°F ~ 104.0°F) für Stirn
Achten Sie darauf, dass sowohl Thermometer als auch Patient sich mindestens 30 Minuten lang an die Raumtemperatur gewöhnen konnten
Thermometer und Patient müssen vor Beginn der Messung mindestens 30 Minuten im Raum verbracht haben
Das Messergebnis ist nicht genau oder Sie haben Zweifel an der Richtigkeit des Messergebnisses
Prüfen, ob die Messmethode korrekt ist
Sie müssen das Handbuch gelesen haben und wissen, wie das Thermometer richtig verwendet wird.
Wird das Thermometer im Gebäude benutzt
Die Messung bitte im Gebäude vornehmen

6. WARTUNG· In einen Luftzug legen, um die Genauigkeit zu messen.· Das Produkt nicht nass werden lassen. Wenn es doch nass wird, gründlich trocknen lassen. Bitte beachten Sie, dass ätzende Flüssigkeiten das Produkt schädigen können.· Das Produkt bei normalen Temperaturbedingungen benutzen und lagern. Die Lebensdauer des Produkts kann sich bei extrem hohen oder niedrigen Temperaturen verkürzen.· Wenn Ihr Thermometer nicht regelmäßig benutzt wird, die Batterie entnehmen, um mögliche Schäden durch Austreten von Batteriesäure zu vermeiden. Wenn Batteriesäure austritt, die Batterien vorsichtig entfernen. Die Säure nicht mit bloßer Haut berühren.
6.1. PFLEGE UND REINIGUNG· Zur Sicherstellung genauer Messergebnisse darauf achten, dass die Sondenspitze sauber und nicht zerkratzt ist. Fingerabdrücke oder Schmutz beeinträchtigen die Genauigkeit des Thermometers.· Für eine genaue Messung bitte die Sondenspitze reinigen.· Zur Reinigung des Sensors die Oberfläche sanft mit einem Wattestäbchen reinigen, das leicht mit Alkohol getränkt wurde, und dann sofort mit einem sauberen Wattestäbchen trocken wischen.· Das Gehäuse des Thermometers mit einem weichen, trockenen Tuch reinigen. Das Thermometer niemals mit aggresiven Reinigern, Verdünnern oder Benzenen reinigen oder das Thermometer in Wasser oder andere Flüssigkeiten eintauchen.· Nach der Reinigung das Thermometer mindestens 20 Minuten trocknen lassen, bevor Sie messen. Das Thermometer in die Schutzhülle oder den Tischhalter stecken. Bei Raumtemperatur an einem trockenen und sauberen Ort lagern.
Batteriesymbol aufdem LCD
SonstigeFehlfunktionen
Batteriestandswarnung Tauschen Sie die Batterien gegen neue aus
Technischen Service von MINILAND
PROBLEME CHECKLISTE LÖSUNGEN
± 0,3 ºC± 0,5 ºF
Stromversorgung DC 3 V (2 x 1,5 AAA-Batterien)
Messbereich Körpertemperatur
32,0 ºC-42,9 ºC 89,6 ºF-109,3 ºF
Messtoleranz Stirntemperatur
Im Bereich von 35,5 ºC-42,0 ºC95,9 ºF-107,6 ºF
± 0,2 ºC± 0,4 ºF
Para otro intervalo
7. TECHNISCHE DATEN
Betriebsmodus Modus einstellen
Referenzstandort Körper Herz

Komponenten Typ BF
Entsorgung gemäß Richtlinie 2012/19/EU (WEEE)
7.1. GENORMTE SYMBOLE
Entspricht der Europäischen Medizintechnikrichtlinie (93/42/EEC) undAbänderungen sowie den Bestimmungen der Richtlinie 2007/47/EG.Geprüft durch TÜV Rheinland (0197).
Name und Adresse des Herstellers.
0197
Name und Adresse des autorisierten EG-Vertreters in Europa.
Siehe Bedienungsanleitung.
Gewicht 56 g (ohne Batterie)
59,0 ºF-104,0 ºF
Betriebsbedingungen Stirntemperatur
Bei relativer Luftfeuchtigkeit 20%-85%
15,0 ºC-40,0 ºC
Bei relativer Luftfeuchtigkeit 20%-85%
50,0 ºF-104,0 ºF10,0 ºC-40,0 ºC
Bei relativer Luftfeuchtigkeit 15%-90%
-4,0 ºF-131,0 ºF-20,0 ºC-55 ºC
Betriebsbedingungen Objekttemperatur
Lagerungsbedingungen
Messgenauigkeit Raumtemperatur
Abmessungen 89 (L) x 53 (A) x 35 (F) mm
± 1,0 ºC ± 2,0 ºF
Lagerzeit 2 Jahren
Messbereich Gegenstände
20,0 ºC-60,0 ºC 68,0 ºF-140,0 ºF
Messbereich Raumtemperatur
5,0 ºC-59,9 ºC 41,0 ºF-139,8 ºF
Messgenauigkeit Gegenstände
± 1,0 ºC ± 2,0 ºF
Atmosphärischen Druck: 700hPa-1060hPa
WICHTIGE INFORMATIONEN ÜBER ELEKTROMAGNETISCHE VERTRÄGLICHKEIT (EMV)Mit der erhöhten Anzahl von elektronischen Geräten wie PCs und mobilen (Handy) Telefonen können im Einsatz befindliche medizinische Geräte möglicherweise durch elektromagnetische Interferenzen anderer Geräte beeinflusst werden. Elektromagnetische Interferenzen können zu einem fehlerhaften Betrieb von medizinischen Geräten und potenziell zu unsicheren Situationen führen.Medizinische Geräte sollten auch nicht andere Geräten beeinflussen.Der Standard EN60601-1-2 wurde mit dem Ziel eingeführt, die Anforderungen für EMV (Elektromagnetische Verträglichkeit) zu definieren und einen unsicheren Betrieb von Geräten zu vermeiden. Dieser Standard definiert die Stufe der Verträglichkeit / Immunität von elektromagnetischen Interferenzen sowie Höchstwerte für die Emission elektromagnetischer Wellen von medizinischen Geräten.

Dieses medizinische Gerät erfüllt dieser EN60601-1-2:2007 Norm für Immunität und Emissionen. Dennoch müssen besondere Vorsichtsmaßnahmen ergriffen werden:· Das Gerät muss in Übereinstimmung mit den Angaben in der Bedienungsanleitung installiert und in Betrieb genommen werden.· Die Verwendung von anderen Kabeln und Zubehör als die vom Hersteller genannten können zu erhöhten Emissionen führen oder die Immunität des Geräts beeinflussen. Ausgenommen sind dabei Kabel, die vom Hersteller als Ersatzteile für interne Komponenten vertrieben werden.· Medizinische Geräte sollte nicht neben oder übereinander angeordnet mit anderen Geräten verwendet werden. Für den Fall, dass Geräte nebeneinander oder übereinander angeordnet eingesetzt werden müssen, sollte das medizinische Produkt überwacht werden, um einen normalen Betrieb in der Konfiguration, in der es verwendet wird, zu gewährleisten.· Beachten Sie weitere, unten angegebene Hinweise in Bezug auf das EMV Umfeld, in dem das Gerät sollte verwendet werden.
Geräte mit drahtloser Kommunikation, wie etwa kabellose Netzwerk-Geräte, Mobiltelefone, schnurlose Telefone und ihre Basisstationen, Walkie-talkies können die Funktion dieses Geräts beeinträchtigen und sollten mindestens in einer Entfernung d vom Gerät gehalten werden. Die Entfernung d wird vom HERSTELLER aus der 800 MHz bis 2,5 GHz Spalte der Tabelle 6 der IEC 60601-1-2 berechnet,
Empfohlener Abstand zwischen tragbaren und mobilen RF Kommunikationsgerätenund dem Thermometer
Das Gerät sollte in einer elektromagnetischen Umgebung eingesetzt werden, in der die ausgestrahlten RF Störungen geprüft bzw. kontrolliert werden. Der Kunde oder Bediener dieses Thermometer kann dazu beitragen, elektromagnetische Interferenz zu vermeiden, indem er den Mindestabstand zwischen tragbaren und mobilen RF Kommunikationsgeräten (Sendern) und des Thermometer entsprechend der maximalen Abgabeleistung des Kommunikationsgeräts einhält, wie unten angegeben.
Ausgangsleistung des Senders in Watt
Abstand in Abhängigkeit der Frequenz des Senders in Meter
150 kHz bis80 MHz
d = 1,2 √P
80 MHz bis800 MHz
d = 1,2 √P
800 MHz bis2,5 GHz
d = 2,3 √P
0.01 0.12 0.12 0.23
0.1 0.38 0.38 0.78
1 1.2 1.2 2.3
10 3.8 3.8 7.3
100 12 12 23
Für Sender, deren maximale Ausgangsleistung nicht oben angegeben sind, kann der empfohlene Mindestabstand d in Metern (m) durch Anwendung der für die Sendefrequenz zutreffende Formel berechnet werden, wobei P die maximale, vom Hersteller angegebeneAusgangsleistung des Senders in Watt (W) ist.Hinweis: Bei 80MHz und 800MHz ist der Mindestabstand für das höhere Frequenzband zu beachten.Hinweis: Diese Empfehlungen treffen nicht unbedingt auf alle Situation zu. Die Ausbreitung von elektromagnetischen Wellen wird durch die Absorption und Reflexion durch Strukturen,

8. INFORMATION ÜBER DIE ENTSORGUNG DER BATTERIEN UND DES PRODUKTES· Vergessen Sie nicht, die Batterien aus dem Gerät zu entfernen und in verantwortungsvoller Weise zu entsorgen, bevor Sie das Babyüberwachungsgerät wegwerfen. · Produkte, die mit dem Bildsymbol des durchgestrichenen Mülleimers gekennzeichnet sind, dürfen nicht in den gewöhnlichen Hausmüll geworfen werden.· Zur Gewährleistung der richtigen Entsorgung müssen diese Produkte an dievon den örtlichen Behörden eingerichteten Sondermüllsammelstellen gebracht werden. Sollte das nicht möglich sein, so wenden Sie sich an die Verkaufsstelle, an der Sie das Produkt erworben haben.

ÍNDICE1. Introduzione 2. Contenuto della confezione 3. Istruzioni di sicurezza 4. Caratteristiche prodotto 5. Istruzioni per l'uso 6. Manutenzione 7. Specifiche tecniche 8. Informazioni di smaltimento batteria e prodotto
1. INTRODUZIONECongratulazioni per l'acquisto di questo termometro clinico parlante a raggi infrarossi
Prima di usare questo dispositivo, si prega di leggere attentamente tutte le istruzioni contenute in questo manuale. Conservarlo in luogo sicuro, dal momento che contiene informazioni importanti.
Le caratteristiche descritte in questa guida dell'utente sono soggetti a modifiche senza preavviso.
2. CONTENUTO DELLA CONFEZIONE - 1 Termometro parlante IR senza contatto- 1 custodia di trasporto- 2 pile AAA - 1 Manuale di istruzioni e garanzia
Se uno qualsiasi di questi elementi risultasse mancante, si prega di rivolgersi al proprio rivenditore.
3. ISTRUZIONI DI SICUREZZA1. Questo dispositivo non è un giocattolo; non lasciare che I bambini vi giochino.2. Tenere il termometro fuori dalla portata dei bambini.3. Leggere le istruzioni attentamente prima dell'uso e conservarle per riferimento futuro.4. L'uso di questo termometro non va inteso come sostitutivo di un consulto medico. I risultati di misurazione sono solo un riferimento. Per qualsiasi dubbio riguardante lo stato di salute, rivolgersi al proprio medico.5. Assicurarsi che le batterie siano inserite con la polarità corretta.6. Le batterie esaurite devono essere rimosse.7. Non gettare la batteria nel fuoco, poiché potrebbe esplodere.8. Non tentare mai di aprire una qualsiasi parte dell'unità o di smontarne i controlli. Qualora questa avvertenza sia stata ignorata, non verranno accettate responsabilità per eventuali guasti.9. Non tentare di riparare a sostituire una qualsiasi parte dell'unità.10. Non usare il termometro se il corpo principale è danneggiato (per esempio,se il sensore a infrarossi è rotto). L'uso continuato di un'unità danneggiata può
ITALIANO

causare lesioni, risultati inattendibili o grave pericolo.11. Non scuotere il termometro e non lasciarlo cadere.12. Il sensore infrarosso deve essere mantenuto pulito, asciutto e integro in ogni momento per assicurare misurazioni precise.13. Non far funzionare il sistema nelle vicinanze di un forte emettitore, come apparecchiature a microonde e a onde corte.14. Questo prodotto necessita di precauzioni particolari riguardanti i campi elettromagnetici e deve essere messo in servizio rispettando le informazioni fornite relative ai campi elettromagnetici; questa unità può subire interferenze di dispositivi di comunicazione portatili operanti in radiofrequenza.15. Per assicurare che le letture di eMyBaby App siano precise, tenere il termometro a una distanza minima di una trentina di centimetri da altri dispositivi senza fili.16. Non custodire il termometro a temperature estreme (al di sotto di -20 ºC/-4 ºF o al di sopra di 55 ºC/131 ºF) o a condizioni di umidità estreme (al di sotto del 15% o al di sopra del 90% di umidità relativa). In caso contrario, il dispositivo può diventare inattendibile.17. Il dispositivo è destinato alla lettura e al monitoraggio della temperatura del corpo umano o di oggetti in un ambiente domestico. Non usare il prodotto per altri scopi.
Cambiamenti e modifiche all'apparecchio non eseguiti dal servizio tecnico MINILAND non sono coperti dalla garanzia prodotto.
4. CARATTERISTICHE DEL PRODOTTO 4.1. DESCRIZIONE DELLE PARTI4.1.1. TERMOMETRO
9
8
1. Misurazione di temperatura alla fronte 2. Sensore infrarosso3. Faretto4. Coperchio batteria 5. Impostazione/Memoria
6. Altoparlante7. Pulsante talk8. Misurazione temperatura oggetto9. LCD

4.1.2. DISPLAY LCDA. Visualizzazione di temperatura B. PM (formato ora)C. Segnale MemoriaD. Segnale pile in esaurimentoE. Segnale misurazione temperatura ambiente F. Segnale misurazione temperature oggettoG. Segnale misurazione temperatura fronteH.Simbolo febbre
5. ISTRUZIONI PER L'USO5.1. PRIMA DELL'USO5.1.1. RACCOMANDAZIONI1. Per ottenere misurazioni precise è molto importante controllare la pulizia del sensore infrarosso prima dell'uso.2. Se la temperatura del luogo in cui il termometro viene conservato differisce nettamente da quella del luogo in cui la temperatura viene rilevata, bisogna attendere che la temperatura del termometro si uniformi alla temperatura ambiente (lasciare trascorrere circa 30 minuti prima della misurazione).3. Non toccare il sensore infrarosso e non soffiarvi sopra. Un sensore infrarosso sporco è causa di imprecisione di misurazione.4. Ricordarsi che in modalità di attesa, il display visualizza ciclicamente ora, data e temperature ambiente.
5.1.2. INSTALLAZIONE/RIMOZIONE DELLE PILEQuando l'indicatore di batteria in esaurimento (D) compare sul display, o quando il termometro non funziona del tutto, si devono sostituire le pile non appena possibile.Questo prodotto usa due pile AAA 1.5V; per sostituirle occorre seguire questa procedura:1. Aprire lo scomparto batteria seguendo la direzione della freccia.2. (Tirare su le pile vecchie e quindi) inserire le pile nuove nello scomparto batteria. Assicurarsi che le pile vengano installate in modo appropriato: i poli positivi e negativi della pila devono corrispondere ai contrassegni presenti nello scomparto batteria del termometro.3. Ricollocare al suo posto il coperchio dello scomparto batteria e premere per chiuderlo.
5.2. MISURAZIONE DI TEMPERATURA ALLA FRONTE · Accertarsi che la sonda sia pulita prima di misurare la temperatura.· Una pelle grassa della fronte può causare una misurazione imprecisa, per cui occorre assicurarsi che la fronte sia pulita. Dopo aver pulito la fronte, attendere per 5-10 minuti prima di misurare la temperatura.· I fattori esterni possono influenzare la temperatura della fronte, in particolare quando un soggetto è stato esposto a temperature molto alte o molto basse o ha appena fatto una nuotata o un bagno. In questi casi, attendere per 30 minuti
A
B C D
EFG
FE
H

prima di rilevare la temperatura.· La temperatura alla fronte o alla tempia differisce dalla temperatura interna che viene rilevata per via orale o rettale. Durante le prime fasi di un episodio febbrile, inoltre, si può verificare vasocostrizione: un effetto di restringimento periferico dei vasi sanguigni che rende la pelle anormalmente fredda per quella che è la temperatura corporea reale. In questo caso, la temperatura misurata da questo termometro può essere insolitamente bassa. Se la misurazione non corrisponde alla percezione del paziente, si consiglia di ripeterla ogni 15 minuti. Come riferimento, si può anche misurare la temperatura corporea interna (per via orale o rettale) usando un termometro convenzionale.· La pelle dei bambini reagisce molto rapidamente alla temperatura ambiente. Pertanto, non si deve rilevare la loro temperatura con il termometro durante o dopo l'allattamento al seno, dal momento che la temperatura della pelle può essere inferiore alla temperatura corporea interna.
1. Tenere il termometro in mano col dito sul pulsante fronte (1).
2.Tenere il termometro sul centro della fronte, a distanza di 3-5 cm circa, a metà strada tra il sopracciglio e l'attaccatura dei capelli.
3. Premere e tenere premuto il pulsante fronte (1), il faretto è ON e in questo modo si può localizzare la posizione corretta per la misurazione alla fronte. Tenere premuto il pulsante fronte fintanto che si vuole tenere acceso il faretto. Se la posizione è corretta, rilasciare il pulsante per dare inizio alla misurazione e il termometro emetterà un bip.
4. Tenere fermo il termometro finché non si sentono due bip e la temperatura viene trasmessa. A quel punto, si accende la retroilluminazione a seconda della temperatura misurata.
5.La misurazione completa e il termometro può essere allontanato dalla fronte. Leggere la temperatura sul display.
6. Si può premere il pulsante fronte (1) per dare inizio a una nuova misurazione o premere il pulsante Set/Mem (5) per ritornare alla modalità di attesa.
36.6c

NOTA Il faretto rimane acceso fin tanto che il pulsante di misurazione viene premuto e si spegne quando viene rilasciato. Il faretto si spegne automaticamente se la pressione del pulsante fronte (1) supera un minuto; dopo il rilascio del pulsante il dispositivo ritorna alla modalità di attesa.
La temperatura corporea normale è compresa in un intervallo. L'intervallo di normalità di una persona tende a diminuire con l'età. La seguente tabella mostra gli intervalli di normalità per fascia d'età:
0-2 anni 36.4ºC-38.0ºC 97.5ºF-100.4ºF
3-10 anni 36.1ºC-37.8ºC 97.0ºF-100.0ºF
11-65 anni 35.9ºC-37.6ºC 96.6ºF-99.7ºF
> 65 anni 35.8ºC-37.5ºC 96.4ºF-99.5ºF
L'intervallo di temperatura normale varia da persona a persona e può essere influenzato da molti fattori come l'ora del giorno, il livello di attività, l'assunzione di farmaci, lo stato emotivo ecc.Si raccomanda pertanto di fare pratica con il termometro su se stessi o sui membri della famiglia quando si è in buona salute. In questo modo si potrà sapere come funziona il termometro e si potrà fare più affidamento sulle misurazioni rilevate quando un membro della famiglia è ammalato.
NOTA: Se la temperatura misurata è uguale o maggiore di 38 ºC, il display mostrerà l'indicazione di febbre e verrà retroilluminato in rosso.
5.2.1 INDICAZIONE DI RETROILLUMINAZIONE La retroilluminazione del display si accende a misurazione terminata nel modo seguente:Retroilluminazione blu: temperatura al di sotto di 37.9 ºC (100.3 ºF)Retroilluminazione rossa: 38.0 ºC-42.9 ºC (100.4 ºF-109.3 ºF)
5.3. MISURAZIONE DELLA TEMPERATURA DI OGGETTI2. Prima della misurazione, accertarsi che la sonda sia pulita.3. Non usare questa modalità per misurare la temperatura corporea.4. Con la misurazione di oggetti, viene visualizzata la temperatura superficiale attuale dell'oggetto. Questa può essere diversa dalla sua temperatura interna, in particolare se la superficie è esposta a luce solare diretta o a una corrente d'aria.

1. Tenere in mano il termometro con il dito sul pulsante oggetto (8).
2. Tenere il termometro in modo che la sonda si trovi a una distanza di 3-5 cm dal liquido e/o dalla superficie di cui si vuole misurare la temperatura.
3. Premere il pulsante oggetto (8) per dare inizio alla misurazione. Il termometro emette un bip.
4. Allontanare il termometro dell'oggetto. Il display mostra la temperatura misurata.
5. Si può premere il pulsante “oggetto" (8) per avviare una nuova misurazione o premere il pulsante Set/Mem (5) per ritornare alla modalità di attesa. 52.7c5.4. CONTROLLO DELLA MEMORIAVi è un totale di 9 dati di memoria per registrare le misurazioni di temperatura.La misurazione attuale viene sempre salvata nell'ultimo spazio di memoria a disposizione. Quando tutti gli spazi di memoria sono stati occupati, la misurazione più vecchia viene cancellata dalla memoria.
8 36.4c 12.23 2-14
1. Premere il pulsante Set/Mem (5) per controllare il numero di memoria, la temperatura e la data.2. Premere il pulsante Set/Mem (5) ciclicamente per controllare le temperature contenute in memoria.3. Premere e tenere premuto il pulsante Set/Mem (5) per controllare i dati in memoria rapidamente.4. Premere i pulsanti di misurazione oggetto (8) e fronte (1) simultaneamente per riportare il dispositivo alla modalità di attesa.
Numerodi memoria
Temperatura Ora Data

1. Premere e tenere premuto il pulsante Set/Mem (5) per circa 2 secondi per entrare nella modalità di impostazione sotto la modalità di attesa.
2. Premere nuovamente il pulsante Set/Mem (5) per selezionare la modalità di visualizzazione dell'ora (12 o 24 ore; quando si sceglie la modalità a 12 ore, sul display appare “PM”), l'ora, il minuto, l'anno (2001-2099), il mese, il giorno e la modalità sleep (ON o OFF).
3. Premere il pulsante talk (7) per confermare le impostazioni e andare all'impostazione successiva.
5.5 IMPOSTAZIONE DATA E ORA
12
off
Quando la modalità sleep è attiva, il termometro si spegne automaticamente in circa 3 min; quando la modalità sleep è disattiva, il termometro rimane acceso. Per risparmiare energia, raccomandiamo di impostare la modalità sleep su “on”.
5.6 MESSAGGIO VOCALEPremere il pulsante talk (7) perché il termometro riferisca la temperatura misurata, l'ora o la temperatura ambiente.Dopo ogni misurazione alla fronte, il termometro riporta la temperatura ottenuta nella lingua scelta.
Questo termometro comunica la temperatura con un messaggio vocale (possibilità di scelta fra 6 lingue: spagnolo, inglese, tedesco, francese, italiano e russo).
AudioFunzione Spagnolo Inglese Tedesco Francese Italiano Russo
Temperatura (ºC)
Temperatura (ºF)
Ora
Temperaturaambiente (ºC)
Temperaturaambiente (ºF)

5.7 COMMUTAZIONE TRA GRADI FAHRENHEIT E CELSIUSQuando il display mostra una misurazione o una temperatura in memoria, premere e tenere premuto il pulsante talk (7) per circa 3 secondi per cambiare unità di misura a ºF o a ºC.
5.8 CONTROLLO DELLA TEMPERATURA DEL BEBÈQuesto termometro ha un modulo speciale di comunicazione che consente di connettersi con Smartphone o tablet, inviando automaticamente i risultati di ogni misurazione per tenere traccia delle temperature.
5.8.1 RACCOMANDAZIONI1. Assicurarsi che lo smartphone o il tablet usino il sistema operativo più aggiornato. Per informazioni riguardanti le informazioni del software, si vedano le relative istruzioni del dispositivo in questione.2. Assicurarsi che il software eMyBaby venga aggiornato a intervalli regolari. Per informazioni sugli aggiornamenti, si vedano le istruzioni relative al dispositivo.3. Perché il modulo di comunicazione possa funzionare correttamente, il dispositivo mobile deve avere una carica sufficiente. Assicurarsi di avere a portata di mano un'unità di alimentazione elettrica o un dispositivo di ricarica.4. Assicurarsi che vi sia sempre memoria sufficiente per salvare i dati delle letture sullo smartphone o sul tablet.5. Se si riceve una chiamata o un messaggio di testo durante una lettura di temperatura, la lettura potrebbe essere cancellata o risultare imprecisa. Raccomandiamo pertanto di comunicare il dispositivo in modalità “aereo”.
AVVERTENZA:Questo dispositivo non deve essere usato in adiacenza o in impilamento su altra apparecchiatura; se ciò fosse impossibile, questo dispositivo deve essere osservato per verificarne il funzionamento normale nella configurazione in cui viene utilizzato.
5.8.2. Applicazione eMyBaby (FIGURA A)Questo termometro si collega con lo smartphone o il tablet per registrare e controllare la temperatura del bambino. Per utilizzare il nuovo termometro a infrarossi con lo smartphone o il tablet, come prima cosa impostare la modalità "Silenzioso" per ottimizzare la comunicazione tra i due dispositivi. Per realizzare l'operazione, mantenere premuto il pulsante voce (7) per 2 secondi, il termometro passa da una lingua all'altra ogni volta chequesto pulsante viene premuto fino a posizionarsi sul modo silenzioso .
Per scegliere la lingua desiderata o l'opzione "non parlante", in modalità di attesa premere e tenere premuto il pulsante talk (7) per circa 2 secondi e selezionare la lingua voluta.
1

Inoltre, è necessario anche installare l'applicazione gratuita eMyBaby. Per farlo,seguire le istruzioni indicate all'inizio di questo manuale.Una volta installato correttamente il software, sul dispositivo comparirà l'icona di eMyBaby .Accedere all'applicazione e seguire i seguenti passi per registrare una misurazione con il termometro:
1. Se non si dispone già di un profilo del bambino al quale misurare la temperatura, sarà necessario crearlo. Per farlo, aprire la sezione "My Baby" (Il mio bambino) dal menu principale dell'applicazione eMyBaby e seguire i passi indicati per la creazione della scheda personale.2. Accedere alla sezione "Thermometer" (Termometro) dal menu principale e selezionare il profilo del bambino per cui realizzare la misurazione. 3. Selezionare "New measure" (Nuova Misurazione) e scegliere l'opzione "aggiungere" utilizzando il termometro. 4. Misurare la temperatura del bambino così come è indicato nel paragrafo 5.2 di questo manuale .5. Dopo il secondo suono che indica l'avvenuta misurazione della temperatura, collocare l'altoparlante del termometro (6) direttamente di fronte al microfono del telefono o tablet. Tenere in considerazione che la comunicazione si realizza tramite ultrasuoni, quindi i due dispositivi devono trovarsi il più vicino possibile l'uno all'altro . 6. Il Tablet o telefono registrerà automaticamente la misurazione effettuata dal termometro. 7. Cliccare su "Save temperature" (Registrare temperatura) per salvare la misurazione nello Storico delle temperature del bambino.
Ricordare che è possibile consultare il Registro delle temperature sia dall'applicazione eMyBaby che dalla pagina web www.emybaby.com, accedendo alla sezione "Termometro".
NOTALa connessione a dispositivo mobile può non andare a buon fine in condizioni di rumore.
5.9 CALIBRAZIONEIl termometro viene calibrato in fabbrica. Se viene usato secondo le istruzioni, non è necessaria una sua ricalibrazione periodica. Se in qualsiasi momento si dovessero avere dubbi sulla precisione delle misurazioni, rivolgersi immediatamente al rivenditore.Non tentare di modificare o riassemblare il termometro.
2
3

Si sta usando il termometro in interni?
Prendere la misurazione in interni
Simbolo di batteria su display
Altri malfunzionamenti
Pile in esaurimento Sostituire con nuova pila
Contattare il servizio tecnico MINILAND
Controllare di avere lasciato stabilizzare il termometro e il paziente nella stanza per almeno 30 minuti
Tenere il termometro e il paziente nella stanza in cui avviene la misurazione per almeno 30 minuti prima dell'uso
La misurazione nonè precisa o vi sono dubbi sul risultato di misurazione
La misurazione non è precisa o vi sono dubbi sul risultato di misurazione
Assicurarsi di avere letto il manuale e di sapere come usare il termometro in modo appropriato.
“ErrP” o “ErrH” su display
“Lo” su display“Lo” su display
La temperatura misurata è superiore a 42.9 ºC/109.3 ºF.Si prega di controllare il metodo di rilevazione.
Problema di Hardware
Controllare che il sensore infrarosso sia pulito
Pulire il sensore infrarosso con un batuffolo di ovatta secondo il manuale utente.
Controllare che il modo di misurare sia corretto
Per una misurazione appropriata, seguire i passi indicati sul manuale utente.
Contattare il fabbricante o il distributore
"ErrE" su display Temperatura ambiente al di fuori dell'intervallo 10- 40 °C per misurazione su oggetti e di 15-40 °C per misurazione alla fronte
Far rientrare la temperatura ambiente nell'intervallo 10-40°C per misurazione su oggetti e di 15-40 °C per isurazione alla fronte
PROBLEMICONTROLLI DAEFFETTUARE
SOLUZIONI
Nessuna risposta/Reset automatico quando si estrae l'isolatore
“Lo” su display
Batteria esaurita
Batteria in polarità erronea
La batteria non fa bene contatto
Inserire pile nuove
Estrarre le pile, reinserirle correttamente.
La temperatura misurata è inferiore a 32.0 ºC/89.6 ºF.Si prega di controllare il metodo di rilevazione.
Per una misurazione appropriata, seguire i passi indicati sul manuale utente.
5.10. RISOLUZIONE DEI PROBLEMI

Precisione di misurazione temperatura ambiente
± 1,0 ºC ± 2,0 ºF
Intervallo di misurazione temperatura ambiente
5,0 ºC-59,9 ºC 41,0 ºF-139,8 ºF
Intervallo di misurazione temperatura oggetti
20,0 ºC-60,0 ºC 68,0 ºF-140,0 ºF
Precisione di misurazione temperatura oggetti
± 1,0 ºC ± 2,0 ºF
Intervallo di misurazione temperatura corporea
32,0 ºC-42,9 ºC 89,6 ºF-109,3 ºF
Precisione di misurazione alla fronte
En el intervalo de 35,5 ºC-42,0 ºC95,9 ºF-107,6 ºF
± 0,2 ºC± 0,4 ºF
Per altri intervalli di temperatura
± 0,3 ºC± 0,5 ºF
7. SPECIFICHE TECNICHE
6. MANUTENZIONE2. Per misurare la precisione, mettere il dispositivo in una corrente d'aria.3. Impedire che il prodotto si bagni; se si bagna, asciugarlo accuratamente. Tenere presente che i liquidi corrosivi possono danneggiarlo.4. Usare e conservare il prodotto a temperatura normale: la vita del prodotto a abbreviata se le temperature sono eccessivamente alte o basse.5. Se si prevede di non usare il termometro per qualche tempo, estrarne le pile per prevenire possibili danni dovuti a perdite chimiche. Se la pila perde, rimuoverla con cautela. Non toccare il fluido che fuoriesce dalla pila con la pelle nuda.
6.1. CURA E PULITURA6. Per assicurare misurazioni precise, tenere pulita la punta della sonda e impedire che si graffi. Impronte digitali o sporcizia condizioneranno la precisione del termometro.7. Per avere una misurazione precisa, pulire la punta della sonda.8. Per pulire il sensore, detergerne delicatamente la superficie con un batuffolo di ovatta leggermente imbevuto di alcol e asciugarlo immediatamente con un batuffolo di ovatta pulito e asciutto.9. Usare un panno asciutto e morbido per pulire il corpo del termometro. Non pulire mai il termometro con detergente abrasivo, solvente o benzene e non immergere mai il termometro in acqua o altri liquidi.10. Dopo la pulitura, lasciare asciugare il dispositivo per almeno 20 minuti prima di usarlo per misurare temperature. Collocare il termometro della custodia protettiva o nel supporto da tavolo. Conservarlo in un luogo asciutto e pulito, a temperatura ambiente.
Alimentazione elettrica DC 3V (2 pile AAA 1.5V)
Modalità di funzionamento Modo regolato
Sito di riferimento corpo Cuore

Con umidità relativa 15%-90%
-4,0 ºF-131,0 ºF-20,0 ºC-55 ºC
Ambiente di conservazione
Durata del prodotto 2 anni
59,0 ºF-104,0 ºF15,0 ºC-40,0 ºC
Con umidità relativa 20%-85%Condizione di funzionamento per rilevamento temperatura oggetti
Condizione di funzionamento per rilevamento temperatura alla fronte
Con umidità relativa 20%-85%
50,0 ºF-104,0 ºF10,0 ºC-40,0 ºC
0197
Parte applicata di tipo BF
Smaltimento secondo Direttiva 2012/19/EU (WEEE)
7.1 SIMBOLI NORMALIZZATI
Conforme a Direttiva Europea su Dispositivi Medicali (93/42/EEC)emendata da requisiti di direttiva 2007/47/EC.Corpo notificato TÜV Rheinland (0197).
Nome e indirizzo del fabbricante.
Nome e indirizzo del rappresentante autorizzato EC in Europa.
Fare riferimento al manuale di istruzioni.
Pressione atmosferica: 700hPa-1060hPa
Peso 56 g (senza batteria)
Dimensioni 89 (L) x 53 (A) x 35 (F) mm
INFORMAZIONI IMPORTANTI RIGUARDANTI LA COMPATIBILITÀ ELETTROMAGNETICA (EMC)Con un numero sempre maggiore in circolazione di dispositivi elettronici come PC e telefoni mobili (cellulari), i dispositivi medici in uso possono essere suscettibili di interferenza elettromagnetica da altri dispositivi. L'interferenza elettromagnetica può dar luogo a un funzionamento non corretto del dispositivo medico e creare una situazione potenzialmente non sicura.I dispositivi medici non dovrebbero interferire con altri dispositivi.Al fine di regolare i requisiti di EMC (Compatibilità Elettromagnetica) con l'obiettivo di prevenire situazioni di uso non sicuro del prodotto, è stato implementato lo standard EN60601-1-2. Tale standard definisce i livelli di immunità alle interferenze elettromagnetiche, nonché i livelli massimi di emissioni elettromagnetiche per i dispositivi medici.
Questo dispositivo medico è conforme a questo standard EN60601-1-2:2007 per quanto riguarda sia l'immunità che le emissioni. Tuttavia, devono essere osservate alcune precauzioni speciali:· Il dispositivo deve essere installato e messo in servizio secondo le informazioni fornite nel manuale di istruzioni.· L'uso di accessori e cavi diversi da quelli specificati dal Fabbricante, con l'eccezione di cavi venduti dal Fabbricante come parti di ricambio per componenti interni, può far sì che si abbia una maggiore emissione o una minore immunità del dispositivo.· I dispositivi medici non devono essere usati adiacenti ad altre apparecchiature o impilati su di

esse. Qualora ciò sia inevitabile, il dispositivo medico deve essere osservato per verificarne il funzionamento normale nella configurazione in cui verrà usato.· Fare riferimento all'ulteriore guida che segue, riguardante l'ambiente EMC nel quale il dispositivo dovrebbe essere usato.
Le apparecchiature di comunicazione senza fili, come dispositivi wireless di rete domestica, telefoni mobili, telefoni cordless con le loro stazioni di base, e walkie-talkie possono condizionare questa apparecchiatura e devono essere mantenute ad una distanza minima d dall'apparecchiatura. La distanza d è calcolata dal FABBRICANTE dalla colonna da 800 MHz a 2,5 GHz della Tabella 6 di IEC 60601-1-2,
Distanza di separazione raccomandata tra l'apparecchiatura di comunicazione RFportatile/mobile e lo termometro
Lo termometro è destinato all'uso in un ambiente elettromagnetico in cui i disturbi irradiati in radiofrequenza sono controllati. I clienti o gli utilizzatori di questo termometro possono contribuire a prevenire l'interferenza elettromagnetica mantenendo una distanza minima tra apparecchiature di comunicazione in radiofrequenza portatile/mobile (trasmettitori) e lo termometro, come raccomandato di seguito, secondo la potenza massima di uscita dell'apparecchiatura di comunicazione.
Potenza di uscitadel trasmettitorein Watt
Distanza di separazione secondo la frequenzadel trasmettitore in metri
da 150 kHza 80 MHzd = 1,2 √P
da 80 MHza 800 MHzd = 1,2 √P
da 800 MHza 2,5GHzd = 2,3 √P
0.01 0.12 0.12 0.23
0.1 0.38 0.38 0.78
1 1.2 1.2 2.3
10 3.8 3.8 7.3
100 12 12 23
Per trasmettitori con potenza massima di uscita nominale non è elencata qui sopra, la distanza di separazione raccomandata d in metri (m) può essere stimata usando l'equazione applicabile alla frequenza del trasmettitore, dove P è la potenza massima di uscita nominale del trasmettitore in watt (W) secondo le specifiche fornite dal fabbricante del trasmettitore.Nota: A 80MHz e 800MHz si applica la distanza di separazione per il range di frequenza più elevato Nota: Queste linee guida possono non applicarsi in tutte le situazioni. La propagazione elettromagnetica è condizionata da assorbimento e riflessione di strutture, oggetti e persone.
8. INFORMAZIONI RELATIVE ALLO SMALTIMENTO DELLE PILE E DEL PRODOTTO· Ricordare di togliere le pile e smaltirle in modo responsabile al momento della dismissione del dispositivo vigilbebè · Non mescolare prodotti che recano il simbolo del contenitore per rifiuti cancellato con i rifiuti domestici.· Per il corretto trattamento di questo tipo di rifiuti è necessario portarli al punto di raccolta designato dalle Autorità Locali. In alternativa, è possibile contattare il punto di vendita ove il prodotto è stato acquistato.
SPIS TREŚCI1. Wstęp 2. Zawartość 3. Instrukcje bezpieczeństwa 4. Cechy produktu 5. Instrukcja użytkowania 6. Konserwacja 7. Specyfikacja techniczna 8. Informacje o utylizacji baterii i produktu
1. WSTĘPGratulujemy zakupu mówiącego klinicznego termometru na podczerwień.
Przed użyciem należy dokładnie przeczytać niniejszą instrukcję. Zachowaj ją do przyszłego wykorzystania, gdyż zawiera ważne informacje.
Funkcje opisane w niniejszej instrukcji mogą podlegać zmianom bez uprzedniego powiadomienia.
2. ZAWARTOŚĆ - 1 bezdotykowy mówiący termometr na podczerwień- 1 futerał podróżny- 2 baterie AAA- 1 instrukcja obsługi i gwarancja
W przypadku braku któregokolwiek z powyższych elementów skontaktuj się ze sprzedawcą.
3. INSTRUKCJE BEZPIECZEŃSTWA1. To urządzenie nie jest zabawką; nie pozwalaj dzieciom bawić się nim.2. Przechowuj termometr poza zasięgiem dzieci.3. Przed użyciem uważnie przeczytaj instrukcję i zachowaj ją do przyszłego wykorzystania.4. Użycie termometru nie zastępuje konsultacji z lekarzem. Wyniki pomiaru mają znaczenie wyłącznie informacyjne. W przypadku odczuwania lub podejrzenia problemów zdrowotnych skontaktuj się z lekarzem.5. Baterie muszą być założone zgodnie z polaryzacją.6. Zużyte baterie muszą zostać usunięte.7. Nie wrzucaj baterii do ognia. Może to spowodować ich wybuch.8. Nie próbuj otwierać lub demontować urządzenia. W takim przypadku producent nie bierze odpowiedzialności za uszkodzenia.9. Nie demontuj, nie naprawiaj i nie wymieniaj żadnych części urządzenia.10. Nie używaj termometru, jeśli jego korpus jest uszkodzony (na przykład element podczerwieni). Kontynuowanie użytkowania uszkodzonego urządzenia może spowodować obrażenia, nieprawidłowe wyniki lub poważne zagrożenie.11. Nie potrząsaj i nie uderzaj termometru. Nie rzucaj nim.12. Czujnik podczerwieni musi być przez cały czas czysty, suchy i nieuszkodzony
POLSKI

dla zapewnienia dokładnych pomiarów.13. Nie używaj urządzenia w pobliżu silnych nadajników, takich jak kuchenka mikrofalowa lub urządzenia krótkofalowe.14. Produkt wymaga szczególnych środków ostrożności w zakresie zgodności elektromagnetycznej i musi być instalowany i użytkowany zgodnie z podanymi informacjami zgodności elektromagnetycznej, może też wpływać na stacjonarne i przenośne urządzenia komunikacyjne, używające częstotliwości radiowych.15. W celu zapewnienia dokładnych odczytów aplikacji eMyBaby zachowaj minimalną odległość około 30 cm od innych urządzeń bezprzewodowych.16. Nie przechowuj termometru w skrajnych temperaturach (poniżej -20°C lub powyżej 55°C) i wilgotności (poniżej 15% lub powyżej 90% wilgotności względnej). Może to spowodować brak dokładności.17. Urządzenie jest przeznaczone do okazjonalnego odczytu i monitorowania temperatury ludzkiego ciała lub przedmiotów w środowisku domowym. Nie używaj go do innych celów.
Pamiętaj, że zmiany i modyfikacje urządzenia, nie wykonane przez serwis MINILAND nie będą objęte gwarancją.
4. CECHY PRODUKTU 4.1. OPIS CZĘŚCI4.1.1. TERMOMETR1. Pomiar temperatury na czole2. Czujnik podczerwieni3. Lampka4. Osłona baterii5. Ustawienia/pamięć6. Głośnik7. Przycisk mówienia8. Pomiar temperatury przedmiotu9. Wyświetlacz ciekłokrystaliczny
9
8

4.1.2. WYŚWIETLACZ CIEKŁOKRYSTALICZNYA. TemperaturaB. PM (format czasu)C. Symbol pamięciD. Symbol rozładowania bateriiE. Symbol pomiaru temperatury w pomieszczeniuF. Symbol pomiaru temperatury przedmiotuG. Symbol pomiaru temperatury na czoleH.Symbol gorączka
5. INSTRUKCJA UŻYTKOWANIA5.1. PRZED UŻYCIEM5.1.1. ZALECENIA1. W celu uzyskania dokładnych pomiarów bardzo ważne jest sprawdzenie czystości czujnika podczerwieni przed użyciem.2. Jeśli temperatura miejsca przechowywania różni się znacząco od temperatury obszaru pomiaru, odczekaj około 30 minut przed pomiarem na wyrównanie się tych temperatur.3. Nie dotykaj i nie dmuchaj na czujnik podczerwieni. Zanieczyszczony czujnik podczerwieni może spowodować brak dokładności.4. Pamiętaj, że w trybie oczekiwania wyświetlacz pokazuje cyklicznie godzinę, datę i temperaturę w pomieszczeniu.
5.1.2. INSTALACJA/USUWANIE BATERIIGdy na wyświetlaczu pojawi się symbol rozładowania baterii (D), lub gdy termometr w ogóle nie działa, należy jak najszybciej założyć nowe baterie.Produkt ten używa dwóch baterii AAA 1,5 V, w celu ich wymiany lub instalacji postępuj następująco:1. Otwórz pokrywę baterii w kierunku wskazanym przez strzałkę.2. Wyjmij stare baterie i włóż do komory nowe. Sprawdź, czy baterie zostały założone prawidłowo; należy dopasować oznaczenia dodatnich i ujemnych biegunów baterii do oznaczeń w komorze.3. Załóż pokrywę baterii i dociśnij w celu zamknięcia.
5.2. POMIAR TEMPERATURY NA CZOLE· Sprawdź, czy czujnik przed pomiarem jest czysty.· Tłuszcz na czole może powodować niedokładny pomiar, upewnij się więc, że jest ono czyste. Po czyszczeniu czoła odczekaj 5-10 minut do pomiaru.· Czynniki zewnętrzne mogą wpływać na temperaturę czoła, szczególnie gdy osoba była narażona na bardzo wysokie lub niskie temperatury, niedawno pływała lub kąpała się. W takich przypadkach należy ją zabrać z takie sytuacji i odczekać 30 minut przed pomiarem.· Temperatura czoła i skroni różni się od temperatury wewnętrznej, mierzonej doustnie lub doodbytniczo. We wczesnych etapach gorączki może wystąpić zwężenie naczyń krwionośnych, powodujące schłodzenie skóry. W takim
A
B C D
EFG
FE
H
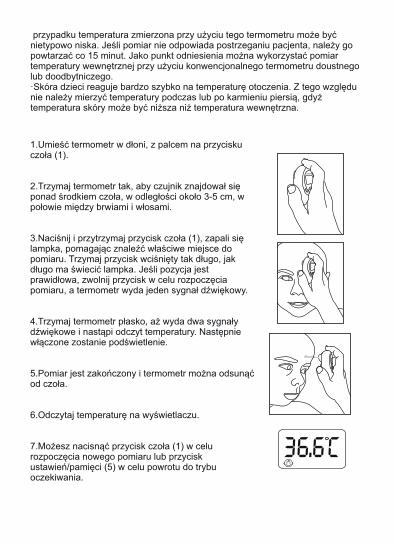
przypadku temperatura zmierzona przy użyciu tego termometru może być nietypowo niska. Jeśli pomiar nie odpowiada postrzeganiu pacjenta, należy go powtarzać co 15 minut. Jako punkt odniesienia można wykorzystać pomiar temperatury wewnętrznej przy użyciu konwencjonalnego termometru doustnego lub doodbytniczego.· Skóra dzieci reaguje bardzo szybko na temperaturę otoczenia. Z tego względu nie należy mierzyć temperatury podczas lub po karmieniu piersią, gdyż temperatura skóry może być niższa niż temperatura wewnętrzna.
1. Umieść termometr w dłoni, z palcem na przycisku czoła (1).
2. Trzymaj termometr tak, aby czujnik znajdował się ponad środkiem czoła, w odległości około 3-5 cm, w połowie między brwiami i włosami.
3. Naciśnij i przytrzymaj przycisk czoła (1), zapali się lampka, pomagając znaleźć właściwe miejsce do pomiaru. Trzymaj przycisk wciśnięty tak długo, jak długo ma świecić lampka. Jeśli pozycja jest prawidłowa, zwolnij przycisk w celu rozpoczęcia pomiaru, a termometr wyda jeden sygnał dźwiękowy.
4. Trzymaj termometr płasko, aż wyda dwa sygnały dźwiękowe i nastąpi odczyt temperatury. Następnie włączone zostanie podświetlenie.
5. Pomiar jest zakończony i termometr można odsunąć od czoła.
6. Odczytaj temperaturę na wyświetlaczu.
7. Możesz nacisnąć przycisk czoła (1) w celu rozpoczęcia nowego pomiaru lub przycisk ustawień/pamięci (5) w celu powrotu do trybu oczekiwania.
36.6c

0-2 lat 36.4ºC-38.0ºC 97.5ºF-100.4ºF
3-10 lat 36.1ºC-37.8ºC 97.0ºF-100.0ºF
11-65 lat 35.9ºC-37.6ºC 96.6ºF-99.7ºF
> 65 lat 35.8ºC-37.5ºC 96.4ºF-99.5ºF
Zakres ten zmienia się w zależności od osoby oraz może podlegać wpływowi takich czynników jak pora dnia, poziom aktywności, leki, emocje itp.Zalecamy więc przećwiczenie użytkowania termometru na sobie i członkach rodziny, gdy jesteście zdrowi. W ten sposób można nauczyć się, jak działa termometr, i nabrać pewności co do pomiarów, gdy członek rodziny jest chory.
UWAGA: Jeśli zmierzona temperatura osiąga lub przekracza 38°C, wyświetlacz pokaże symbol gorączki i będzie podświetlony na czerwono.
5.2.1. WSKAZANIA PODŚWIETLENIAPodświetlenie wyświetlacza włączy się po zakończeniu pomiaru temperatury ciała w następujący sposób:Niebieskie podświetlenie: poniżej 37,9°C (100,3°F)Czerwone podświetlenie: 38,0°C – 42,9°C (100,4°F – 109,3°F)
5.3. POMIAR TEMPERATURY PRZEDMIOTU· Sprawdź, czy czujnik przed pomiarem jest czysty.· Nie używaj tego trybu do pomiaru temperatury ciała.· Przy pomiarze wyświetlana jest aktualna temperatura powierzchni przedmiotu. Może ona różnić się od jego temperatury wewnętrznej, szczególnie gdy powierzchnia jest wystawiona na bezpośrednie nasłonecznienie lub przeciąg.
UWAGA Lampka pozostaje włączona przez cały czas, gdy wciśnięty jest przycisk pomiaru. Lampka gaśnie po zwolnieniu przycisku. Lampka gaśnie automatycznie, jeśli przycisk czoła (1) jest wciśnięty dłużej niż jedną minutę; po zwolnieniu przycisku urządzenie powraca do trybu oczekiwania.
Normalna temperatura ciała mieści się w pewnym zakresie. Zakres ten obniża się wraz z wiekiem. Poniższa tabela przedstawia zakresy normalnej temperatury w zależności od wieku:
1. Umieść termometr w dłoni, z palcem na przycisku przedmiotu (8). 2. Trzymaj termometr tak, aby czujnik znajdował się w odległości 3-5 cm od płynu i/lub powierzchni, której temperaturę chcesz zmierzyć.

3. Naciśnij przycisk przedmiotu (8) w celu rozpoczęcia pomiaru, a termometr wyda jeden sygnał dźwiękowy.
4. Odsuń termometr od przedmiotu. Wyświetlacz pokaże zmierzoną temperaturę.
5. Możesz nacisnąć przycisk przedmiotu (8) w celu rozpoczęcia nowego pomiaru lub przycisk ustawień/pamięci (5) w celu powrotu do trybu oczekiwania. 52.7c5.4. SPRAWDZANIE PAMIĘCIIstnieje w sumie 9 pozycji pamięci do zapisu pomiarów temperatury czoła.Bieżący pomiar jest zawsze zapisywany w ostatnim miejscu pamięci. Gdy wszystkie miejsca pamięci są zajęte, najstarszy pomiar jest zawsze kasowany z pamięci.
8 36.4c 12.23 2-14
1. Naciśnij przycisk ustawień/pamięci (5) w celu sprawdzenia numeru pamięci, temperatury i daty.2. Naciskaj wielokrotnie przycisk ustawień/pamięci (5) w celu sprawdzenia temperatury w pamięci.3. Naciśnij i przytrzymaj przycisk ustawień/pamięci (5) w celu szybkiego sprawdzenia danych w pamięci.4. Naciśnij równocześnie przycisk pomiaru przedmiotu (8) i czoła (1) w celu powrotu do trybu oczekiwania.
5.5. USTAWIANIE DATY I GODZINY
1. Naciśnij i przytrzymaj przycisk ustawień/pamięci (5) w trybie oczekiwania na około 2 sekundy, aby przejść do trybu ustawień.
Numerupamięci
Temperatury Godziny Daty

2. Naciśnij ponownie przycisk ustawień/pamięci (5), aby wybrać spośród ustawień trybu godziny (12- lub 24-godzinny, po wybraniu 12-godzinnego na wyświetlaczu pojawi się „PM”), godziny, minut, roku (2001-2099), miesiąca, dnia, roku i trybu uśpienia (włączony lub wyłączony).
3. Naciśnij przycisk mówienia (7), aby potwierdzić ustawienie i przejść do kolejnego.
12
off
Gdy włączony jest tryb uśpienia, termometr będzie wyłączaćsię automatycznie po około 3 minutach; gdy tryb ten jestwyłączony, termometr będzie pozostawać włączony. W celuoszczędzania energii zalecamy włączenie trybu uśpienia.
5.6. KOMUNIKAT GŁOSOWYNaciśnij przycisk mówienia (7), aby uzyskać komunikat o bieżącym pomiarze temperatury, aktualnej godzinie lub temperaturze w pomieszczeniu.Po każdym pomiarze na czole termometr przedstawia raport o uzyskanej temperaturze w wybranym języku.
Termometr prezentuje temperaturę przy użyciu komunikatu głosowego w jednym z sześciu języków: hiszpańskim, angielskim, niemieckim, francuskim, włoskim i rosyjskim.
· W celu wybrania żądanego języka lub opcji braku głosu w trybie oczekiwania naciśnij i przytrzymaj przycisk mówienia (7) na około 2 sekundy, aby wybrać język; nastąpi przełączanie między językami i brakiem głosu.
AudioFunkcja Hiszpańskim Angielskim Niemieckim Francuskim Włoskim Rosyjskim
Temperatury (ºC)
Temperatury (ºF)
Godzinie
Temperaturze wpomieszczeniu (ºC)
Temperaturze wpomieszczeniu (ºF)

5.7. PRZEŁĄCZANIE MIĘDZY STOPNIAMI CELSJUSZA I FAHRENHEITAGdy wyświetlacz pokazuje temperaturę z odczytu lub pamięci, naciśnij i przytrzymaj przycisk mówienia (7) na około 3 sekundy, co spowoduje zmianę trybu na °F lub °C.
5.8. KONTROLA TEMPERATURY DZIECKATermometr ma specjalny moduł komunikacyjny, pozwalający na połączenie ze smartfonem lub tabletem w celu śledzenia temperatury.
5.8.1. ZALECENIA1. Upewnij się, że twój smartfon lub tablet korzysta z najnowszej wersji systemu operacyjnego. Informacje na temat aktualizacji są podane w instrukcji urządzenia.2. Upewnij się, że aplikacja eMyBaby jest regularnie aktualizowana. Informacjena temat aktualizacji są podane w instrukcji urządzenia.3. Aby moduł komunikacji działał prawidłowo urządzenie mobilne musi być wystarczająco naładowane. Użytkownicy powinni mieć dostęp do zasilacza lub ładowarki.4. Upewnij się, że smartfon lub tablet ma wystarczającą ilość pamięci do zapisu danych odczytów.5. Jeśli podczas odczytu odbierzesz połączenie lub wiadomość tekstową, odczyt może zostać anulowany lub dać niedokładny pomiar. Zalecamy przełączenie urządzenia w tryb lotniczy.
UWAGA:Urządzenie nie powinno być stosowane w pobliżu lub w stosie z innymi urządzeniami, a jeśli jest to konieczne, należy sprawdzić, czy w takiej konfiguracji występuje normalne działanie.
5.8.2. Aplikacja eMyBaby (RYSUNEK A)Termometr łączy się ze smartfonem lub tabletem w celu rejestrowania i monitorowania temperatury dziecka.Aby móc korzystać z nowego termometru na podczerwień w smartfonie lub tablecie, najpierw należy przejść w tryb cichy, by komunikacja między urządzeniem a telefonem komórkowym lub tabletem przebiegała w sposób optymalny. W tym celu należy przytrzymać przycisk głośności (7) około 2 sekundy, a wówczas ustawienia językowe termometru zaczną się zmieniać po każdym naciśnięciu przycisku, aż do przejścia w tryb cichy . Ponadto należy również zainstalować bezpłatną aplikację eMyBaby. W tym celu należy postępować zgodnie ze wskazówkami podanymi na początku niniejszej instrukcji. Po pomyślnym zainstalowaniu oprogramowania w urządzeniu pojawi się ikona aplikacji eMyBaby .Należy otworzyć aplikację i wykonać poniższe kroki, aby móc rejestrować wartości wskazywane przez termometr:
1
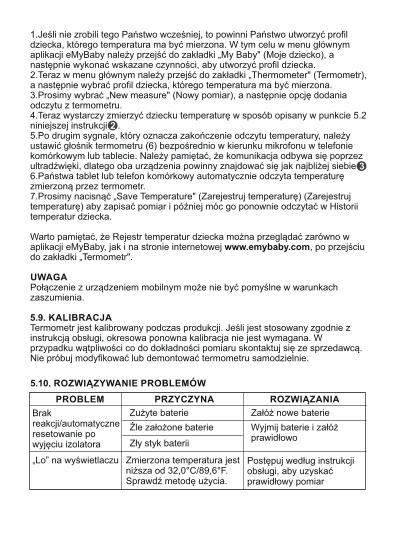
„Lo” na wyświetlaczu Zmierzona temperatura jest niższa od 32,0°C/89,6°F.Sprawdź metodę użycia.
Postępuj według instrukcji obsługi, aby uzyskać prawidłowy pomiar
PROBLEM PRZYCZYNA ROZWIĄZANIA
Brak reakcji/automatyczne resetowanie po wyjęciu izolatora
Zużyte baterie
Źle założone baterie
Zły styk baterii
Załóż nowe baterie
Wyjmij baterie i załóż prawidłowo
5.10. ROZWIĄZYWANIE PROBLEMÓW
1. Jeśli nie zrobili tego Państwo wcześniej, to powinni Państwo utworzyć profil dziecka, którego temperatura ma być mierzona. W tym celu w menu głównym aplikacji eMyBaby należy przejść do zakładki „My Baby" (Moje dziecko), a następnie wykonać wskazane czynności, aby utworzyć profil dziecka.2. Teraz w menu głównym należy przejść do zakładki „Thermometer" (Termometr), a następnie wybrać profil dziecka, którego temperatura ma być mierzona. 3. Prosimy wybrać „New measure" (Nowy pomiar), a następnie opcję dodania odczytu z termometru. 4. Teraz wystarczy zmierzyć dziecku temperaturę w sposób opisany w punkcie 5.2 niniejszej instrukcji .5. Po drugim sygnale, który oznacza zakończenie odczytu temperatury, należy ustawić głośnik termometru (6) bezpośrednio w kierunku mikrofonu w telefonie komórkowym lub tablecie. Należy pamiętać, że komunikacja odbywa się poprzez ultradźwięki, dlatego oba urządzenia powinny znajdować się jak najbliżej siebie .6. Państwa tablet lub telefon komórkowy automatycznie odczyta temperaturę zmierzoną przez termometr. 7. Prosimy nacisnąć „Save Temperature" (Zarejestruj temperaturę) (Zarejestruj temperaturę) aby zapisać pomiar i później móc go ponownie odczytać w Historii temperatur dziecka.
Warto pamiętać, że Rejestr temperatur dziecka można przeglądać zarówno w aplikacji eMyBaby, jak i na stronie internetowej www.emybaby.com, po przejściu do zakładki „Termometr".
UWAGAPołączenie z urządzeniem mobilnym może nie być pomyślne w warunkach zaszumienia.
5.9. KALIBRACJATermometr jest kalibrowany podczas produkcji. Jeśli jest stosowany zgodnie z instrukcją obsługi, okresowa ponowna kalibracja nie jest wymagana. W przypadku wątpliwości co do dokładności pomiaru skontaktuj się ze sprzedawcą.Nie próbuj modyfikować lub demontować termometru samodzielnie.
2
3

6. KONSERWACJA· Umieść w przeciągu w celu pomiaru dokładności.· Unikaj zamaczania produktu, a jeśli tak się stanie, osusz go starannie. Pamiętaj, że korozyjne płyny mogą spowodować uszkodzenia.· Używaj i przechowuj urządzenie w normalnej temperaturze, gdyż zbyt wysokie lub niskie temperatury skrócą żywotność produktu.· Jeśli termometr nie jest regularnie używany, wyjmij baterie w celu uniknięcia możliwych uszkodzeń na skutek wycieku. Jeśli dojdzie do wycieku baterii, wyjmij je ostrożnie. Unikaj kontaktu odsłoniętej skóry z wyciekiem.
Symbol baterii na wyświetlaczu
Inne usterki
Załóż nową baterię
Skontaktuj się z serwisem MINILAND
„ErrP” lub „ErrH” na wyświetlaczu
Pomiar nie jest dokładny lub istnieją wątpliwości co do wyniku
Problem sprzętowy
Sprawdź, czy czujnik podczerwieni jest czysty
Oczyść czujnik podczerwieni bawełnianym wacikiem zgodnie z instrukcją obsługi
Sprawdź, czy sposób pomiaru jest prawidłowy
Upewnij się, że przeczytałeś instrukcję obsługi i wiesz, jak właściwie używać termometru
Sprawdź, czy termometr i pacjent ustabilizowali się pomieszczeniu przez co najmniej 30 minut
Umieść termometr i pacjenta w pomieszczeniu pomiaru na co najmniej 30 minut przed użyciem
Czy termometr jest używany wewnątrz?
Korzystaj z termometru wewnątrz
Skontaktuj się z producentem lub dystrybutorem
„ErrE” na wyświetlaczu
Temperatura otoczenia poza zakresem 10°C~40°C (50.0°F~104.0°F) Dla obiektów 15°C~40°C (59.0°F~104.0°F) Dla czoła
Przetrzymać termometr w temperaturzeotoczenia 10°C~40°C (50.0°F~104.0°F)dla obiektów 15°C~40°C (59.0°F~ 104.0°F) Dla czoła
Rozładowana bateria
„Hi” na wyświetlaczu Zmierzona temperatura jest wyższa od 42,9°C/109,3°F.Sprawdź metodę użycia.
Postępuj według instrukcji obsługi, aby uzyskać prawidłowy pomiar
PROBLEM PRZYCZYNA ROZWIĄZANIA

50,0 ºF-104,0 ºF10,0 ºC-40,0 ºC
Waga 56 g (bez baterii)
59,0 ºF-104,0 ºFWarunki pomiaru na czole
Wilgotność względna 20%-85%
15,0 ºC-40,0 ºC
Wilgotność względna 20%-85%Warunki pomiaru przedmiotu
Zasilanie 3 V prądu stałego (dwie baterie AAA 1,5 V)
Zakres pomiaru temperatury ciała
32,0 ºC-42,9 ºC 89,6 ºF-109,3 ºF
Dokładność pomiaru na czole
W zakresie 35,5 ºC-42,0 ºC95,9 ºF-107,6 ºF
± 0,2 ºC± 0,4 ºF
Dla innego zakresu ± 0,3 ºC± 0,5 ºF
Zakres pomiaru przedmiotu
Dokładność pomiaru przedmiotu
20,0 ºC-60,0 ºC 68,0 ºF-140,0 ºF
± 1,0 ºC ± 2,0 ºF
Dokładność temperatury pomieszczenia
Wymiary 89 (L) x 53 (A) x 35 (F) mm
Zakres temperatury pomieszczenia
5,0 ºC-59,9 ºC 41,0 ºF-139,8 ºF
± 1,0 ºC ± 2,0 ºF
6.1. CZYSZCZENIE· Dla zapewnienia dokładnych pomiarów utrzymuj czujnik w czystości i chroń przed zarysowaniami. Odciski palców lub zanieczyszczenia mają wpływ na dokładność termometru.· W celu uzyskania dokładnego pomiaru oczyść czujnik.· Aby wyczyścić czujnik delikatnie wytrzyj jego powierzchnię bawełnianym wacikiem, lekko nasączonym alkoholem, i natychmiast wytrzyj do sucha czystym wacikiem.· Użyj miękkiej, suchej szmatki do oczyszczenia korpusu termometru. Nigdy nie czyść termometru środkami ciernymi, rozpuszczalnikami lub benzyną i nie zanurzaj go w wodzie lub innych płynach.· Po czyszczeniu pozostaw urządzenie do wyschnięcia na co najmniej 20 minut przed pomiarem temperatury. Umieszczaj termometr w futerale lub na stabilnej podstawce. Przechowuj w suchym, czystym miejscu w temperaturze pokojowej.
7. SPECYFIKACJA TECHNICZNA
Tryb pracy Ustaw tryb
Odwołanie strony ciała Serce

Użyta część typu BF
Usuwać zgodnie z Dyrektywą 2012/19/EU (WEEE).
7.1. STOSOWANE SYMBOLE
Zgodność z wymogami Dyrektywy Urządzeń Medycznych 93/42/EWG,zmienionej przez Dyrektywę 2007/47/WE.Notyfikowana jednostka TÜV Rheinland (0197).
Nazwa i adres producenta.
Nazwa i adres autoryzowanego przedstawiciela w Europie.
Patrz instrukcja obsługi.
0197
-4,0 ºF-131,0 ºF-20,0 ºC-55 ºC
Okres trwałości urządzenia
2 lat
Ciśnienie atmosferyczne: 700hPa-1060hPa
Wilgotność względna 15%-90%Warunki przechowywania
WAŻNA INFORMACJA DOTYCZĄCA KOMPATYBILNOŚCI ELEKTROMAGNETYCZNEJ (EMC)Wraz z wzrastającą ilością urządzeń elektronicznych, takich jak komputery i komórki, używane urządzenia medyczne mogą być wrażliwe na zakłócenia elektromagnetyczne pochodzące z innych urządzeń. Zakłócenia elektromagnetyczne mogą doprowadzać do niepoprawnego działania urządzenia medycznego i tworzyć potencjalnie niebezpieczną sytuację.Urządzenia medyczne nie powinny zatem interferować z innymi urządzeniami.W celu uporządkowania wymagań dla EMC (kompatybilności elektromagnetycznej), w celu zapobiegania potencjalnie niebezpiecznym sytuacjom dla produktu, wprowadzono normę EN60601-1-2. Norma ta definiuje poziomy odporności na zakłócenia elektromagnetyczne, jak również maksymalne poziomy emisji elektromagnetycznej urządzeń medycznych.
Ten produkt medyczny spełnia normę EN60601-1-2:2007 zarówno w zakresie odporności, jak i emisji. Niemniej jednak należy przestrzegać specjalnych środków ostrożności:· Urządzenie powinno być zainstalowane i oddane do eksploatacji zgodnie z informacjami zawartymi w niniejszym podręczniku.· Użycie innych akcesoriów i kabli od wyspecyfikowanych przez producenta, za wyjątkiem kabli sprzedawanych przez producenta, jako części zamienne dla urządzeń wewnętrznych, może doprowadzać do zwiększenia emisji lub zmniejszenia odporności urządzenia.· Urządzenia medyczne nie powinny być używane w sąsiedztwie lub w zestawieniu z innymi urządzeniami. W przypadku, gdy sąsiedztwo lub zestawienie jest konieczne, urządzenie medyczne powinno być obserwowane, w celu sprawdzenia normalnej pracy w konfiguracji, w jakiej będzie używane.· Proszę zapoznać się z poniższym przewodnikiem dotyczącym EMC środowiska, w jakim urządzenie powinno być używane.
Bezprzewodowe urządzenia komunikacyjne, takie jak bezprzewodowe urządzenia sieci domowej, telefony komórkowe, telefony bezprzewodowe i ich stacje bazowe, przenośne radiotelefony mogą wpływać na to urządzenie i powinny być utrzymywane co najmniej w

odległości d od tego urządzenia. Odległość d jest obliczona przez producenta w kolumnie od 800 MHz do 2,5 GHz Tabeli 6 IEC 60601-1-2,
Zalecany odstęp między przenośnym i mobilnym urządzeniem komunikacyjnymczęstotliwości radiowej RF a
termometr jest przewidziany do użytkowania w środowisku elektromagnetycznym, w którym zakłócenia promieniowania RF są kontrolowane. Klienci lub użytkownicy tych termometr mogą pomóc zapobiec zakłóceniom elektromagnetycznym przez utrzymanie minimalnej odległości między przenośnymi lub mobilnymi urządzeniami komunikacji RF (nadajnikami), a termometr, jak zalecono poniżej, zależnie od maksymalnej mocy wyjściowej urządzenia komunikacyjnego.
Moc wyjściowa nadajnika w watach
Odstęp zależnie od częstotliwości nadajnika w metrach
150 kHz do80 MHz
d = 1,2 √P
80 MHz do800 MHz
d = 1,2 √P
800 MHz do2,5 GHz
d = 2,3 √P
0.01 0.12 0.12 0.23
0.1 0.38 0.38 0.78
1 1.2 1.2 2.3
10 3.8 3.8 7.3
100 12 12 23
Dla nadajników o maksymalnej mocy nominalnej nie wymienionej powyżej, zalecany odstęp d w metrach (m) może być wyznaczony za pomocą równania stosowanego do częstotliwości nadajnika, gdzie P jest maksymalną nominalną mocą wyjściową nadajnika w watach (W) według producenta nadajnika.Uwaga: Przy 80MHz i 800MHz, stosuje się odległość dla największego zakresu częstotliwości Uwaga: Te wytyczne nie mogą być stosowane we wszystkich okolicznościach. Propagacja elektromagnetyczna dokonuje się przez absorpcję i odbicie od konstrukcji, przedmiotów i ludzi.
8. INFORMACJE O UTYLIZACJI BATERII I PRODUKTU· Baterie należy utylizować zgodnie z obowiązującymi przepisami.· Nie można mieszać odpadów oznaczonych przekreślonym pojemnikiem z odpadami komunalnymi.· Należy utylizować w miejscach do tego przewidzianych lokalnymi przepisami. Można również skontaktować się z punktem sprzedaży, gdzie zakupiono produkt.

ОГЛАВЛЕНИЕ1. Введение 2. Комплектация 13. Указания по безопасности 24. Основные характеристики изделия 25. Инструкции по использованию 6. Обслуживание 27. Технические характеристики 28. Порядок утилизации батарей и устройства
1. ВВЕДЕНИЕПоздравляем Вас с покупкой инфракрасного медицинского термометра с голосовой функцией!
Внимательно прочитайте эту инструкцию перед использованием данного устройства. Сохраните инструкцию, поскольку она содержит важную информацию.
Характеристики, описанные в этой инструкции, могут быть изменены без предварительного уведомления.
2. КОМПЛЕКТАЦИЯ- 1 инфракрасный термометр с голосовой функцией- 1 сумка для хранения и перевозки- 2 батарейки AAA- 1 инструкция и гарантия
При отсутствии какого-либо из вышеуказанных элементов обратитесь к продавцу.
3. УКАЗАНИЯ ПО БЕЗОПАСНОСТИ1. Данное устройство не является игрушкой; не позволяйте детям играть с ним.2. Храните термометр вне досягаемости детей.3. Перед использованием внимательно прочитайте инструкцию и сохраните ее для дальнейшего использования.4. Использование данного термометра не заменяет консультации с врачом. Результаты измерений следует использовать исключительно в справочных целях. При возникновении проблем со здоровьем или подозрении на них следует обратиться к врачу.5. Убедитесь, что батарейки вставлены правильно.6. Использованные батарейки следует извлечь.7. Запрещается бросать батарейки в огонь. При попадании в огонь батарейка может взорваться.8. Никогда не пытайтесь открыть какую-либо часть прибора или разобрать элементы управления. При несоблюдении данных инструкций мы не несем ответственности за поломку термометра.9. Запрещается разбирать, ремонтировать или менять какие-либо части устройства.10. Не используйте термометр при повреждении корпуса прибора (например,
PУССКИЙ

9
8
при повреждении инфракрасного датчика). Длительное использование поврежденного прибора может привести к травме, неправильным результатам измерений или к серьезной опасности.11. Не следует трясти термометр или стучать по нему. Не бросать.12. Для обеспечения точных измерений инфракрасный датчик должен всегда оставаться чистым, сухим и неповрежденным.13. Не используйте термометр вблизи сильных радиопередающих устройств, таких как микроволновые или коротковолновые приборы.14. Данное изделие требует особых мер предосторожности относительно электромагнитной совместимости (ЭМС), поэтому его установка и ввод в эксплуатацию должны выполняться в соответствии с имеющейся информацией по ЭМС; на работу данного термометра могут влиять переносные и мобильные устройства радиосвязи.15. Для обеспечения точности показаний приложения eMyBaby измерения следует проводить как минимум в 30 см от других беспроводных устройств.16. При хранении термометра следует избегать крайних значений температуры (ниже -20ºC/-4ºF или выше 55ºC/131ºF) и влажности (ниже 15% о.в. или выше 90% о.в.). Несоблюдение этих условий может привести к неточности измерений.17. Данное устройство предназначено для периодического измерения и контроля температуры тела или предметов в домашних условиях. Использовать изделие в каких-либо других целях запрещается.
Изменения и модификации, выполненные с данным устройством без участия сервисной службы MINILAND, не покрываются гарантией на изделие.
4. ОСНОВНЫЕ ХАРАКТЕРИСТИКИ ИЗДЕЛИЯ4.1. ОПИСАНИЕ ЭЛЕМЕНТОВ4.1.1. ТЕРМОМЕТР1. Кнопка для измерения температуры тела на лбу2. Инфракрасный датчик3. Фонарик4. Крышка отсека батареек5. Кнопка [Set/Mem] (Установка/Память) 6. Динамик7. Голосовая кнопка8. Кнопка для измерения температуры предметов

4.1.2. ЖК-дисплейA. Отображение температурыB. PM (формат времени)C. Значок памятиD. Индикатор низкого заряда батареекE. Значок измерения температуры в помещенииF. Значок измерения температуры предметовG. Значок измерения температуры тела на лбуH.Символ лихорадка
5. ИНСТРУКЦИИ ПО ИСПОЛЬЗОВАНИЮ5.1. ПЕРЕД ИСПОЛЬЗОВАНИЕМ5.1.1. РЕКОМЕНДАЦИИ1. Для получения точных измерений необходимо убедиться в отсутствии каких-либо загрязнений на инфракрасном датчике.2. Для компенсации температурной разницы между помещением, где хранится прибор, и местом проведения измерения оставьте термометр на 30 минут при комнатной температуре (в помещении, где будет производиться измерение).3. Не прикасайтесь к инфракрасному датчику и не дуйте на него. Загрязнённость инфракрасного датчика может вызвать погрешность измерения.4. Помните, что в режиме ожидания ЖК-дисплей попеременно показывает время, дату и комнатную температуру.
5.1.2. УСТАНОВКА/ИЗВЛЕЧЕНИЕ БАТАРЕЕККогда на ЖК-дисплее появляется индикатор низкого заряда батареек или термометр не включается совсем, батарейки следует как можно скорее заменить.В данном изделии используются батарейки AAA 1,5 В. Чтобы заменить или вставить батарейки, используйте следующий порядок действий:1. Отодвиньте крышку отсека батареек в направлении стрелки.2. (Извлеките из отсека старые батарейки, после чего) вставьте туда новые. Убедитесь в том, что батарейки установлены правильно; положительный и отрицательный полюса батареек обязательно должны совпадать с отметками в отсеке термометра.3. Накройте отсек крышкой и плотно закройте, прижав ее.
5.2. ИЗМЕРЕНИЕ ТЕМПЕРАТУРЫ ТЕЛА НА ЛБУ· Перед измерением убедитесь, что датчик не загрязнен.· Жировой слой на поверхности кожи лба может вызвать погрешности измерения, поэтому убедитесь, что лоб чистый. Прежде чем приступать к измерению после очистки лба, следует подождать 5-10 минут.· На температуру тела могут влиять внешние факторы, например, воздействие высоких или низких температур, плавание или водные процедуры. В этих случаях следует устранить такие условия и перед измерением температуры подождать 30 минут.
A
B C D
EFG
FE
H

· Температура лба и висков отличается от внутренней температуры, измеряемой орально или ректально. На ранних стадиях лихорадки может возникнуть вазоспазм – явление, при котором сужаются сосуды, и происходит охлаждение кожи. В этом случае температура, измеряемая данным термометром, может оказаться необычно низкой. Если результаты измерений не совпадают с ощущениями больного, повторяйте измерения каждые 15 минут. Для сравнения вы также можете измерить внутреннюю температуру тела с помощью обычного орального или ректального термометра.· Детская кожа очень быстро реагирует на изменения окружающей температуры. По этой причине не следует измерять температуру ребенка данным термометром во время или после кормления грудью, так как температура кожи может быть ниже внутренней температуры тела.
1. Возьмите термометр в руку, поместив палец на кнопку измерения температуры тела на лбу (1).
2. Поднесите термометр на расстояние примерно 3-5 см к центру лба между линией бровей и линией волос.
3. Нажмите и удерживайте кнопку измерения температуры тела на лбу (1). Загоревшийся фонарик поможет вам выбрать правильное положение для измерения. Удерживайте кнопку, пока не найдете правильное положение. Выбрав правильное положение, отпустите кнопку для начала измерения, после чего термометр издаст однократный короткий сигнал.
4. Удерживайте термометр в таком положении, пока вы не услышите двойной короткий сигнал и голосовое сообщение о температуре. В зависимости от температуры загорается соответствующий световой сигнал.
5. Измерение завершено, и термометр можно убрать от головы.
6. Посмотрите температуру на дисплее.
7. Вы можете нажать кнопку измерения температуры тела (1) для начала нового измерения или кнопку [Set/Mem] (5) для возврата в режим ожидания. 36.6c

ПРИМЕЧАНИЕ:Фонарик точечного освещения горит все время, пока удерживается кнопка измерения температуры тела. Когда вы отпускаете кнопку, фонарик выключается. Если кнопка измерения температуры тела (1) удерживается больше 1 минуты, фонарик выключается автоматически; после отпускания кнопки устройство возвращается в режим ожидания.
Нормальная температура тела варьируется в определенном диапазоне. Диапазон нормальной температуры тела человека с возрастом уменьшается. В следующей таблице показаны диапазоны нормальной температуры тела для различных возрастов:
0-2 года 36.4ºC-38.0ºC 97.5ºF-100.4ºF
3-10 года 36.1ºC-37.8ºC 97.0ºF-100.0ºF
11-65 года 35.9ºC-37.6ºC 96.6ºF-99.7ºF
> 65 года 35.8ºC-37.5ºC 96.4ºF-99.5ºF
Диапазон нормальной температуры у каждого человека индивидуален и зависит от множества факторов, например, времени суток, уровня активности, приема лекарств, эмоционального состояния и т.д.Поэтому мы рекомендуем Вам опробовать термометр на себе и на членах вашей семьи в здоровом состоянии. Таким образом, вы узнаете, как работает термометр, и будете более уверены в результатах измерений, если кто-нибудь в вашей семье заболеет.
ПРИМЕЧАНИЕ: Если измеренная температура равна или больше 38ºC, на дисплее появится индикатор лихорадки и загорится красная подсветка.
5.2.1. СИГНАЛЬНАЯ ПОДСВЕТКА По завершении измерения температуры тела загорается следующая подсветка дисплея:Подсветка синего цвета: при температуре ниже 37,9ºC (100,3ºF)Подсветка красного цвета: при температуре 38,0ºC-42,9ºC (100,4ºF-109,3ºF)
5.3. ИЗМЕРЕНИЕ ТЕМПЕРАТУРЫ ПРЕДМЕТОВ· Перед измерением убедитесь, что датчик не загрязнен.· Не используйте данный режим для измерения температуры тела.· При измерении температуры предметов отображается текущая температура поверхности предмета. Она может отличаться от внутренней температуры, особенно если поверхность находилась под воздействием прямых солнечных лучей или сквозняка.

1. Возьмите термометр в руку, поместив палец на кнопку измерения температуры предметов (8).
2. Удерживайте термометр таким образом, чтобы датчик находился на расстоянии 3-5 см от жидкости и/или поверхности предмета, температуру которого вы хотите измерить.
3. Нажмите кнопку измерения температуры предметов (8) для начала измерения, после чего термометр издаст один короткий сигнал.
4. Уберите термометр от предмета. Измеренная температура отображается на ЖК-дисплее.
5. Вы можете нажать кнопку измерения температуры предметов (8) для начала нового измерения или кнопку [Set/Mem] (5) для возврата в режим ожидания. 52.7c5.4. ПРОВЕРКА ПАМЯТИТермометр запоминает 9 последних измерений температуры тела.Текущее измерение всегда сохраняется в последней ячейке памяти. При заполнении всех ячеек памяти самое ранее измерение всегда удаляется.
8 36.4c 12.23 2-14
1. Нажмите кнопку [Set/Mem] (5) для просмотра номера ячейки, температуры и даты измерения.2. Нажмите кнопку [Set/Mem] (5) для проверки данных измерений температуры, хранящихся в памяти.3. Нажмите и удерживайте кнопку [Set/Mem] (5) для быстрого просмотра сохраненных данных. 4. Для возврата в режим ожидания одновременно нажмите кнопку измерения температуры предметов (8) и кнопку измерения температуры тела (1).
Hомераячейки
Tемпературы Bремени Дата

1. В режиме ожидания нажмите и удерживайте в течение 2 секунд кнопку [Set/Mem] (5), чтобы перейти в режим установки.
2. Снова нажмите кнопку [Set/Mem] (5) для установки формата времени (12 или 24 часов; в случае выбора 12-часового формата на ЖК-экране будет отображаться значок "PM"), часов, минут, года (2001-2099), месяца, дня и режима автоматического выключения (ON (ВКЛ.) или OFF (ВЫКЛ.)).
3. Нажмите кнопку голосового сообщения (7), чтобы подтвердить эти настройки и перейти к следующим.
5.5. УСТАНОВКА ДАТЫ И ВРЕМЕНИ
12
off
При активации режима автоматического выключения термометр автоматически выключается через 3 минуты работы в режиме ожидания; при отключении данного режима термометр остается включенным. В целях энергосбережения мы рекомендуем использовать режим автоматического выключения.
5.6. ГОЛОСОВАЯ ПОДСКАЗКАНажмите кнопку голосового сообщения (7) для получения сообщения об измеренной температуре, текущем времени или температуре помещения.После каждого измерения температуры тела термометр сообщает полученную температуру на выбранном языке.
Данный термометр сообщает температуру с помощью голосового сообщения на 6 языках: испанском, английском, немецком, французском, итальянском и русском.
аудиофункция испанском английском немецком французском итальянском русском
температуре (ºC)
температуре (ºF)
текущем времени
температурепомещения (ºC)
температурепомещения (ºF)

сообщения (7) около 3 секунд. Это позволит переключиться между режимами ºF и ºC.
5.8. КОНТРОЛЬ ТЕМПЕРАТУРЫ ТЕЛА РЕБЕНКАДанный термометр имеет специальный модуль обмена данными, позволяющий подключаться к смартфону или планшету, автоматически передавая результаты каждого измерения для контроля данных о температуре.
5.8.1. РЕКОМЕНДАЦИИ1. Убедитесь, что ваш смартфон или планшет работает на базе последней операционной системы. Информацию об обновлении программного обеспечения смотрите в инструкции к вашему устройству.2. Убедитесь, что установленное вами приложение eMyBaby регулярно обновляется. Информацию об обновлении приложения смотрите в инструкции к вашему устройству.3. Для надлежащей работы модуля передачи данных мобильное устройство должно быть в достаточной мере заряжено. Пользователям рекомендуется иметь под рукой блок питания или зарядное устройство.4. Убедитесь, что на смартфоне или планшете всегда имеется достаточно памяти для сохранения считанных данных.5. Если во время считывания данных вам звонят или вы получаете текстовое сообщение, считывание может прерваться или данные измерений могут быть искажены. Мы рекомендуем переключить ваше устройство в режим работы "в самолете".
МЕРЫ ПРЕДОСТОРОЖНОСТИ: Данное устройство не должно использоваться в непосредственной близости с другим оборудованием. В случае если такая близость необходима, рекомендуется следить за нормальной работой устройства с используемой конфигурацией.
5.7. ПЕРЕКЛЮЧЕНИЕ ШКАЛЫ ФАРЕНГЕЙТ/ЦЕЛЬСИЙПри отображении на дисплее температуры последнего или одного из сохраненных измерений нажмите и удерживайте кнопку голосового
· Чтобы выбрать требуемый язык или беззвучный режим, в режиме ожидания нажмите и удерживайте кнопку голосового сообщения (7) около 2 секунд. После выбора требуемого языка или беззвучного режима термометр автоматически переключится на выбранную вами функцию.

ПРИМЕЧАНИЕ:Подключению к мобильному устройству может препятствовать наличие помех.
5.8.2. Приложение eMyBaby (Рисунок A)Термометр подключается к смартфону или планшету для записи и контроля температуры ребенка.Для использования инфракрасного термометра со смартфоном или планшетом сначала переведите его в режим тишины для улучшения связи между устройством и мобилиьным телефоном или планшетом. Для этого нажмите и удерживайте кнопку "Звук" (7) на протяжении 2 секунд. При этом в устройстве последовательно меняется язык отображения. Продолжайте нажимать на кнопку до смены режима на режим тишины .Кроме этого необходимо также установить бесплатное приложение eMyBaby. Для установки приложения выполните действия, описанные в начале руководства. После успешной установки приложения на экране устройства появляется пиктограмма eMyBaby .Для записи измерений термометра перейдите в приложение и выполните следующие действия:
1. Если этого не было сделано раньше, необходимо создать учетную запись ребенка, для которого планируется вести запись. Для этого из главного меню приложения eMyBaby перейдите в раздел "My Baby" (Мой ребенок) и выполните указанные там шаги для создания учетной записи.2. Перейдите из главного меню в раздел "Термометр" и выберите необходимую учетную запись ребенка.3. Выберите "New measure" (Новое измерение) и выберите опцию добавления измерения с термометра4. После этого выполните измерение температуры так, как указано в разделе 5.2 этого руководства .5. После второго звукового сигнала, обозначающего окончание измерения температуры, разместите звуковой передатчик термометра (6) непосредственно перед микрофоном мобильного устройства или планшета. Следует помнить, что связь между устройствами выполняется с помощью ультразвукового сигнала, поэтому их желательно разместить максимально близко друг к другу .6. Планшет или мобильное устройство автоматически зафиксирует измеренное значение температуры.7. Выберите пункт "Save measure" (Запись температуры) для записи результата измерений в файл графика температуры ребенка.
Обратрите внимание, что доступ к записям графика температуры ребенка возможем как из приложения eMyBaby, так и с веб-страницы www.emybaby.com в разделе "Термометр".
3
2
1

Убедитесь в том, что перед измерением термометр и пациент пробыли в помещении, где производится измерения, как минимум 30 минут
Перед измерением термометр и пациент должны находиться в помещении, где производится измерение, в течение как минимум 30 минут
Проверьте правильность способа измерения
Следуйте инструкции для правильного использования термометраНеточные измерения
или сомнения в результате измерений
Неточные измерения или сомнения в результате измерений
Проверьте, не загрязнен ли инфракрасный датчик
Вычистите инфракрасный датчик ватной палочкой согласно инструкции по эксплуатации.
НЕИСПРАВНОСТЬ ВОЗМОЖНЫЕ ПРИЧИНЫ СПОСОБЫ УСТРАНЕНИЯ
Прибор не включается/ автоматический сброс при извлечении изолятора
Надпись "ErrP" или "ErrH" на экране
Надпись "Lo" на экране
Батарейки разряжены
Неправильно вставлены батарейки
Плохой контакт батареек
Вставьте новые батарейки
Правильно вставьте батарейки, соблюдая полярность
Результат ниже 32,0ºC/89,6ºF.Проверьте метод измерения
Надпись "Hi" на экране Результат выше 42,9ºC/109,3.6ºF.Проверьте метод измерения
Проблемы с аппаратным обеспечением
Следуйте инструкции по эксплуатации для правильного измерения
Следуйте инструкции по эксплуатации для правильного измерения
Свяжитесь с производителем или дистрибьютором
5.10. УСТРАНЕНИЕ НЕИСПРАВНОСТЕЙ
На экране знак “ErrE” Температура окружающей среды превышает ледующиезначения: 10°C~40°C (50.0°F~104.0°F) для объекты ам и 15°C~40°C (59.0°F~104.0°F) для лба
Акклиматизируйте термометр к температуре окружающей среды: 10°C~40°C (50.0°F~104.0°F) для измерениятемпературы объектов 15°C~40°C (59.0°F~104.0°F) для измерения температуры лба
5.9. КАЛИБРОВКАЭтот термометр откалиброван производителем. Если термометр используется в соответствии с инструкциями, периодическая повторная калибровка не требуется. Если Вы сомневаетесь в точности измерения, немедленно обратитесь к продавцу.Не пытайтесь вносить изменения или разбирать термометр.

Источник питания Постоянный ток 3В (2 батарейки 1,5 В AAA)
Диапазон измерения температуры тела
32,0 ºC-42,9 ºC 89,6 ºF-109,3 ºF
7. ТЕХНИЧЕСКИЕ ХАРАКТЕРИСТИКИ
6. ОБСЛУЖИВАНИЕ· Не допускайте измерений на сквозняке во избежание неточностей измерения.· Не допускайте намокания изделия. При попадании на термометр воды, тщательно вытрите его. Помните, что агрессивные жидкости могут повредить термометр.· Используйте и храните термометр при нормальной температуре. При воздействии чрезмерно высоких или низких температур срок службы изделия уменьшается.· Если вы не планируете использовать термометр регулярно, извлеките батарейки во избежание возможных повреждений вследствие их протекания. В случае протекания батарейки, осторожно извлеките ее. Не допускайте попадания вытекшей жидкости на кожу.
6.1. УХОД И ЧИСТКА· Для обеспечения точных измерений поддерживайте датчик в чистоте и не допускайте царапин на его поверхности. Отпечатки пальцев или грязь могут повлиять на точность измерений.· Для получения точных результатов очищайте датчик.· Для очистки датчика аккуратно вытрите его поверхность хлопковой тканью (ватной палочкой), слегка смоченной в спирте, после чего вытрите насухо чистой тканью.· Для чистки корпуса термометра используйте мягкую сухую ткань. Никогда не мойте термометр чистящим средством, содержащим абразив, растворитель, бензол, и не погружайте термометр в воду или другие жидкости.· После чистки дайте термометру высохнуть в течение 20 минут, прежде чем измерять температуру. Храните термометр в защитном футляре или на специальной настольной подставке. Храните в сухом чистом месте при комнатной температуре.
Символ батареи наЖК-дисплее
Другие неисправности
Батарейки разряжены Вставьте новые батарейки
Обратитесь в сервисную службу MINILAND
Используете ли вы термометр в помещении?
Производите измерения в помещении
Неточные измерения или сомнения в результате измерений
НЕИСПРАВНОСТЬ ВОЗМОЖНЫЕ ПРИЧИНЫ СПОСОБЫ УСТРАНЕНИЯ
Режим работы Режим набора
Сайта ссылка тела сердце

Вес 56 g (без батареек)
59,0 ºF-104,0 ºF
Условия работы при измерении температуры тела
При относительной влажности 20%-85%
15,0 ºC-40,0 ºC
При относительной влажности 20%-85%
50,0 ºF-104,0 ºF10,0 ºC-40,0 ºC
При относительной влажности 15%-90%
-4,0 ºF-131,0 ºF-20,0 ºC-55 ºC
Условия работы при измерении температуры предметов
Условия хранения
0197
Рабочая часть типа BF
Утилизация в соответствии с Директивой 2012/19/EU (Об отходахэлектрического и электронного оборудования (WEEE))
7.1. СТАНДАРТНЫЕ СИМВОЛЫ
Отвечает требованиям Европейской директивы по медицинскомуоборудованию (93/42/EEC) с учетом изменений, внесенныхДирективой 2007/47/EC.Продукт сертифицирован уполномоченным органом TÜV Rheinland (0197).
Название и адрес производителя.
Название и адрес Уполномоченного представителя ЕС в Европе.
См. инструкцию.
Точность измерения комнатной температуры
Размеры 89 (L) x 53 (A) x 35 (F) mm
Диапазон измерения комнатной температуры
5,0 ºC-59,9 ºC 41,0 ºF-139,8 ºF
± 1,0 ºC ± 2,0 ºF
Точность измерения температуры предметов
± 1,0 ºC ± 2,0 ºF
Диапазон измерения температуры предметов
20,0 ºC-60,0 ºC 68,0 ºF-140,0 ºF
Для другого диапазона ± 0,3 ºC± 0,5 ºF
Точность измерения температуры тела на лбу
Срок хранения 2 лет
Точность измерения температуры тела на лбу
Диапазон:35,5ºC-42,0ºC95,9ºF-107,6ºF
± 0,2 ºC± 0,4 ºF
Атмосферное давление: 700hPa-1060hPa
ВАЖНЫЕ СВЕДЕНИЯ ОБ ЭЛЕКТРОМАГНИТНОЙ СОВМЕСТИМОСТИ (ЭМС)С увеличением количества электронных устройств, таких как ПК и мобильные (сотовые) телефоны, используемые медицинские приборы могут быть восприимчивыми к электромагнитным помехам, создаваемыми другими аппаратами. Электромагнитные помехи могут привести к неправильной работе медицинского прибора и создать потенциально небезопасную ситуацию.Медицинские приборы также не должны оказывать влияние на другие устройства.

Чтобы нормировать требования к ЭМС (электромагнитная совместимость) с целью предотвращения небезопасных ситуаций при использовании продукции, был введен в действие стандарт EN60601-1-2. Этот стандарт определяет уровни устойчивости к электромагнитным помехам, а также максимально допустимые значения электромагнитного излучения для медицинских устройств.
Это медицинское устройство соответствует стандарту EN60601-1-2:2007 как в части устойчивости к помехам, так и в части излучения. Тем не менее, требуются особые меры предосторожности:· Устройство необходимо установить и ввести в эксплуатацию в соответствии с информацией в руководстве пользователя.· Использование комплектующих и кабелей, отличных от тех, которые определены производителем (кроме кабелей, проданных производителем в качестве запасных частей для внутренних деталей), может привести к увеличению значения излучения или снижению уровня помехоустойчивости прибора.· Медицинские приборы не следует использовать рядом или совместно с другим оборудованием. В случае необходимости такого смежного или совместного использования следует убедиться в нормальном функционировании медицинского аппарата в той конфигурации, в которой он будет использоваться.· Указания относительно окружающей среды ЭMC, в которой следует использовать устройство, приведены ниже.
Беспроводные средства связи, такие как беспроводные устройства домашней сети, мобильные телефоны, беспроводные телефоны и их базовые станции, портативные рации могут оказывать влияние на это оборудование и должны находиться от него не ближе, чем на расстоянии d. Расстояние d определяется ПРОИЗВОДИТЕЛЕМ по значениям колонки "От 800 МГц до 2,5 ГГц" Таблицы 6 IEC 60601-1-2.
Рекомендуемое расстояние между портативным или мобильным оборудованиемРЧ связи и термометр
термометр предназначены для использования в электромагнитной среде с контролируемым уровнем РЧ излучения. Заказчики или пользователи термометр могут не допускать электромагнитного влияния, поддерживая минимальное расстояние между портативным или мобильным оборудованием РЧ связи (радиопередатчиком) и термометр, следуя приведенным ниже рекомендациям и принимая во внимание наибольшую выходную мощность средства связи.
Выходная мощность радиопередатчика в ваттах
Расстояние в соответствии с частотой радиопередатчика в метрах
От 150 кГцдо 80 МГцd = 1,2 √P
От 80 МГц до800 МГц
d = 1,2 √P
От 800 МГцдо 2,5 ГГцd = 2,3 √P
0.01 0.12 0.12 0.23
0.1 0.38 0.38 0.78
1 1.2 1.2 2.3
10 3.8 3.8 7.3
100 12 12 23
Для радиопередатчиков с максимальной выходной мощностью, значения которой в таблице не приведены, рекомендуемое минимальное расстояние d в метрах (м) можно определить с помощью уравнения, относящегося к частоте излучения, где P - это максимальная выходная мощность радиопередатчика в ваттах ( W) в зависимости от его изготовителя.

8. ПОРЯДОК УТИЛИЗАЦИИ БАТАРЕЙ И УСТРОЙСТВА· При утилизации радионяни не забудьте извлечь батареи и утилизировать их. Отнеситесь к этому процессу ответственно.· Не следует смешивать продукцию, на которую нанесен символ перечеркнутого мусорного контейнера с бытовым мусором.· Для правильной утилизации таких продуктов следует отнести их в пункты сбора, определенные местными властями. В качестве альтернативы вы можете связаться с пунктом продажи вашего изделия.
Примечание: для значений 80 МГц и 800 МГц необходимо определять расстояние, исходя из величин диапазона более высоких частот.Примечание: эти указания не являются универсальными для всех ситуаций. На распространение электромагнитного излучения оказывает влияние поглощение и отражение от строений, предметов и людей.

Para descargar la aplicación eMyBaby,en primer lugar, acceda a la tienda de aplicaciones correspondiente.
The eMyBaby appcan be downloaded from the app store.
Para descarregar a aplicação eMyBaby,em primeiro lugar aceda à respectiva loja de aplicações.
Um die Anwendung eMyBaby runterzuladen,AppStoregehen Sie bitte zuerst im entsprechenden .
Per scaricare l'applicazione eMyBaby è necessario,come prima cosa, accedere al market delle applicazioni.
W celu pobrania aplikacji eMyBabynajpierw należy wejść do odpowiedniego sklepu z aplikacjami.
Для того, чтобы загрузить приложение eMyBaby, в первую очередь нужно перейти в соответствующую библиотеку приложений.
Haga click sobre el icono de Play Store, según seindica en la imagen:
Click on the icon in the Play Store, as shown in thepicture:
Cliquez sur l'icône Play Store, comme indiqué surl'image:
Clique no ícone da Play Store, conforme se indicana imagem:
Klicken Sie auf das Play Store Symbol, wie im Bildgezeigt:
Fare click sull'icona di Play Store così comeindicato dall'immagine:
Należy kliknąć na ikonkę Play Store, jak pokazanona obrazku:
Кликните на иконке как показано наPlay Store, :изображении
1
Pour télécharger l'application eMyBaby,accédez d'abord à la boutique d'applications correspondante.
ES
EN
PT
DE
FR
IT
PL
RU
ES
EN
PT
DE
FR
IT
PL
RU
Play Store
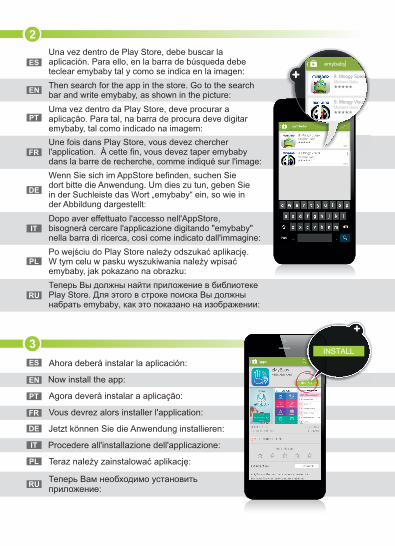
2
3
ES
EN
PT
DE
FR
IT
PL
RU
ES
EN
PT
DE
FR
IT
PL
RU
Una vez dentro de Play Store, debe buscar laaplicación. Para ello, en la barra de búsqueda debeteclear emybaby tal y como se indica en la imagen:
Then search for the app in the store. Go to the searchbar and write emybaby, as shown in the picture:
Une fois dans Play Store, vous devez chercherl'application. À cette fin, vous devez taper emybabydans la barre de recherche, comme indiqué sur l'image:
Uma vez dentro da Play Store, deve procurar aaplicação. Para tal, na barra de procura deve digitaremybaby, tal como indicado na imagem:
Wenn Sie sich im AppStore befinden, suchen Siedort bitte die Anwendung. Um dies zu tun, geben Siein der Suchleiste das Wort „emybaby“ ein, so wie inder Abbildung dargestellt:
Dopo aver effettuato l'accesso nell'AppStore,bisognerà cercare l'applicazione digitando "emybaby"nella barra di ricerca, così come indicato dall'immagine:
Po wejściu do Play Store należy odszukać aplikację.W tym celu w pasku wyszukiwania należy wpisaćemybaby, jak pokazano na obrazku:
Теперь Вы должны найти приложение в библиотеке. Для этого в строке поиска Вы должныPlay Store
набрать , как это показано на изображении:emybaby
Ahora deberá instalar la aplicación:
Now install the app:
Vous devrez alors installer l'application:
Agora deverá instalar a aplicação:
Jetzt können Sie die Anwendung installieren:
Procedere all'installazione dell'applicazione:
Teraz należy zainstalować aplikację:
Теперь Вам необходимо установитьприложение:
INSTALL
emybaby
8. Moogy SpeakMiniland Baby
9. Moogy VisualMiniland Baby

4
5
ES
EN
PT
DE
FR
IT
PL
RU
ES
EN
PT
DE
FR
IT
PL
RU
Una vez instalada, aparecerá el icono de la aplicación deeMyBaby en su pantalla principal. Pulse para entrar.
Once it is installed, the eMyBaby app icon will appear on your home screen. Click to open the app.
Une fois installée, l'icône de l'application eMyBaby apparaîtrasur votre écran principal. Appuyez dessus pour entrer.
Uma vez instalada, aparecerá o ícone da aplicação da eMyBaby no seu ecrã principal. Pressione para entrar.
Nach der Installierung erscheint auf Ihrem Hauptbildschirmdas App-Symbol von eMyBaby.Klicken Sie dieses Symbol, um zur Anwendung zu gelangen.
Una volta installata, l'icona dell'applicazione eMyBabycomparirà sulla schermata principale. Fare click su di essa per entrare.
Po zainstalowaniu aplikacji na ekranie głównym pojawi sięikonka aplikacji eMyBaby. Należy ją wcisnąć aby wejść.
После того как приложение будет , eMyBaby установлено на Вашей главной странице появится, соответствующая иконка. Нажмите ее для входа.
Al abrirse la aplicación, aparecerá la imagen que se muestraa continuación.
The app will open and the following picture will appear.
En ouvrant l'application, l'image qui est montrée ci-dessousapparaîtra.
Quando a aplicação se abre, aparece a imagem que semostra em seguida.
Beim Öffnen der Anwendung, erscheint das weiter unterwiedergegebene Bild.
Una volta aperta l'applicazione, si vedrà l'immagine seguente.
Po otwarciu aplikacji pojawi się obrazek pokazany poniżej.Należy wprowadzić nazwę użytkownika i hasło.
Когда Вы откроете приложение Вы увидите изображение , , .представленное ниже

En el caso de tener un móvil o tablet de Apple, debedescargar la aplicación desde la AppStore, cuyo iconose muestra en la imagen:
If you have an iPhone or iPad, you should go to theAppStore, to the following icon:
Si vous avez un téléphone portable ou une tabletted'Apple, vous devez télécharger l'application à partirde l'AppStore, dont l'icône est montrée sur l'image:
Caso tenha um telemóvel ou tablet da Apple, devedescarregar a aplicação a partir da AppStore, cujoícone se apresenta na imagem:
Falls Sie über ein Handy oder Tablet von Appleverfügen, dann müssen Sie die Anwendung beimAppStore, dessen Symbol im folgenden Bild erscheint,runterladen:
Se si possiede uno smartphone o un tablet Apple, sarà necessario scaricare l'applicazione dall'AppStore;l'icona corrispondente è quella mostrata nell'immagine:
W przypadku telefonów komórkowych lub tabletówApple należy pobrać aplikację z AppStore, któregoikonkę pokazano na obrazku:
В случае если у Вас мобильный телефон илипланшет марки Вам необходимо загрузитьApple, приложение, иконку которого Вы видите наизображении, из AppStore:
1
Una vez dentro de Play Store, debe buscar la aplicación.Para ello, en la barra de búsqeda debe teclear emybabytal y como se indica en la imagen:
Then search for the app in the store. Go to the search bar and write emybaby, as shown in the picture:
Une fois dans Play Store, vous devez chercherl'application. À cette fin, vous devez taper emybaby dansla barre de recherche, comme indiqué sur l'image:
Uma vez dentro da Play Store, deve procurar a aplicação.Para tal, na barra de procura deve digitar emybaby, talcomo indicado na imagem:
Wenn Sie sich im AppStore befinden, suchen Sie dortbitte die Anwendung. Um dies zu tun, geben Sie in derSuchleiste das Wort „emybaby“ ein, so wie in derAbbildung dargestellt:
2
emybaby
emybaby
Results
By RelevanceAll Categories
13:50
App Store
ES
EN
PT
DE
FR
IT
PL
RU
ES
EN
PT
DE
FR

Dopo aver effettuato l'accesso nell'AppStore, bisognerà cercare l'applicazione digitando"emybaby" nella barra di ricerca, così come indicato dall'immagine:
Po wejściu do Play Store należy odszukać aplikację. W tym celu w pasku wyszukiwania należy wpisać emybaby, jak pokazano na obrazku:
Теперь Вы должны найти приложение в библиотеке Play Store. Для этого в строкепоиска Вы должны набрать emybaby, как это показано на изображении:
Tras buscar la aplicación, pulse el botón marcadoen rojo para descargarla.
Once you have found the app, click on the buttonhighlighted in red in order to download it.
Après avoir trouvé l'application, appuyez sur le boutonmarqué en rouge pour la télécharger.
Depois de ter encontrado a aplicação, pressione o botãomarcado a vermelho para a descarregar.
Suchen Sie bitte die Anwendung, und drücken Sieanschließend den rot markierten Button, um dieAnwendung runterzuladen.
Una volta trovata l'applicazione, cliccare sul pulsanterosso per scaricarla.
Po wyszukaniu aplikacji należy wcisnąć przyciskoznaczony na czerwono w celu pobrania aplikacji.
После того, как приложение будет Вами найдено,нажмите кнопку, выделенную красным цветом, чтобыего загрузить.
3
Tras la instalación, en su pantalla principal aparecerá elicono de eMyBaby. Púlselo.
When it is installed, the eMyBaby icon will appear on thehome screen. Click on it.
Une fois installée, l'icône eMyBaby apparaîtra sur votreécran principal. Appuyez dessus.
Após a instalação, no seu ecrã principal aparecerá oícone da eMyBaby. Pressione-o.
Nach der Installierung erscheint auf Ihrem Hauptbildschirmdas App-Symbol von eMyBaby. Drücken Sie bitte diesesSymbol.
Quando l'installazione sarà completata, l'icona dieMyBaby comparirà sullo schermo. Fare click su di essa.
Po zainstalowaniu na ekranie głównym pojawi się ikonkaeMyBaby. Należy ją wcisnąć.
После того как Вы установите приложение на Вашей , , главной странице появится иконка приложения
Нажмите ееeMyBaby. .
4
ES
EN
PT
DE
FR
IT
PL
RU
IT
PL
RU
ES
EN
PT
DE
FR
IT
PL
RU

Al abrirse la aplicación, aparecerá la imagen que se muestra a continuación.
The app will open and the following picture will appear.
En ouvrant l'application, l'image qui est montrée ci-dessous apparaîtra.
Quando a aplicação se abre, aparece a imagem que se mostra em seguida.
Beim Öffnen der Anwendung, erscheint das weiter unter wiedergegebene Bild.
Una volta aperta l'applicazione, si vedrà l'immagine seguente.
Po otwarciu aplikacji pojawi się obrazek pokazany poniżej.
Когда Вы откроете приложение Вы увидите изображение представленное ниже , , .
5
ES
EN
PT
DE
FR
IT
PL
RU

2607172050089083
89083 thermoadvanced plus
Miniland, S.A. 2013©
Shanghai International Holding Corp. GmbH (Europe)
Eiffestraße 80, 20537 Hamburg GermanyEC� REP
Shenzhen Dongdixin Technology Co., LtdNo. 3 Building XiliBaimang Xusheng Industrial Estate 518108,Nanshan Shenzhen China
0197
Fabricado en China. Conservar los datos.Made in China. Keep this information.Fabricado em China. Conservar dados.Fabbricato in China. Conservare i dati.Fabriqué en China. Conserver ces informations.Hergestellt in China. Bewahren Sie diese Angaben aufWyprodukowano w Chinach. Zachowaj instrukcję.Сделано в Китае. Сохраните эту информацию.
Miniland S.A. P.Ind. La Marjal I C/ La Patronal 8-10
03430 ONIL (Alicante) SPAIN
Technical support: +34 966 557 775
Fax +34 965 565 454
www.minilandbaby.com · [email protected]
Importador / Distribuidor · Importer / Distributormportador / Distribuidor · Importateur / DistributeurImporteur / Händler · Importatore / DistributoreImporter / Dystrybutor · импортер / Дистрибьютор