refrigerador automático - calidadtelstar.com · ponga su refrigerador en un lugar ventilado y...
TRANSCRIPT

RefrigeradorAutomáticoTRX596310MD

Refrigerador AutomáticoTRX596310MD
2
CONTENIDO
Seguridad ................................................................................................................4DESCRIPCIÓN DEL PRODUCTO .............................................................................5Instalación ..............................................................................................................6Empiece a Usar ......................................................................................................8Instalación del cajón inferior del congelador ...................................................11Cajón Grande ........................................................................................................12Máquina de hielo...................................................................................................12Instrucciones ...........................................................................................................12Elimine, limpie e instale la caja de cubos de hielo ............................................13Quite e instale la máquina de hielo ....................................................................14Manijas de la puerta .............................................................................................15Instrucciones para montar la manija de la puerta del refrigerador...............16Ajustes menores entre puertas .............................................................................16Conexión de la línea de agua al refrigerador ...................................................18Conexión de la línea de agua a la fuente de agua potable .........................18Introducción a las funciones del refrigerador ....................................................18Bloqueo y desbloqueo ..........................................................................................19Modo de ahorro de energía ...............................................................................19Modo Automático .................................................................................................20Modo de enfriamiento rápido ............................................................................20Modo de congelamiento rápido ........................................................................21Apagando el compartimento del refrigerador .................................................21Para establecer la temperatura del compartimento del refrigerador ..........21Para establecer la temperatura del congelador ..............................................22Interruptor de la fábrica de hielo .........................................................................22Función de la luz de fondo ...................................................................................22Limpieza y Mantenimiento ....................................................................................22Mantenimiento y reparación de la refrigeradora .............................................22

Refrigerador AutomáticoTRX596310MD
3
Bienvenidos al mundo de manejo sencillo y sin preocupaciones
Gracias por escoger Telstar. Este manual contiene toda la información necesaria para el uso correcto de la
refrigeradora. Por favor lea todas las instrucciones antes de usar la refrigeradora y mantenga este manual en
un lugar seguro para futuras referencias. No quite el adhesivo de etiqueta de identificación que contiene
el código, número de modelo, fabricante y otra información acerca de la refrigeradora. Esta etiqueta será
usada por el servicio autorizado representante en el caso de que tu refrigeradora necesite mantenimiento.
Consejo Ambiental
El material del empaque usado es reciclable; recomendamos que separe el plástico, papel y cartones y
los dé a la compañía de reciclables. Para ayudar a preservar el ambiente, el refrigerante usado en este
producto es R134a (Hidrofluorocarbono- HFC), el cual no afecta la capa de ozono y tiene un pequeño
impacto en el efecto invernadero. De acuerdo a las directrices de Residuos Eléctricos y Equipos
Electrónicos (WEEE, siglas en inglés), los residuos eléctricos deben ser recolectados por separado. Si usted
necesita desechar este aparato en el futuro, NO lo tire con el resto de la basura. En su lugar, por favor lleve el
aparato al lugar más cercano de Residuos Eléctricos y Equipos Electrónicos.
¡ATENCIÓN!La refrigeradora que ha comprado puede ser un poco diferente a los dibujos mostrados en este manual,
pero el diseño es el mismo.
Por favor lea la información referente a esta operación. El refrigerador fue diseñado solamente para uso
doméstico.
El enchufe del refrigerador que ha comprado puede ser un poco diferente a los dibujos mostrados en este
manual, además, el enchufe que acompaña este producto depende de las especificaciones eléctricas del
país en el que esté.

Refrigerador AutomáticoTRX596310MD
4
SEGURIDAD
Para niños
Por favor cuide a los niños para evitar que se encierren dentro o se dañen si la refrigeradora cae. No deje
a los niños cerca del refrigerador cuando se abra o cierre la puerta. Los niños deben ser supervisados para
asegurar que ellos no jueguen con el aparato.
Para el usuario
Nunca jale el conector al jalar el cable de energía. Siempre sostenga el conector y jálelo directamente
del enchufe. No deje el cable de energía debajo del refrigerador. Cuando el refrigerador es movido de la
pared, nunca presione o dañe el cable de energía. Cuando el cable de energía o conector es dañado o
deteriorado, no lo use más, por lo que deberá cambiarlo en la estación de reparación diseñada por el fab-
ricante.
Cuando el gas de carbón u otro gas inflamable estén goteando, cierre la válvula para fuga de gases. Abra
la puerta y ventanas. No empuje o inserte el conector del refrigerador u otro aparato eléctrico.
No ponga sustancias inflamables, explosivas, volátiles o fuertes sustancias corrosivas en el refrigerador para
evitar el daño de la refrigeradora, que se incendie u otro accidente que pueda ocurrir.
No utilice solvente inflamable cerca del refrigerador para evitar el fuego.
Por seguridad, es aconsejable que no ponga el cable de energía, estabilizador de voltaje, horno de
microondas y otros aparatos electrónicos encima del refrigerador. No use ningún aparato eléctrico dentro
del refrigerador (excepto por el modelo recomendado) para evitar interferencia electromagnética u otros
accidentes.
Cuando el refrigerador empiece a trabajar, no toque la superficie fría del compartimento del congelador,
especialmente con manos mojadas, para evitar daño.
La brecha entre puertas y entre el cuerpo del refrigerador es pequeño. No ponga sus manos en estas áreas
para evitar congelamiento de dedos. Cuando abra la puerta del refrigerador, no deje a los niños acercarse.
No riegue agua para enjuagar la refrigeradora. No deje la refrigeradora mojada en lugares donde pueda
dañar el aislamiento eléctrico.

Refrigerador AutomáticoTRX596310MD
5
No desarme o reforme la refrigeradora por usted mismo. Nunca dañe la tubería. Por favor deje que la
refrigeradora sea reparada por profesionales.
No ponga sustancias líquidas en botellas o contenedores sellados en el congelador, como botellas de
cerveza o bebidas para evitar que exploten durante el congelamiento.
Cuando corte la corriente o la esté limpiando, desconéctela del enchufe. Encienda la fuente de alimentación
después de al menos 5 minutos para evitar que se reinicie y pueda dañar al compresor.
Cuando la refrigeradora esté fuera de servicio, por favor quite la puerta y remueva el sellado de la puerta
y estantes y póngalas en un lugar apropiado para evitar que los niños puedan jugar adentro y tengan un
accidente.
Este producto es una refrigeradora de casa y sólo está hecha para almacenar comida de acuerdo a la
condición estándar. No puede ser usada para otros propósitos, como almacenaje de sangre, drogas, pro-
ductos biológicos, etc.
1. Monitor
2. Puerta izquierda
3. Puerta superior del congelador
4. Puerta inferior del congelador
5. Manija de la puerta
6. Puerta derecha
7. Manija del cajón
8. Caja de almacenaje de hielo
9. Cuchara para hielo
10. Placa de separación inferior para cajón de
congelador
11. Placa de separación superior para cajón de
congelador
12. Cajón superior del congelador
13. Cajón inferior del congelador
DESCRIPCIÓN DEL PRODUCTO

Refrigerador AutomáticoTRX596310MD
6
1. Puerta izquierda 2. Estante voladizo3. Plegador giratorio4. Deslizamiento del estante voladizo5. Cajón de frutas y vegetales6. Cajón pequeño7. Cajón grande8. Fabricador de hielo automático9. Manija del cajón 10. Pata de nivelación11. Interruptor de la bombilla 12. Parte superior de la bombilla13. Puerta derecha14. Caja de la mantequilla15. Placa del conducto de aire16. Estante voladizo plegada17. Luz lateral 18. Envase (con soporte de huevo)19. Mantenimiento fresco de la bombilla de luz 20. Envase 21. Lámpara superior del congelador22. Puerta superior del congelador23. Puerta inferior del congelador24. Cubierta decorativa para la viga inferior
INSTALACIÓN
Remueva todo el empaque antes de usar la nueva refrigeradora. Este incluye la base de espuma y el tape
adhesivo que sostiene los accesorios del refrigerador.
Limpie (dentro y fuera) con un trapo seco (un poco de detergente con agua caliente para lavar el trapo y
luego limpie de nuevo con agua limpia).
Use un enchufe independiente de 2 polos y no lo comparta con otros aparatos electrónicos.
Abra el refrigerador y tome el accesorio (cubierta decorativa para la viga inferior) y luego 3 tornillos del bolsa

Refrigerador AutomáticoTRX596310MD
7
de instrucciones del empaque; luego instálelas en la viga inferior como se muestra en el diagrama esque-
mático en la derecha.
La cubierta decorativa de la viga inferior es usada como ornamento, así que no es necesario que la instale,
queda a su elección. No afectará el funcionamiento del refrigerador, si la instala o no.
Transporte y Acomodando Su Refrigeradora
• Transporte
Mantenga en posición vertical y evite que se apriete o vibre durante su transporte. Evite un ángulo de de
inclinación de más de 45° durante el manejo.
Evite que la puerta o tapa superior se ponga bocabajo, de lo contrario, podría deformarse.
• Acomodo
Ponga su refrigerador en un lugar ventilado y evite que el calor y la luz solar le peguen directamente. No
lo coloque en ningún lugar húmedo o lugar seco para evitar que se oxide o se debilite por el efecto de
aislamiento.
Debe haber un espacio no menos de 30cm del tope del refrigerador y no menos de 10cm de ambos lados
o de atrás del refrigerador de las paredes adyacentes. Este requerimiento es bueno para abrir y cerrar las
puertas de la mejor manera.
La refrigeradora debe estar colocada en una superficie plana y firme (Si no es plana, puede nivelarla con los
patas o ajustarla).
• Mantenga su refrigeradora en pie
No conecte la refrigeradora a la fuente de poder inmediatamente después de colocarla verticalmente.
Debe dejarla en pie por al menos 6 horas antes de conectarla para que funcione correctamente.
Tornillos
Cubierta decorativa para la viga inferior

Refrigerador AutomáticoTRX596310MD
8
Asegúrese que el cable de alimentación no esté clavado por el refrigerador u otro objeto para evitar
accidentes por fallos de conductores eléctricos. Por favor compruebe el alcance del voltaje de la
refrigeradora contra la potencia real antes de ponerlo en marcha.
Atención
La refrigeradora debe estar conectada de la fuente de alimentación eléctrica antes de intentar la
instalación del accesorio.
No use equipo mecánico u otros métodos para acelerar el proceso del congelamiento excepto los medios
recomendados por el fabricante.
No use ningún aparato eléctrico en el compartimento del almacenaje de comida, excepto el modelo
recomendado por el fabricante.
El refrigerante R134a y el material de espuma ciclopentano usado en el refrigerador son inflamables. Todos los
residuos y refrigeradores desechados deben estar colocados lejos del fuego, no se permiten ser quemados.
Recordatorio de Advertencia: Coloque la comida dentro del cajón. No coloque ningún alimento después de
remover el cajón.
• Empiece a Usar
Usted debe tener un buen conocimiento de todas las precauciones de seguridad y asegurarse que la refrig-
eradora sea colocada apropiadamente antes de usarla.
1. Desempacar
Por favor instale la cubierta decorativa de la viga inferior en el refrigerador, después de desempaquetar y
ajuste los patas delanteras para nivelar la refrigeradora.
2. Conéctela a la fuente de alimentación
La refrigeradora entrará a un estado por defecto de fábrica después de conectarla a la fuente de ali-
mentación y se mostrará la temperatura y la del congelador.
3. Modos de trabajo
Usted puede programar la refrigeradora de cualquiera de las siguientes 2 maneras:
Modo automático: le sugerimos que escoja este modo si no tiene requerimientos especiales. Su refrigerador
trabajará automáticamente después de escoger este modo.

Refrigerador AutomáticoTRX596310MD
9
Modo manual: puede programar la temperatura al presionar la tecla de ajustes de la temperatura.
4. Ponga comida en el refrigerador
Usted puede poner comida en el refrigerador después de un período de tiempo cuando el refrigerador esté
plenamente refrigerado en sus compartimientos interiores.
Tips: El interior de la temperatura puede requerir cierto período de tiempo para alcanzar el balance si los
ajustes de temperatura son cambiados u otros alimentos son puestos en el refrigerador. El período de tiempo
depende del cambio en los ajustes de temperatura, la temperatura del entorno, apertura de frecuencia, la
cantidad almacenada de alimentos, etc.
Compartimentos de la refrigeradora
La temperatura ajustable del dispositivo puede mantener la mayoría de los compartimentos del refrigerador
en una temperatura promedio de 28° C. No logra preservar la frescura de los alimentos por mucho tiempo.
Como resultado, el compartimento del refrigerador puede ser usado solamente por un corto periodo de al-
macenamiento.
Uso del plegador giratorio
Por favor manténgase estrictamente a las precauciones en la etiqueta. Es un fenómeno normal que la su-
perficie del plegador giratorio se ponga caliente. Gotas en la superficie son también normales en el verano o
cuando el ambiente esté mojado. Lo que tiene que hacer es limpiarlo con un trapo.
Ajustes del estante voladizo
El estante puede ser ajustado a la altura adecuada según se requiera. Por favor ajústelo, siguiendo las flechas
como se muestran en el diagrama. Levántelo primero hacia arriba y luego inclínelo hacia arriba. Durante la
instalación, ponga el extremo superior de la pata fija en una en una de las ranuras superiores en el primer
soporte de hierro y a continuación, ponga el extremo inferior de la pata fija en la tercera ranura en la parte
inferior del soporte de hierro.
Ajustes de altura y limpieza del envase montado en la puerta
Levante el envase, manténgalo con ambas manos y quítelo. Después de limpiarlo, puede instalar el estante
y ajustarlo.

Refrigerador AutomáticoTRX596310MD
10
Ajuste del estante giratorio
Extremo superior de la pata fija
Extremo inferior de la pata fijaAjuste del envase montado en la puerta
• Comida sugerida para almacenar en el compartimento del refrigerador
1. Alimentos cocinados con trigo, latas, leche, etc.
2. Snacks, productos lácteos
3. Carne cocida fría, embutidos
4. Frutas, vegetales
5. Huevos, mantequilla, queso
6. Latas, condimentos
7. Bebidas, otros alimentos embotellados
• Compartimento del Congelador
La temperatura del congelador es muy baja, para que pueda preservar la frescura de los alimentos por un
largo tiempo, pero sin exceder el periodo de almacenamiento especificado en el empaque de cada tipo
de comida.
Puede quitar los cajones del congelador para incrementar su capacidad y almacenar más comida.
Comida sugerida para almacenar en el congelador
1. El cajón superior del congelador podría ser usado para almacenar pescado, carne, helado, etc.
2. Hielo en su caja de almacenamiento
3. El cajón inferior es usado para almacenar pescado, carne y carne de ave empaquetada

Refrigerador AutomáticoTRX596310MD
11
• Instalación del cajón inferior del congelador
1. Primero, jale el cajón inferior
2. Quite los 2 tornillos de la placa del cajón inferior con un destornillador y luego quite la placa
3. Quite el tapón trasero del cajón inferior como se muestra en la Fig. A
4. Quite el cuerpo del cajón inferior con una fuerza en dirección a las flechas. Fig. B
5. La instalación del cuerpo del cajón inferior es conducido en orden reverso. Deberá instalar el cuerpo
del cajón inferior primero y luego instalar el tapón como se muestra en la Fig. C. finalmente, ambos lados
del cajón deberán ser conectados a la posición mostrada por las flechas respectivamente.
6. La placa de separación debe ser instalada a las ranuras correspondientes y luego se ponen los
tornillos. La posición de la placa para el cajón inferior puede ser ajustado de acuerdo a sus preferencias.
No remueva el cajón inferior del congelador si no es necesario.
Tapón trasero para el cajón inferior
Cuerpo del cajón inferior
Placa de separación del cajón inferior
Agujero posicionado para la placa de separación
Alinea con la ranura
Alinea con la ranura
Inserte en el borde

Refrigerador AutomáticoTRX596310MD
12
• Cajón Grande
El cajón grande soporta máximo 10kg.
Quite e instale el cajón grande
1. Quite el cajón grande
2. Encuentre el gancho en los lados derecha e izquierda en el fondo del cajón (mostrado en la figura)
3. Sostenga el gancho con pinzas de punta y empújelo hacia arriba y afuera de la ranura del carril de
deslizamiento y quite el gancho del otro lado del mismo método.
4. Quite el cajón
5. Instale el cajón al poner el gancho en el lugar correcto.
• Instrucciones
1. Cuando el refrigerador sea usado por la primera vez, inicie la máquina de hielo después de 20 min.
Es capaz de producir 1.0 ~1.1 Kg de hielo en 24 hras, dependiendo en la temperatura del congelador,
temperatura del entorno, las veces en que se abre y cierra la puerta y otras condiciones.
2. Si la máquina de hielo no se usa por periodo largo, ciérrela en el panel de control de la puerta del
refrigerador, limpie la caja de cubo de hielo y la caja del almacenamiento del hielo.
3. Cuando la máquina de hielo inicie de nuevo después de un largo periodo de estar apagado,
asegure que los cubos de hielo no estén derretidos. Por otro lado, limpie la caja de cubo de hielo y la
caja del almacenamiento del hielo.
Cajón grande
Gancho
Carril deslizante
MÁQUINA DE HIELO

Refrigerador AutomáticoTRX596310MD
13
4. Revise el nivel de agua en el tanque de vez en cuando (si el nivel de agua de tanque está muy bajo,
los cubos de hielo serán pequeños)
5. La máquina de hielo revisa la cantidad de hielo automáticamente y se detiene cuando la caja está
llena.
6. Se oirá el sonido del motor después de acerca 2 horas, lo cual es el sonido de la bomba proveyendo
agua a la máquina de hielo. No indica su mal funcionamiento.
7. Es normal que varios cubos de hielo se peguen.
Rejilla
Caja de cubos de hielo
8. Cuando la refrigeradora sea usada por primera vez, la máquina de hielo empieza a trabajar después
de que el congelador se esté enfriando acerca de 3 horas (tal vez un poco más si hay mucha comida
almacenada). La máquina de hielo puede producir acerca de 1.3kg de cubos de hielo en menos de 24
horas, lo cual puede variar dependiendo de la temperatura del congelador, del entorno, las veces en
que se abre y cierra la puerta y otras condiciones.
9. La máquina de hielo es capaz de suministrar agua automáticamente, fabricación y eliminación de
hielo. Por favor no quite los cubos de hielo ni agregue agua por usted mismo.
Si no usó la refrigeradora por un largo tiempo, usted necesita conseguir agua fuera de la máquina de
hielo cuando la vuelva usar y límpiela para asegurarse de que el hielo es puro.
• Elimine, limpie e instale la caja de cubos de hielo
Si la máquina de hielo no es usada por periodo largo, los cubos que usted haya producido podrían tener un
olor desagradable. Debe quitarlos y limpiar la caja.
Abra el cajón superior del congelador, rote el mando de fabricación de hielo en dirección a las manijas del
reloj en un ángulo de 90°, gire la manija de una posición horizontal a una vertical para desbloquearla (como

Refrigerador AutomáticoTRX596310MD
14
se muestra en la Fig. 1 de la Pg.12), jálela (como se muestra en la Fig. 2 de la Pg.12)y quite la caja de cubos
de hielo.
Enjuague la caja con agua caliente (debajo de 60°C) y no use detergente.
Seque la caja de cubos de hielo completamente al aire libre, en caso de que hayan quedado gotas de
agua en la caja, podría causar un funcionamiento anormal.
Cuando la máquina de hielo no se puede mover, sepárela como se muestra en la Fig. 1 y Fig 2. Luego instále-
la después de que los cubos de hielo estén derretidos.
Inserte la caja de cubo hielo en la rejilla, de acuerdo a la secuencia original y rótela en la posición de bloqueo
Bloquedo Desbloqueado
• Quite e instale la máquina de hielo
Cuando la máquina de hielo no se esté usando, puede quitarse y el espacio vacante puede usarse como
parte del congelador.
Presione el botón de la máquina de hielo en panel de control en la puerta de la refrigeradora y la señal de
fabricación de hielo desaparece.
Abra la puerta y quite el cajón.
Jale la máquina de hielo (como se muestra en la Fig. 1), y luego hacia abajo, para que se desenganche
(como se muestra en la Fig. 2).
Jale hacia abajo el enchufe de alimentación de la máquina de hielo para que se deprenda del toma corri-
ente.
Instale la máquina de hielo a la posición original, presione el botón de la máquina de hielo y el símbolo de

Refrigerador AutomáticoTRX596310MD
15
fabricación de hielo aparece.
Cierre la puerta después de que la máquina de hielo esté instalada a un lugar apropiado, de lo contrario,
podría dañarse.
Instrucciones para montar la manija de la puerta de almacenamiento para enfriar:
1. Primero, quite los tornillos del refrigerador, use un destornillador para volverlos a poner en la puerta.
Fíjelos firmemente con el destornillador, como se muestra en la figura;
2. Después de este paso completado, tome la manija de la puerta del almacenamiento fuera de la
caja, colóquela en la dirección como se muestra en la figura (Nota: i.e la dirección la cual ambos
agujeros de los tornillos en la manijas están cerradas en las esquinas ) y cuelgue la manija sobre el tornil-
lo;
3. Use la pequeña llave inglesa hexagonal dada en la caja para ajustar la cabeza del tornillo en los
pequeños agujeros que vienen en la manija. Después, mueva gentilmente la manija, para confirmar que
este bien erguido.
Toma corriente de la máquina de hielo
Enchufe de la máquina de hielo
Gancho de la máquina de hielo
MANIJAS DE LA PUERTA

Refrigerador AutomáticoTRX596310MD
16
• Instrucciones para montar la manija de la puerta del refrigerador
Los pasos para armarla son los mismos que el anterior. Tome nota que durante su montaje, la dirección de
ponerla es hacia abajo (al suelo).
Pequeños agujeros para el tornillo que vienen en la manija
Manija de la cámara de enfri-amiento
Pequeños agujeros para el tornillo que vienen en la manija
Tornillo
Tornillo
Esquema de instalación de la manija de la puerta
Diferencia entre la manija de enfriar y refrigeración:
• Ajustes menores entre puertas
Recuerde un refrigerador nivelado es necesario para conseguir que las puertas estén perfectamente acomo-
dadas. Si necesita ayuda, revise las secciones previas en nivelar el refrigerador.
Cuando la puerta izquierda es más baja que la derecha. O la izquierda es más baja que la derecha

Refrigerador AutomáticoTRX596310MD
17
Haga lo siguiente
1. Levante la puerta derecha o izquierda.
2. Inserte el anillo de sujeción incluido (2) use un par de alicates (3) en la brecha entre la bisagra (1) y la
bisagra inferior (4) El número de anillos de sugestión que necesitarás depende de la brecha.
Instalar la línea de agua
El kit para la instalación de la línea de agua está disponible por un costo adicional en su distribuidor.
Conexión a la línea de suministro de agua
1. Primero cierre la línea de suministro de agua y la máquina de hielo
2. Encuentre la línea de agua más fría.
3. Después de conectar el suministro de agua a la válvula, vuelva a su principal suministro de agua y
enjuague varios galones de agua para limpiar la línea de suministro de agua
Línea de agua fría
Abrazadera del tubo
Kit de instalación de la línea de agua
Cerrar la válvula

Refrigerador AutomáticoTRX596310MD
18
• Conexión de la línea de agua al refrigerador
Hay muchos ítems que necesita comprar para completar esta conexión.
Usted puede encontrar estos ítems como un kit en su ferretería local.
1. Primero inserte los tubos de agua (incluido) a los agujeros cor-
respondientes del conector de agua (incluido)
2. Segundo, inserte el kit de instalación de la línea de agua (no
incluido) al otro agujero del conector de agua (incluido)
3. Abra el agua y revise si alguna fuga
• Conexión de la línea de agua a la fuente de agua potable
Si la línea de agua no es potable, por favor agregue un filtro de agua externo.
Si tiene que reparar o desmontar la línea de agua, corte el tubo de plástico para conseguir que se ajuste, y
que haya una conexión sin fugas.
• Introducción a las funciones del refrigerador
Conector de agua
Tubo de agua

Refrigerador AutomáticoTRX596310MD
19
1. Control de temperatura del refrigerador
2. Control de temperatura del control
3. Modo de ahorro de energía
4. Modo Automático
5. Interruptor de fabricación de hielo
6. Bloqueo infantil
7. Icono de enfriar rápido
8. Icono de congelar rápido
9. Icono de ahorro de energía
10. Icono automático
11. Icono de fabricación de hielo
12. Icono de bloqueo
13. Icono de compartimento del refrigerador
14. Icono de compartimento del congelador
15. Indicador del refrigerador
16. Indicador de congelamiento
17. Icono de apagar: significa que apaga el
refrigerador
18. Temperatura del refrigerador
19. Temperatura del congelador
• Botones del control
• Elementos de la pantalla
• Estado de encendido inicial
Todos encendidos
• Bloqueo y desbloqueo
Cuando el icono de “BLOQUEO” que está en la pantalla no está iluminado, la puerta no está
bloqueada. Para activarla para el bloqueo a prueba de niños, presione el botón de BLOQUEO INFANTIL. El
icono de “Bloqueo” se iluminará y la puerta se bloqueará. Para desbloquearlo, presione y sostenga el botón
BLOQUEO INFANTIL por 3 segundos. Si no se aprietan otros botones en menos de 25 segundos mientras está
desbloqueada, esta automáticamente se bloqueará. Las funciones de abajo pueden ser realizadas mientras
está desbloqueada.
• Modo de ahorro de energía
Para ahorrar energía, este modo establece la temperatura en el refrigerador a 7° C y la del congelador a
-15°C, en modo “AUTO” por defecto se ajusta a 5°C y -18°C, respectivamente.
Para activar el modo de Ahorro de Energía, presione el botón de MODO DE AHORRO DE ENERGÍA y el
icono se iluminará. Deshabilitar este modo para la refrigeradora, automáticamente deshabilitará

Refrigerador AutomáticoTRX596310MD
20
los otros modos.
Para desactivarlo, haga cualquiera de las siguientes maneras:
1. Seleccione otro modo
2. Presione REF.TEMP o FRZ.TEMP. para salir de la configuración.
3. Presione el botón de MODO DE AHORRO DE ENERGIA para salir de este modo, cuando alguna de las
situaciones de arriba ocurran.
4. Presione MODO AUTO para salir del modo de ahorro de energía cuando alguna de las situaciones de
arriba ocurran.
• Modo Automático
Esta función establecerá la temperatura del refrigerador a 5°C y el congelador a -18°C. Si el compartimento
del refrigerador es apagado, el modo automático todavía estaría funcionando en el congelador.
Para activar el modo automático: presione MODO AUTO y el icono de “AUTO” se iluminará, indicando su ac-
tivación. Seleccionando “MODO AUTO” automáticamente desactivará los otros modos.
Para cambiar entre Celsius y Fahrenheit, presione y sostenga el botón “MODO AUTO” por 3 segundos:
Para desactivar MODO AUTO:
1. Seleccione otro modo
2. Presiones REF.TEMP o FRZ.TEMP para salir de la configuración
• Modo de enfriamiento rápido
Este modo es usado para contrarrestar un aumento repentino en la temperatura del refrigerador, como
cuando la cantidad de ítems son puestos en el refrigerador después de un día de compras al supermercado.
El compresor trabajará por largos ciclos para mantener la temperatura deseada.
Para activar el modo: presione REF Temp por 3 segundos y el icono se iluminará. Cuando el modo de enfri-
amiento rápido es activado por el refrigerador, todos los otros modos son desactivados automáticamente.
El modo de “Enfriamiento Rápido” puede ser desactivado por cualquiera de las siguientes maneras:
1. Active el modo de “AHORRO-DE-ENERGIA” o “AUTO”
2. Presione REF.TEMP para ajustar la temperatura

Refrigerador AutomáticoTRX596310MD
21
3. Sostenga el botón REF.TEMP por 3 segundos. Cuando la temperatura del refrigerador alcance la tem-
peratura establecida, el modo “Enfriamiento-rápido” automáticamente se desactivará
• Modo de congelamiento rápido
Esta función es usada para contrarrestar un aumento repentino en el congelador para preservar el conteni-
do nutricional de los alimentos. Es recomendado que este modo sea activado al menos 2 horas antes de que
se coloquen una cantidad larga de ítems.
Para activar el modo de “Congelamiento-rápido”: presione FRZ Tempo por 3 segundos y el icono Super Frz se
iluminará. Cuando el modo “Congelamiento-rápido” está activado, el modo “Ahorro de Energía” o MODO
AUTO se desactivarán automáticamente.
Para desactivarlo, haga cualquiera de lo siguiente:
1. Active el “Ahorro de Energía” o “MODO AUTO”.
2. Presione FRZ.TEMP. para ajustar la temperatura.
3. Presione y sostenga “FRZ.TEMP.” por 3 segundos. Cuando la temperatura del refrigerador alcanza la
establecida, el modo “Congelamiento-rápido”, automáticamente se desactivará.
• Apagando el compartimento del refrigerador
Cuando el compartimento del refrigerador se apague, el congelador seguirá funcionando. Esta función es
recomendada cuando el compartimento del refrigerador esté vacío por un largo período de tiempo.
Para apagarlo, presione y sostenga el botón MODO DE AHORRO DE ENERGÍA por 3 segundos. El Icono de
“APAGADO” se iluminará. La temperatura del refrigerador mostrada en la pantalla digital se leerá “___”.
Para volver a prenderla, presione y sostenga el botón “Ahorro de Energía” por 3 segundos. El icono volverá a
iluminarse, y la pantalla volverá a ser normal.
• Para establecer la temperatura del compartimento del refrigerador
Presione el botón REF.TEMP. y la temperatura del refrigerador marcada en la pantalla digital se iluminará. Para
cambiar la configuración de la temperatura, presione el botón REF.TEMP de nuevo, hasta que la temperatura
deseada se muestre en la pantalla. Se puede ajustar entre 8 y 2 grados C o entre 36 y 46 grados Fahrenheit.

Refrigerador AutomáticoTRX596310MD
22
• Para establecer la temperatura del congelador
Presione el botón FRZ.TEMP y la temperatura del congelador de la pantalla digital se iluminará. Para
cambiar la configuración de la temperatura, presione el botón FRZ.TEMP de nuevo, hasta que la temperatura
deseada se muestre en la pantalla. La temperatura del congelador puede ser ajustada entre -13 y -22 grados
C o entre 9 y -8 grados Fahrenheit.
• Función de las ondas de luz de la bombilla para el mantenimiento de las gavetas
Use las ondas de luz para mantener las frutas y vegetales para la fotosíntesis, con el propósitos de extender su
período de crecimiento y así preservar su efectividad,
Las ondas de luz se prenderán cuando la puerta del refrigerador esté abierta, la bombilla se apagará
después de que la puerta dure 1 minuto de estar abierta. Las ondas de luz custodiada por la bombilla estarán
prendidas por 10 minutos, y se apagará 5 minutos después de que la puerta se haya cerrado, este ciclo es
de 15 minutos.
• Interruptor de la fábrica de hielo
Para activarlo, presione el ícono “FABRICACIÓN DE HIELO” y este se iluminará. Empecerá a hacer hielo. Para
apagarlo, presione “MÁQUINA DE HIELO”. Cuando la temperatura del congelador baja a -5° C, la máquina
de hielo necesita de 135 min a 24 min para completar el hielo de acuerdo a las diferentes temperaturas del
ambiente.
• Función de la luz de fondo
Cuando la puerta del refrigerador/congelador esté abierta o cualquier botón es presionado, la Función de
Pantalla de Visualización se iluminará. Si ningún botón es presionado y la puerta del refrigerador/congelador
sigue abierta por 30 segundos, la Función de Pantalla de Visualización se apagará.
LIMPIEZA Y MANTENIMIENTO
• Mantenimiento y reparación de la refrigeradora
Limpieza
Limpie la parte de atrás y debajo del refrigerador regularmente del polvo.
Limpie el espacio dentro de la refrigeradora regularmente para evitar el mal olor.

Refrigerador AutomáticoTRX596310MD
23
Antes de limpiar, desenchúfelo. Use suaves toallas y detergente neutral y límpiela finalmente con agua limpia.
Es recomendable, limpiarla una vez cada medio año.
Nunca use las siguientes sustancias para limpiar dentro del refrigerador:
Detergente alcalino (podría causar grietas)
Jabón en polvo, disolvente, alcohol, etc (podría causar daño en las partes plásticas)
Limpiar el aceite o condimento de inmediato (podría causar daño en las partes plásticas)
Luces y reemplazo
Que un profesional las reemplace
El compartimento del refrigerador se mantiene fresco con una onda óptica (algunos modelos)
Use la onda óptica de la bombilla para mantener la fotosíntesis de las frutas y vegetales, prologa su período
de crecimiento y mantiene su frescura.
Cierre
Cuando el refrigerador no está siendo usado por un período largo:
Desconecte el cable de alimentación para evitar que cause una descarga eléctrica o fuego.
Limpie el espacio dentro del refrigerador.
Abra la puerta por un período para secar, cierre la puerta con un brecha izquierda para evitar el mal olor.
Corte de Energía
Reduzca los tiempos de abrir la puerta durante el corte de energía, no ponga alimentos frescos dentro del
refrigerador.
Eliminación de desechos
Cuando usted descarte a una refrigeradora sin usar, remueva el sellador de la puerta para evitar que algún
niño se meta en el refrigerador.
Peligro
Antes de tirar su refrigerador congelador viejo:
1. Quite las puertas
2. Deje los estantes en su lugar para que ningún niño pueda trepar fácilmente dentro
Refrigerador AutomáticoTRX596310MD
24
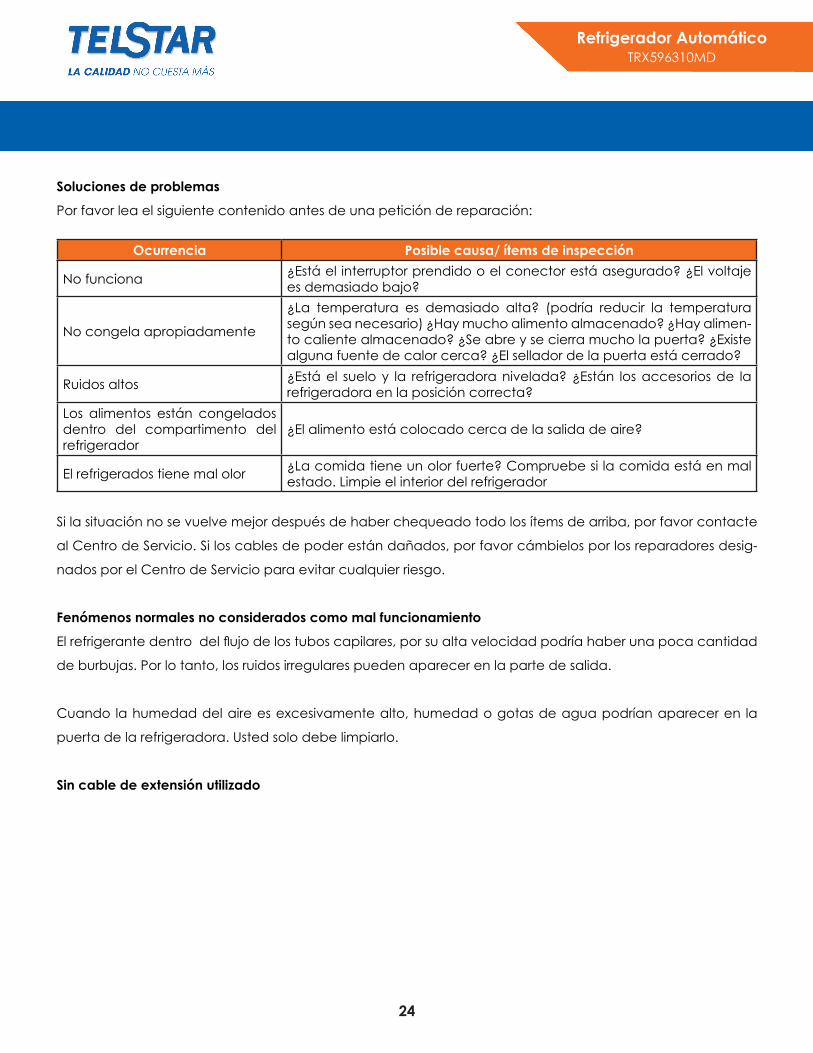
Soluciones de problemas
Por favor lea el siguiente contenido antes de una petición de reparación:
Ocurrencia Posible causa/ ítems de inspección
No funciona ¿Está el interruptor prendido o el conector está asegurado? ¿El voltaje es demasiado bajo?
No congela apropiadamente
¿La temperatura es demasiado alta? (podría reducir la temperatura según sea necesario) ¿Hay mucho alimento almacenado? ¿Hay alimen-to caliente almacenado? ¿Se abre y se cierra mucho la puerta? ¿Existe alguna fuente de calor cerca? ¿El sellador de la puerta está cerrado?
Ruidos altos ¿Está el suelo y la refrigeradora nivelada? ¿Están los accesorios de la refrigeradora en la posición correcta?
Los alimentos están congelados dentro del compartimento del refrigerador
¿El alimento está colocado cerca de la salida de aire?
El refrigerados tiene mal olor ¿La comida tiene un olor fuerte? Compruebe si la comida está en mal estado. Limpie el interior del refrigerador
Si la situación no se vuelve mejor después de haber chequeado todo los ítems de arriba, por favor contacte
al Centro de Servicio. Si los cables de poder están dañados, por favor cámbielos por los reparadores desig-
nados por el Centro de Servicio para evitar cualquier riesgo.
Fenómenos normales no considerados como mal funcionamiento
El refrigerante dentro del flujo de los tubos capilares, por su alta velocidad podría haber una poca cantidad
de burbujas. Por lo tanto, los ruidos irregulares pueden aparecer en la parte de salida.
Cuando la humedad del aire es excesivamente alto, humedad o gotas de agua podrían aparecer en la
puerta de la refrigeradora. Usted solo debe limpiarlo.
Sin cable de extensión utilizado
25
Automatic RefrigeratorTRX596310MD
CONTENTS
Safety ......................................................................................................................27Product description ...............................................................................................28Installation ...............................................................................................................29Start to Use .............................................................................................................31Taking-out and installation of the lower freezer drawer ...................................34Big drawer ..............................................................................................................35Ice-maker ...............................................................................................................35Take out, clean and install the ice cube box ....................................................36Take out and install the ice maker ......................................................................37Door handles .........................................................................................................38Assembly instructions of the refrigeration door handle: ...................................39Scheme of installation of cold storage door handle ........................................39Connecting the water line to the refrigerator ...................................................41Only connect the water line to a drinkable water source. .............................41Introduction of Your Refrigerator’s Functions or .................................................41Initial Power State ...................................................................................................42Energy saving mode .............................................................................................42Auto mode ............................................................................................................43Fast-cooling mode ................................................................................................43Fast-freezing mode ...............................................................................................44Turning off the refrigerator compartment ..........................................................44To set the temperature of the refrigerator compartment .................................44To set the temperature of the freezer compartment .......................................45Function of light-wave fresh-keeping lamp in the crispers. .............................45Ice-making switch .................................................................................................45Backlight action ....................................................................................................45Cleaning and maintenance ...............................................................................45Refrigerator’s maintenance and repair .............................................................45

26
Automatic RefrigeratorTRX596310MD
Welcome to the world of simple handling and no worries
Thank you for choosing Telstar. This manual contains all the information you
will need to safely and correctly use your refrigerator. Please read all the instructions prior to using the appli-
ance, and keep this manual in a secure place for future reference. Do not remove the attached adhesive
identification label containing code, model number, manufacturer and other information from the refriger-
ator. This label will be used by the Midea authorized service representative in the event that your refrigerator
needs servicing.
Environmental advice
The packaging material used is recyclable; we recommend that you separate plastic, paper and cardboard
and give them to recycling companies. To help preserve the environment, the refrigerant used in this prod-
uct is R134a (Hydrofluorocarbon - HFC), which does not affect the ozone layer and has little impact on the
greenhouse effect. According to WEEE (Waste of Electrical and Electronic Equipment) guidelines, waste from
electrical and electronic devices should be collected separately. If you need to dispose of this appliance in
the future, do NOT throw it away with the rest of your domestic garbage. Instead, please take the appliance
to the nearest WEEE collection point, where available.
ATTENTION!The refrigerator you have just purchased may be slightly different from the one shown in the drawings in this
manual, but its overall design is the same.
Please read the information referring to its operation.This refrigerator is intended for domestic use only.
The plug on the refrigerator you have purchased may be different from the one shown in the manual, as the
plug that accompanies the product meets your country’s electrical specifications.

27
Automatic RefrigeratorTRX596310MD
SAFETY
For children
Please keep children from entering or climbing the refrigerator to avoid locking the children inside the
refrigerator and hurting them when the refrigerator falls.
Do not let the children near the refrigerator when open and close the doors. Children should be supervised to
ensure that they do not play with the appliance.
For the user
Never pull out the plug by pulling the power cable. Always hold the plug and pull it out from the socket.
Don’t have the power cable pressed under the refrigerator or feet. When the refrigerator is moved away from
the wall, never press or damage the power cable. When the power cable is damaged or the plug is worn,
don’t use it anymore. When the power cable is worn or damaged, you must change it at the repair station
designated by the manufacturer.
When coal gas or other inflammable gases are leaked, close the valve for leaking gases. Open the door and
windows. Don’t pull out or insert the plug of refrigerator or other electric appliances.
Don’t put inflammable, explosive, volatile or strongly corrosive substances into the refrigerator to avoid
damaging the refrigerator or starting fire or other accidents.
Don’t use inflammable solvent near the refrigerator to avoid fire.
It is advisable that you don’t put the power socket, voltage stabilizer, microwave oven and other electric
appliances on top of refrigerator to ensure safety. Don’t use any electric appliances inside the refrigerator
(except for the model recommended) to avoid electromagnetic interference or other accidents.
When the refrigerator starts to work, don’t touch the cold surface of the freezer compartment, especially with
wet hands, to avoid hurting.
The gap between doors and between the door and refrigerator body is small. Don’t put your hands into these
areas to avoid finger squeeze. When you open the refrigerator’s door, don’t let children approach.
Don’t sprinkle water onto rinse the refrigerator with water. Don’t put the refrigerator in wet or easy-to-sprinkle
places so as not to influence the electric insulation property of the refrigerator.

28
Automatic RefrigeratorTRX596310MD
Don’t disassemble or reform the refrigerator by yourself. Never damage the refrigeration pipeline. Please get
the refrigerator repaired by professionals.
Don’t put fluid substances in bottles or sealed containers into the freezer, like bottled beer or drinks to avoid
that the explosive cracking during freezing causes other losses.
When power outage or cleaning, pull out the plug. Turn on the power supply after at least five minutes to avoid
that repeated startup might damage the compressor.
When the refrigerator is out of service, please take down the refrigerator’s door, remove the door seal and
shelves and put them at proper places to avoid that children might play inside and cause accident.
This product is a household refrigerator and is only suitable for storage of food according to state standards. It
can’t be used for other purposes, like storage of blood, drugs, biological products and etc.
1. Display
2. Left door for refrigerator compartment
3. Upper door for freezer compartment
4. Lower door for freezer compartment
5. Door handle
6. Right door for refrigerator compartment
7. Drawer handle
8. Ice storage box
9. Ice scoop
10. Partition plate for lower freezer drawer
11. Partition plate for upper freezer drawer
12. Uper freezer drawer
13. Lower freezer drawer
PRODUCT DESCRIPTION

29
Automatic RefrigeratorTRX596310MD
1. Left door for refrigerator compartment 2. Cantilever rack 3. Turnover beam 4. Sliding cantilever rack 5. Fruit and vegetable drawer 6. Small drawer 7. Big drawer 8. Automatic ice maker 9. Drawer handle 10. Leveling leg 11. Switch for refrigerator compartment lamp 12. Top lamp for refrigerator compartment 13. Right door for refrigerator compartment 14. Butter box 15. Air duct cover plate 16. Folded cantilever rack 17. Side lamp for refrigerator compartment 18. Gallon bottle rack (With egg bracket) 19. Light-wave fresh-keeping lamp 20. Special-shaped bottle rack21. Top lamp for freezer compartment 22. Upper door for freezer compartment 23. Lower door for freezer compartment24. Decorative cover for bottom beam
INSTALLATION
Remove all packaging material before using the new refrigerator. This includes the foam base and all
adhesive tape holding the refrigerator accessories inside and outside.
Clean both the inside and outside of the refrigerator with wet cloth (a little detergent could be added into the
warm water to wash the cloth and then wipe it again with the clean water);
Prepare an independent two-pole socket with grounding contact for the refrigerator and it shall not share a
multi-purpose socket with other electrical appliances;

30
Automatic RefrigeratorTRX596310MD
Do connect grounding wire! The grounding pole of the socket shall be provided with a reliable grounding wire.
Open the refrigerator body and take out the accessory (decorative cover for bottom beam) and the three
screws from the instruction packaging bag; then install them into the bottom beam as shown by the schemat-
ic diagram on the right.
The decorative cover for bottom beam is used as ornament, so you can choose not to install it. It won’t affect
the refrigerator’s performance or conditions no matter whether you install it or not.
• Transport and Placing of Your Refrigerator
Transport
Keep upright and avoid squeezing or vibration during transport. Avoid a slant angle over 45 degree during
handling.
Avoid the door or top cap from being under excessive stress when moving; otherwise, it may become de-
formed.
Placing
Place your refrigerator in a well- ventilated place and keep it from heat source and direct sunlight. Don’t
place it in any humid or wet place so as to avoid rust and weakening of insulation effect.
There shall be a space not less than 30cm from the top of your refrigerator and not less than 10cm from both
sides or the back of the refrigerator to the adjacent walls respectively. This requirement is good for open and
close of the door and also for heat emission.
The refrigerator shall be placed on a flat and firm ground (if not flat, you can use the leveling legs for adjust-
ment).
Keep Your Refrigerator Standing
Don’t connect your refrigerator to the power supply immediately after it is placed vertically. You should keep

31
Automatic RefrigeratorTRX596310MD
it standing for at least 6 hours before switching it on in order to ensure it running well.
Make sure the power wire is not pinned by the refrigerator or other objects so as to avoid accidents arising
from power wire faults. Please check the voltage scope of your refrigerator against the actual power supply
before switching it on.
Screws Decorative cover for bottom beam
Attention
The refrigerator must be disconnected from the source of electrical supply before attempting the installation
of accessory.
Don’t use mechanical equipment or other methods to accelerate the defrosting process except the means
recommended by the manufacturer.
Don’t use any electrical appliances in the food storage compartments except the model recommended by
the manufacture.
The R134a refrigerant and cyclopentane foaming material used in the refrigerator are inflammable. All waste
and discarded refrigerators shall be placed away from naked fire and they are not allowed to burn.
Warm Reminder: Place foods into the drawer. Do not place any foods after removing the drawer
• Start to Use
You ought to get a good knowledge of all safety precautions and make sure that your refrigerator has been
placed properly in its final position before using.
1. Unpacking
Please install the decorative cover for bottom beam onto your refrigerator after unpacking and adjust the
front leveling legs to level your refrigerator.
2. Connecting Your Refrigerator to the Power Supply
Your refrigerator will enter the ex- factory default state after connecting to the power supply and it will display
target temperature for the refrigerator compartment and freezer compartment.
3. Work Modes of Your Refrigerator
You can set your refrigerator in either of the following two ways:
Auto mode: we suggest you choosing this mode if you have no special requirements. Your refrigerator will work
automatically after you chose this mode.

32
Automatic RefrigeratorTRX596310MD
Manual mode: You can set the temperature by pressing the temperature adjustment key.
4. Put Food into Your Refrigerator
You can put your food into the refrigerator after a period of time (About hours in summer) when the refrigerator
has already fully refrigerated its interior compartments.
Tips: The interior temperature may require a certain period of time to reach balance if the setting temperature
is changed or other food is put into the refrigerator. Such a period of time depends on the change to the set-
ting temperature, the surrounding temperature, opening frequency, the amount of the stored food and etc.
Refrigerator compartment
Though the temperature-adjustable device could keep most of the refrigerator compartment at an average
temperature around 2~8?C, it fails to preserve the freshness of food for long. As a result, the refrigerator com-
partment can be used only for shortterm storage.
Use of turnover beam
Please keep strictly to the warnings on the label of the turnover beam. It is a normal phenomenon that the
surface of the turnover beam is hot. Dews on the surface are also normal in summer or when the surrounding
environment is wet. What you need to do is to clean them away with cloth.
Adjustment of cantilever rack
The cantilever rack could be adjusted to the proper height as required by food. Please adjust the cantilever
rack by following the arrows as shown in the diagram. Raise it upward first and then take it out by tilting it up-
ward. During installation, put the upper end of the fixed leg into one of the upper slots on the supporting iron
first and then put the lower end of the fixed leg into the third slot on the lower part of the supporting iron.
Height adjustment and cleaning of door-mounted bottle rack
Raise the bottle rack in the direction, hold it with both hands and take it out in the direction. After cleaning,
you can install the rack in the reverse order and you can also adjust the height of the rack.

33
Automatic RefrigeratorTRX596310MD
• Food suggested to store in refrigerator compartment
1. Cooked wheaten food, cans, milk, etc.
2. Snack food, food subject to tainting, dairy product
3. Cooked cold meat, sausage
4. Fruit, vegetables
5. Eggs, butter, cheese
6. Cans, seasoning
7. Drinks, other bottled food
• Freezer compartment
The temperature in the freezer compartment is very low so it could preserve the freshness of food for long.
Those that shall be stored for long could be put in this compartment but not exceed the storage period
specified on the packaging of each kind of food.
You can take out the drawers of the freezer compartment to increase its capacity and store more food.
Food suggested to store in freezer compartment
1. The upper drawer of the freezer could be used to store fish, meat, ice-cream and etc.
2. Ice storage box is used to store the ice.
3. The lower drawer of the freezer is used to store fish, meat and packaged poultry meat.

34
Automatic RefrigeratorTRX596310MD
• Taking-out and installation of the lower freezer drawer
1. Pull out the lower freezer drawer first.
2. Take out the two fixed screws from the partition plate of the lower freezer drawer with screw driver and
then take off the partition plate.
3. Take off the rear stopper for the lower drawer as shown by Fig. A.
4. Take out the lower drawer body with force as directed by the arrows in Fig. B.
5. The installation of the lower drawer body is conducted in the reverse order. You should install the lower
drawer body first and then install the rear stopper for the lower drawer as shown in Fig. C. Finally, both
sides of the drawer shall be connected to the position shown by the arrows respectively.
6. The partition plate is installed into the corresponding slots and then is fixed with screws. The position of
the partition plate for the lower drawer could be adjusted according to your preference.
Don’t remove the lower freezer drawer if not necessary.

35
Automatic RefrigeratorTRX596310MD
• Big drawer
The big drawer has a maximum load of 10kg.
Pull out and install the big drawer
1. Pull out the big drawer;
2. Find the hook at the left and right sides at the drawer bottom (shown in the figure).
3. Hold the hook at two sides with a nose pliers or tweezers and push it up and out of the groove of sliding
rail, and take out the hook at the other side with the same method.
4. Take out the drawer.
5. Install the drawer by putting the hook into the right place.
• Operating instructions on the ice- maker
1. When the refrigerator is used for the first time, start the ice-maker after 20min. The ice-maker is capable
of producing 1.0~1.1Kg ice in 24hr, depending on the temperature of freezer compartment, surrounding
temperature, times of door opening/closing and other working conditions.
2. If the ice-maker isn’t used for a long period, please close the ice-maker at the control panel of the
Refrigerator door, clear the ice cube box and ice storage box.
3. When the ice marker starts again after a long period of power off, please ensure that ice cubes are
not melted. Otherwise, please clear the ice cube box and ice storage box.
ICE-MAKER

36
Automatic RefrigeratorTRX596310MD
4. Check the level of water tank from time to time (if the level of water tank is too low, ice cubes will be
smaller).
5. The ice-maker checks the ice amount automatically and stop ice- making when the ice storage box is
full.
6. You will hear the sound of motor after about two hours, which is the sound of pump providing water to
the ice maker and doesn’t indicate malfunctioning.
7. It is normal that several ice cubes may stick together or get crushed.
8. When the refrigerator is used for the first time, the ice maker starts to work after the freezer compart-
ment is cooling for about three hours (maybe longer when there are much food stored). The ice-maker
could produce about 1.3Kg ice cubes within 24 hours, which may vary depending on the temperature of
freezer compartment, surrounding temperature, times of door opening/closing and other working condi-
tions.
9. The ice-maker is capable of automatic water supply, ice-making and ice-removal. Please don’t take
out the ice cube box and add water by yourself.
If you did not use the fridge for a long time,you need to get the water out of the ice-maker when using
again,and clean the ice-maker to make sure the ice is pure.
• Take out, clean and install the ice cube box
lf the ice maker isn’t used for a long period, ice cubes that are just produced might have unpleasant smell. You
must take out and clean the ice cube box.
Open the upper drawer in the freezer compartment, rotate the knob of ice maker counterclockwise by 90,

37
Automatic RefrigeratorTRX596310MD
turn the handle from the horizontal position to vertical position to release the lock (as shown in Fig. 1 of Pg. 34),
pull it out (as shown in Fig. 2 of Pg. 34) and take out the ice cube box.
Rinse the ice cube box with warm water (below 60°C) and don’t use detergent.
Dry the ice cube box completely in air in case that water droplets in the ice cube box might cause abnormal
functioning of the ice maker.
When the ice maker can’t move, separate the ice maker as shown in Fig. 1 and Fig.2. Then install after ice
cubes are melted.
Insert the ice cube box onto the rack according to original sequence and rotate to the locked position.
• Take out and install the ice maker
When the ice maker isn’t used, it could be taken out and the vacated space could be used as a part of the
freezer compartment.
Push the Ice Maker button on the control panel at the refrigerator door and the icemaking sign disappears.
Open the door and take out the drawer.
Pull the ice-maker out (as shown in Fig.1), and then downwards, so that the ice maker is unhooked (as shown
in Fig. 2).
Pull down the ice maker’s power plug so that it is detached from the ice- maker’s power socket (as shown in
Fig. 3)
Install the ice maker into the original position, push the Ice Maker button, the ice-making symbol appears.

38
Automatic RefrigeratorTRX596310MD
Close the door after the ice maker is installed to the proper place, otherwise, it might damage the ice maker.
Making minor adjustments between doors
Assembly instructions of cold storage door handle:
1. Firstly, take the handle set bolts out from the refrigerator, use cross recessed screwdriver to set the bolt
on the door. Fix it tight with all the screw thread twisted through the hole, as shown in the figure;
2. After the first step is completed, take the Cold storage door handle out from the box, place it as per
the direction shown in the figure (Note: i.e. the direction which both screw holes on the handle are close
to the edge), and hang the handle above the set bolt;
3. Use the small hexagon spanner supplied in the box to set the handle fixing socket head cap screws
into both the small screwed holes on the handle. After they are screwed down, gently shake the handle,
so as to confirm that the handle is well erected.
DOOR HANDLES

39
Automatic RefrigeratorTRX596310MD
• Assembly instructions of the refrigeration door handle:
The assembly steps of the refrigeration door handle is same with that of the cold storage door handle. Please
note that: during the assembly of the handle, the direction of tapping hole is downward (to the ground).
• Scheme of installation of cold storage door handle
Difference between the chilling and refrigeration handle: lie them flat, the one with higher chordal height is
the refrigeration hand
Remember a level refrigerator is necessary for getting the doors perfectly even. If you need help, review the
previous section on leveling the refrigerator.
When the left doors is lower than the right door(left). Or the right doors is lower than the left door.

40
Automatic RefrigeratorTRX596310MD
Do as follows
1. Raise the left door or the right door
2. Insert the supplied fastener-ring using (2) using a pair of pliers (3) in the gap between the hinge-grom-
met (1) and the lower hinge (4)The number of fasten- rings you will need to insert depends on the gap.
Installing the water line
Water line installation kits are available at extra cost from your dealer.
Connecting to the water supply line
1. First shut off the main water supply line and turn the ice-maker off.
2. Locate the nearest cold water drinking line.
3. After connecting the water supply to the water valve, turn your main water supply back on and flush
several gallons water to clear the water supply line.

41
Automatic RefrigeratorTRX596310MD
• Connecting the water line to the refrigerator
There are several items that you need to purchase to complete this connection.
You are find these items sold as a kit at your local hardware store.
1.First water tubes (supplied) insert Into corresponding hole of
water connector (supplied).
2.Second water line installation kit (not included) inserts into
another hole of water connector (supplied).
3.Turn water on and check for any leakage
• Only connect the water line to a drinkable water source.
If your water line is not drinkable, please add an external water filter.
If you have to repair or disassemble the water line, cut off the plastic tubing to make sure you get a snug,
leak-free connection.
• Introduction of Your Refrigerator’s Functions or
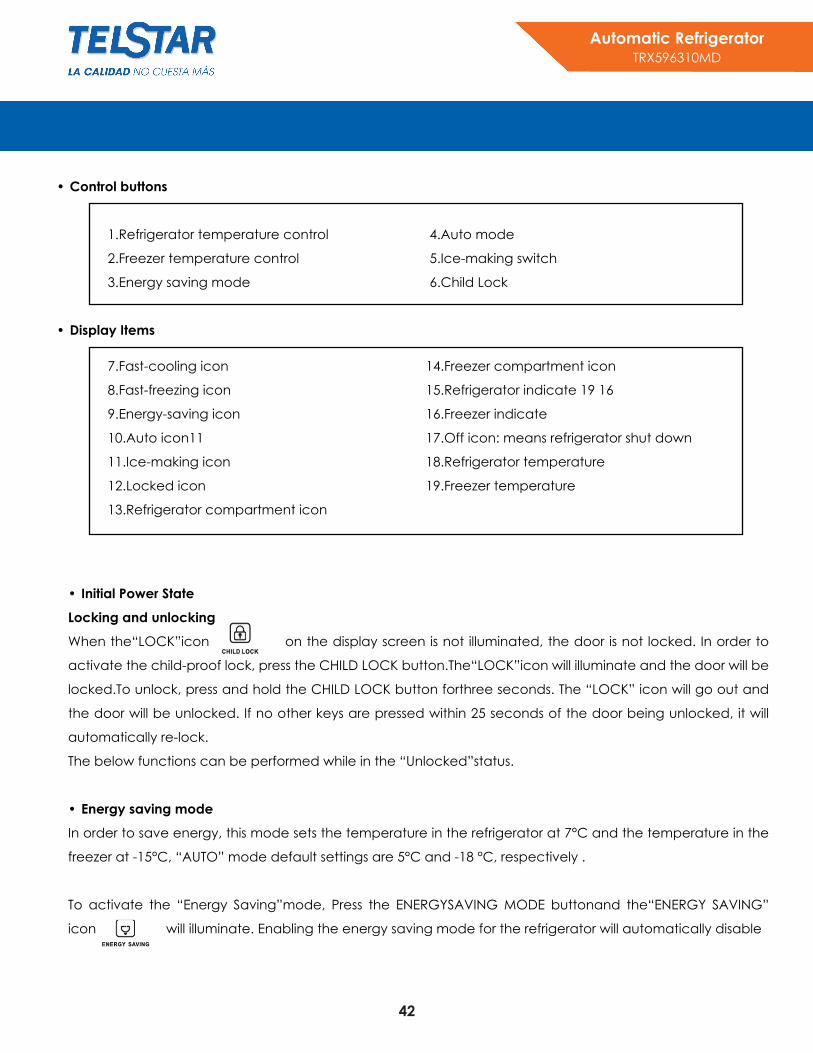
42
Automatic RefrigeratorTRX596310MD
1.Refrigerator temperature control
2.Freezer temperature control
3.Energy saving mode
4.Auto mode
5.Ice-making switch
6.Child Lock
7.Fast-cooling icon
8.Fast-freezing icon
9.Energy-saving icon
10.Auto icon11
11.Ice-making icon
12.Locked icon
13.Refrigerator compartment icon
14.Freezer compartment icon
15.Refrigerator indicate 19 16
16.Freezer indicate
17.Off icon: means refrigerator shut down
18.Refrigerator temperature
19.Freezer temperature
• Control buttons
• Display Items
• Initial Power State
Locking and unlocking
When the“LOCK”icon on the display screen is not illuminated, the door is not locked. In order to
activate the child-proof lock, press the CHILD LOCK button.The“LOCK”icon will illuminate and the door will be
locked.To unlock, press and hold the CHILD LOCK button forthree seconds. The “LOCK” icon will go out and
the door will be unlocked. If no other keys are pressed within 25 seconds of the door being unlocked, it will
automatically re-lock.
The below functions can be performed while in the “Unlocked”status.
• Energy saving mode
In order to save energy, this mode sets the temperature in the refrigerator at 7°C and the temperature in the
freezer at -15°C, “AUTO” mode default settings are 5°C and -18 °C, respectively .
To activate the “Energy Saving”mode, Press the ENERGYSAVING MODE buttonand the“ENERGY SAVING”
icon will illuminate. Enabling the energy saving mode for the refrigerator will automatically disable

43
Automatic RefrigeratorTRX596310MD
all other modes.
To de-activate “Energy Saving” mode, do any of the following:
1. Select another mode.
2. Press REF. TEMP. or FRZ. TEMP. to exit setup.
3. Press ENERGYSAVING MODE button to exit the energy-saving mode when any of the above situations
occur.
4. Press AUTO MODE to exit the energy-saving mode when any of above situations occurs.
• Auto mode
This function will set the temperature of the refrigerator to 5°Cand the freezer compartment to -18°C .If the
refrigerator compartment is turned off, the auto mode will still be in effect for the freezer compartment.
To activate Auto Mode: Press AUTO MODE and the “AUTO ”icon will illuminate, indicating the activation of
“AUTO MODE”. Selecting “AUTO MODE”will automatically de-activate all other modes.
To toggle between Celsius and Fahrenheit display, press and hold the “AUTO MODE”button for 3 seconds. . To
de-activate AUTO MODE:
1. Select another mode
2. Press REF. TEMP. or FRZ. TEMP. to exit setup.
• Fast-cooling mode
This mode is used to counteract a sudden rise in the temperature of the refrigerator compartment,such as
when a large amount of items is placed into the refrigerator after a trip to the supermarket.The compressor will
work for longer cycles to maintain the desired temperature.
To activate the mode: Press REF Temp for three seconds and the“Super Cool ”icon will illuminate. When the
fast-cooling mode is activated for the refrigerator compartment, all other modes are automatically de-acti-
vated.
The“Fast-Cooling”mode can be de-activated by doing any of the following:
1. Activate the “Energy-Saving” or “AUTO” mode;
2. Press REF. TEMP. to adjust the temperature

44
Automatic RefrigeratorTRX596310MD
3. Hold down REF. TEMP. for three seconds.When the temperature of the refrigerator compartment
reaches the set temperature,“Fast-cooling”mode will be automatically de-activated.
• Fast-freezing mode
This function is used to counteract a sudden rise in the freezer compartment in order to preserve the nutritional
content of the food.It is recommended that this mode be activated at least two hours before a large quantity
of items is placed into the freezer.
To activate the “Fast-freezing”mode:Press FRZ Temp for three seconds and the Super Frz. icon will illuminate.
When the “Fast-freezing”mode is activated for the freezer compartment, and the “Energy-saving”mode or
AUTO MODE will automatically be de-activated.
The“Fast-Freezing”mode can be de-activated by doing any of the following:
1. Activate the “Energy-saving”or “AUTO” MODE.
2. Press FRZ. TEMP. to adjust the temperature
3. Press and hold“FRZ. TEMP”. for three seconds. When the temperature of the freezer compartment
reaches the set temperature,“Fast-freezing” mode will be automatically de-activated.
• Turning off the refrigerator compartment
The refrigerator compartment can be independently turned off.When the refrigerator compartment is
turned off,the freezer compartment will remain working.This function is recommended when the refrigerator
compartment will remain empty for a long period of time .
To independently turn off the refrigerator compartment,Press and hold the ENERGY SAVING MODE
button for three seconds.The“Refrigerator Compartment”icon will go out and the“OFF”icon will illuminate. The
REFRIGERATOR TEMPERATURE digital display will read shows“—”.
To turn the refrigerator compartment back on, press and hold the “Energy Saving”button for three sec-
onds.The“Refrigerator Compartment”icon will illuminate, the“OFF”icon will go out, and the REFRIGERATOR
TEMPERATURE digital display will return to normal.
• To set the temperature of the refrigerator compartment
Press the REF. TEMP. button and the REFRIGERATOR TEMPERATURE digital display will illuminate.To change the

45
Automatic RefrigeratorTRX596310MD
temperature setting,press the REF.TEMP. button again,until the desired temperature is diaplayed. The
temperature of the refrigerator compartment can be adjusted between 8 and 2 degrees C with a step of 1°C
or between 36 and 46 degrees Fahrehneit with a step of 1°F .
• To set the temperature of the freezer compartment
Press the FRZ.TEMP button and the Freezer Temperature digital display will illuminate.To change the tempera-
ture setting, press the FRZ. TEMP. button again,until the desired temperature is displayed.The temperature of
the freezer compartment can be adjusted between -13 and -22 degrees C with a step of 1°C or between 9
and -8 degrees Fahrehneit with a step of 1 °F .
• Function of light-wave fresh-keeping lamp in the crispers.
Use light waves to keep fruit and vegetable for photosynthesis, in order to extend the growth period and make
preservation effectively. Light-wave fresh-keeping lamp will be on when the refrigerator door open,the
lamp will be off after the door open lasts for 1 minutes.Light-wave fresh- keeping lamp will be on for 10
minutes,off for 5 minutes after the refrigerator door closed, this cycle is 15 minutes.
• Ice-making switch
To activate the ice maker,press the“ICE-MAKING”and the“ICE-MAKING” icon will illuminate.The ice maker will
begin to make ice.To turn off the ice maker, press“ICE-MAKER”.The ice maker will stop making ice.When the
freezer temperature below -5°C the ice marker needs 135minutes to 240 minutes to complete ice according
to different ambient temperature.
• Backlight action
When the refrigerator/ freezer door is open or any button is pressed,the Function Display Screen will become
illuminated.If no button is pressed and the refrigerator/freezer door has remained open for 30 seconds,the
Function Display will turn off.
CLEANING AND MAINTENANCE
• Refrigerator’s maintenance and repair
Cleaning
Clean regularly dust from the back of refrigerator and ground.
Clean regularly the space inside the refrigerator to avoid any unpleasant smell.

46
Automatic RefrigeratorTRX596310MD
Before cleaning, pull out the plug and use soft towels and neutral detergent and clean it finally with clear
water. It is recommended to clean once half a year.
Never use following substances to clean the space inside the refrigerator:
Alkaline or weakly alkaline detergent (it might cause cracking of the liner and plastic parts).
Soap powder, benzoline, thinner, alcohol and etc (might damage plastic parts). Wipe off edible oil or flavoring
immediately (might cause cracking of plastic parts)
Lights and replacement
Replace by professionals.
Refrigerator compartment keep fresh with optical wave (only some models)
Keep fresh with optical wave--- use the optical-wave lamp to maintain the Photosynthesis of fruit and
vegetables, prolong the growth period and keep it fresh effectively.
Shutdown
When the refrigerator isn’t used for a long period:
Pull out the power cable to avoid that the power cable gets old and causes electric shock or fire.
Clean the space inside the refrigerator
Open the door for a period for drying, close the door with a gap left to avoid unpleasant odor.
Power outage
Reduce the times of door opening during power outage; don’t put fresh food inside the refrigerator anymore.
Disposal
When you discard an unused refrigerator, remove the door seal to avoid locking children inside the refrigera-
tor.
Danger
Risk of child entrapment. Before you throw away your old refrigerator or freezer:
1. Take off the doors.
2. Leave the shelves in place so that children may not easily climb inside.
Please read the following contents before repair request:

47
Automatic RefrigeratorTRX596310MD
Problem solving
Please read the following contents before repair request:
Ocurrence Possible cause / inspection itens
Not working Whether the power is switched on, whether the plug is secured? Whether the voltage is too low?
Can’t freeze properly
Whether the temperature is set too high (might reduce the tempera-ture as required). ? Whether too much food is stored? Whether hot foot is stored? Whether the door is opened and closed too frequently? Whether there is hot source around the refrigerator? Whether the door seal is closed?
Loud noises Whether the ground is leveled and the refrigerator is placed on leveled ground? Whether accessories of the refrigerator are put at the right position?
Food is frozen inside the refrigera-tor compartment. Whether the food is put near the air outlet?
The refrigerator has unpleasant smell
Food with special odor shall be tightly wrapped. Check whether the food has gone bad. Clean inside the refrigerator.
If the situation doesn’t turn better after you have checked all above items, please contact with the after-sales
Service Centers. If power cables are damaged, please get it changed by the repairmen designated by our
Service Centers to avoid any risk.
Normal phenomena not regarded as malfunctioning
Refrigerant inside the capillary tubes of the refrigerator flow in high speed and might have a few amount of
bubbles. Hence, irregular noises might appear at the outlet.
When the air humidity is excessively high, moisture or water droplets might appear around the refrigerator’s
door. You just need to wipe it off.
No extension cord used.

Refrigerador AutomáticoTRX596310MD
48
EN EL COMPRESOR