modelador de cabelo 8 em 1 in 1 hair...
TRANSCRIPT
MODELADOR D8DE CABEL8 IN 1 HAIR
MANUAL DE
INSTRUCT
LO 8 EM 1
RSTYLER
JDL-118
INSTRUÇÕES
TION MANUAL
ÍNDICE Pág. INTRODUÇÃO 3
INSTRUÇÕES DE SEGURANÇA 3
DESCRIÇÃO DAS PARTES 8
DESCRIÇÃO GERAL 9
ESPECIFICAÇÕES TÉCNICAS 9
UTILIZAÇÃO DO APARELHO 9
ANTES DA UTILIZAÇÃO 9
FUNCIONAMENTO 9
COLOCAR E REMOVER ACESSÓRIOS 10
PLACAS PARA ALISAR E FRISAR 10
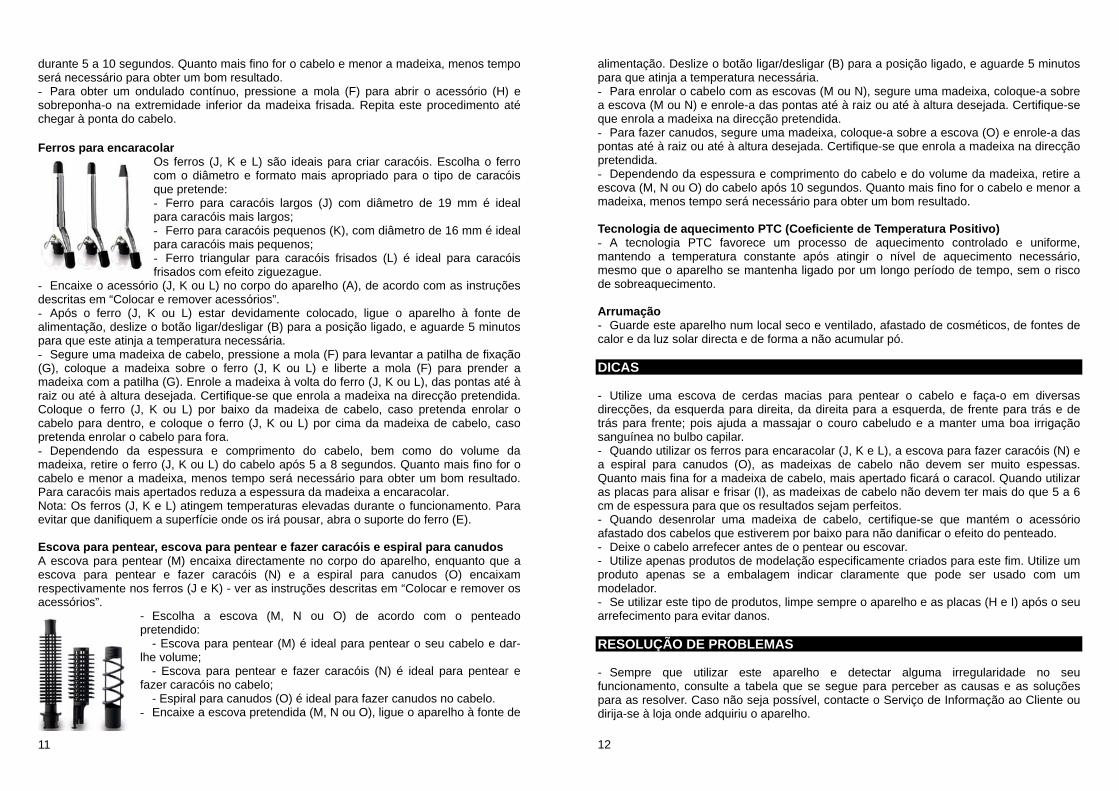
FERROS PARA ENCARACOLAR 11 ESCOVA PARA PENTEAR, ESCOVA PARA PENTEAR E FAZER CARACÓIS E ESPIRAL PARA CANUDOS 11
TECNOLOGIA DE AQUECIMENTO PTC (COEFICIENTE DE TEMPERATURA POSITIVO) 12
ARRUMAÇÃO 12
DICAS 12
RESOLUÇÃO DE PROBLEMAS 12
LIMPEZA 13
PROTECÇÃO DO AMBIENTE – 2002/96/EC 14
GARANTIA E ASSISTÊNCIA 14
CONDIÇÕES DE GARANTIA 14
CERTIFICADO DE GARANTIA 28

3
INTRODUÇÃO Agradecemos a sua escolha, este aparelho Electric Co irá certamente facilitar o seu dia-a-dia. Leia atentamente este manual de instruções antes de colocar o aparelho em funcionamento, para que possa tirar o máximo partido do mesmo, e guarde-o para referência futura. INSTRUÇÕES DE SEGURANÇA ESTE APARELHO DESTINA-SE EXCLUSIVAMENTE A UTILIZAÇÃO DOMÉSTICA!
Para reduzir o risco de acidentes pessoais ou danos quando utilizar aparelhos eléctricos, deve seguir sempre as precauções de segurança básicas, incluindo as seguintes: - Antes de utilizar o aparelho verifique, na etiqueta de especificações técnicas, se a corrente eléctrica corresponde à rede eléctrica da sua habitação. A etiqueta está colocada no aparelho. Em caso de dúvida, recorra à ajuda de um electricista qualificado. - Este aparelho pode ser utilizado por crianças de 8 ou mais anos e pessoas com capacidades físicas, sensoriais ou mentais reduzidas ou sem experiência e conhecimento para o seu manuseamento, se tiverem recebido supervisão ou instruções relativas à utilização do aparelho de forma segura e compreenderem os riscos envolvidos. As crianças não devem brincar com o aparelho. A limpeza e manutenção não devem ser feitas por crianças sem supervisão. - As crianças desconhecem os danos que podem ser causados por aparelhos eléctricos, e devem ser sempre supervisionadas por forma a garantir que não brincam com o aparelho. Este aparelho não é um brinquedo, como tal, deve
4
ser mantido fora do alcance de crianças. - Após desembalar o aparelho, certifique-se que não está danificado e que não falta nenhuma peça. Em caso de dúvida contacte o Serviço de Informação ao Cliente. Todo o conteúdo da embalagem, como por exemplo, sacos de plástico, esferovite, fitas, etc., deve ser mantido fora do alcance das crianças, pois pode ser perigoso e causar asfixia. Deve utilizar apenas os acessórios recomendados pelo fabricante e contidos nesta embalagem, sob o risco de acidente ou danos no aparelho. - Nunca deixe o aparelho sem supervisão durante o funcionamento. - Nunca desmonte ou tente efectuar qualquer tipo de reparação no aparelho. Caso não cumpra com esta norma de segurança pode colocar em risco a sua própria segurança e invalidar os termos da garantia. Somente pessoal técnico, devidamente qualificado, pode efectuar qualquer tipo de reparação neste aparelho. - O aparelho não deve ser utilizado se estiver avariado, se não estiver a funcionar correctamente ou se detectar alguma anomalia no cabo de alimentação ou na ficha. Sempre que detectar alguma avaria e/ou anomalia, retire imediatamente a ficha da fonte de alimentação e dirija-se à loja onde o adquiriu, ou a um técnico qualificado, a fim de efectuar a reparação ou substituição do aparelho ou do cabo de alimentação. Assegure-se que somente são usadas peças novas e recomendadas. - Este aparelho foi concebido apenas para uso doméstico. Qualquer outro uso será considerado impróprio e consequentemente perigoso. O fabricante não pode ser
5
responsabilizado por nenhuns ferimentos ou danos resultantes do uso impróprio do aparelho. - De forma a evitar riscos de incêndio ou choques eléctricos, certifique-se que nenhum tipo de líquido entra em contacto com as partes eléctricas do aparelho ou com o cabo de alimentação. Não utilize o aparelho no exterior e mantenha-o afastado de fontes directas ou indirectas de água, como por exemplo, lavatórios, jarras, vasos, etc., nunca o utilize nas imediações da banheira, chuveiro ou piscina e certifique-se que não fica ao alcance de uma pessoa que esteja no banho ou duche. No caso de derrame de qualquer líquido sobre as partes eléctricas, desligue o aparelho imediatamente da fonte de alimentação e dirija-se à loja onde o adquiriu ou a um técnico qualificado para reparação. - Não toque no aparelho, nem na sua ficha, com as mãos molhadas ou os pés húmidos ou descalços, a fim de evitar choques eléctricos. - Se o aparelho cair dentro de água, não o retire sem o desligar da fonte de alimentação. - Caso o aparelho apresente alguma humidade, retire imediatamente a ficha da fonte de alimentação e aguarde que seque devidamente antes de o voltar a utilizar. - Desligue sempre o aparelho da fonte de alimentação quando não o utilizar, mesmo que por breves momentos, e no final de cada utilização. Tenha especial atenção quando utilizar o aparelho numa casa de banho, pois a proximidade de água representa um perigo, mesmo quando este se encontra desligado no botão ligar/desligar. - Verifique periodicamente o cabo de alimentação. Se estiver
6
danificado, dirija-se à loja onde adquiriu o aparelho ou a um técnico qualificado para reparação ou substituição para evitar riscos - Não coloque nenhum objecto por cima do cabo de alimentação, nomeadamente carpetes e tapetes, nunca o dobre ou torça e certifique-se que o mantém afastado de arestas cortantes, superfícies quentes e de locais de normal circulação de pessoas de forma a evitar quedas. Não deixe que o cabo de alimentação fique pendurado de forma a que uma criança o possa agarrar. - Segure sempre na ficha para desligar o aparelho da fonte de alimentação, nunca o faça puxando pelo cabo de alimentação. - Não desloque o aparelho puxando-o pelo cabo de alimentação. Certifique-se que nada impede o seu movimento e não o enrole à volta do aparelho. - Sempre que pretender limpar, armazenar, e se não pretender utilizar o aparelho por um longo período de tempo, desligue-o no botão ligar/desligar, retire a ficha da fonte de alimentação e permita que arrefeça por completo. - Enquanto o aparelho estiver em funcionamento ou ainda quente, mantenha-o afastado de superfícies que não sejam resistentes ao calor, não o deixe próximo de roupa, papel ou outros objectos inflamáveis, e nunca o cubra. - O aparelho e os acessórios ficam quentes durante e após o funcionamento o que é normal devido à sua própria função. Desligue sempre o aparelho da fonte de alimentação e aguarde que arrefeça completamente antes de mudar os acessórios, proceder a qualquer operação de limpeza e antes de o arrumar. Evite o contacto com a pele e couro cabeludo
7
pois pod- Nunca - Não apacessóriborrifadoarmazenpoderão- Consenão o gperto de - Este apeléctrico tomada c- Para pcircuito dispositivresidual especial
derá sofrer queutilize este ap
plique produtoios. Não diores para o ne o aparelhoo deformar o crve o aparelh
guarde em locfontes de caloparelho perten
duplo), pelocom ligação dprotecção adeléctrico que
vo de correntnominal que nista.
AVISOS! NÃO UTILMESMO PBACIAS OCONTÊM ÁRISCO DEMERGULHQUALQUE
eimaduras. parelho em caos ou loções ireccione spraparelho ou
o perto de coscorpo principal ho e os seus acais húmidosor. nce à Classe o que não éde terra. dicional, acone fornece a te residual – dnão exceda 3
IZE ESTE APPERTO DE BAOU OUTROS R
ÁGUA E CHOQUE EHE O APAREER OUTRO L
abelo artificial.de cabelo dirrays (laca)
u para os acsméticos, uma
e os acessóracessórios lims, sob a luz s
II (aparelho cé necessário
nselha-se a casa de b
disjuntor, com30mA. Solicite
PARELHO DEANHEIRAS, CRECIPIENTE
ELÉCTRICO -LHO EM ÁGU
LÍQUIDO.
rectamente noou água d
cessórios. Nãa vez que esterios.
mpos e sem psolar directa o
com isolamenligá-lo a um
instalação, nbanho, de um uma correne a ajuda de u
ENTRO OU CHUVEIROSES QUE
- NÃO UA OU
os de ão es
pó, ou
nto ma
no m
nte m
,
8
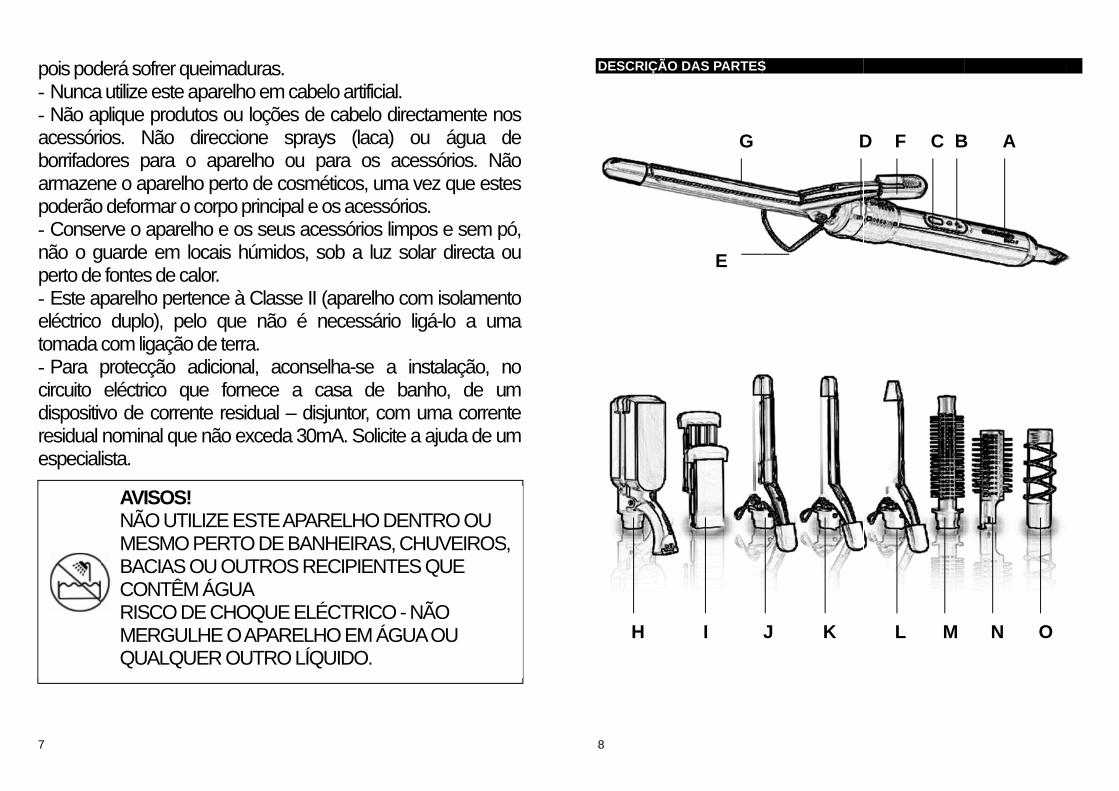
DESCRIÇÃ
H
ÃO DAS PARTES
I
E
G
S
D
J K
BC D
L M
F
A B
N O
9
DESCRIÇÃO GERAL A. Corpo do aparelho B. Botão de ligar/desligar C. Luz de funcionamento D. Anel de bloqueio E. Suporte do ferro F. Mola G. Patilha de fixação H. Acessório para as placas de alisar e frisar I. Placas para alisar e frisar em alumínio J. Ferro para caracóis largos K. Ferro para caracóis pequenos L. Ferro triangular para caracóis frisados M. Escova para pentear N. Escova para pentear e fazer caracóis O. Espiral para canudos ESPECIFICAÇÕES TÉCNICAS Tensão de alimentação: 230V ~ 50Hz Potência: 25W UTILIZAÇÃO DO APARELHO Com o Modelador de Cabelo 8 em 1 JDL-118 Electric Co pode criar penteados diferentes todos os dias, com a máxima rapidez e comodidade. É um aparelho versátil pois dispõe de 8 acessórios diferentes, fáceis de utilizar e substituir, que lhe permitem encaracolar, enrolar, frisar e esticar o cabelo. Antes da utilização - Certifique-se que todo o material de acondicionamento foi devidamente retirado antes de proceder à utilização do aparelho. - Retire o excesso de água do cabelo com uma toalha e penteie-o para o desembaraçar. - Antes de utilizar o aparelho certifique-se que o cabelo está ligeiramente húmido ou seco. Nota: nunca utilize este aparelho para secar o cabelo, mas sim para o alisar ou modelar. Funcionamento - Escolha um dos acessórios disponíveis, de acordo com o penteado que pretender e insira-o no aparelho (ver ponto “Colocar e remover acessórios”):
- Placas para alisar ou esticar (I) com o respectivo acessório de encaixe (H), ideais para alisar ou frisar o cabelo;
- Ferros para encaracolar (J, K ou L), ideais para caracóis perfeitos de diversos tamanhos e formatos;
- Escova para pentear (M), ideal para pentear e dar volume ao cabelo. - Escova para pentear e fazer caracóis (N) e espiral para canudos (O), que devem ser
utilizadas conjuntamente com os ferros (J e K), são ideais para pentear, fazer caracóis e
10
canudos. Nota: certifiqcorpo do apNota: os acutilização, pevitar queim- Ligue o aaguarde cerNota: enqufuncionamen- O tempo qdepende da - Deixe o ca- Quando tefonte de alim Colocar e re- Coloque oalimentação- Antes de impressa noaparelho (A)- Encaixe ofirmemente alinhadas. - Para de ree que o apa- Remova o
ficarem a Placas para
extremidade- Após o aalimentaçãopara que est- Segure umcoloque a malisar o cabe- Dependen
que-se que o acessarelho (A) antes decessórios (H, I, J, pelo que deverá evmaduras. aparelho à fonte derca de 5 minutos paanto o aparelho nto (C) mantem-se que o aparelho necespessura e comp
abelo arrefecer anteerminar, deslize o bmentação.
emover acessórioso acessório pretendo.
encaixar qualquer o anel de bloqueio). o acessório (H, J,até encaixar e rod
emover o acessóriorelho está desligadoo acessório (H, J, Kalinhadas.
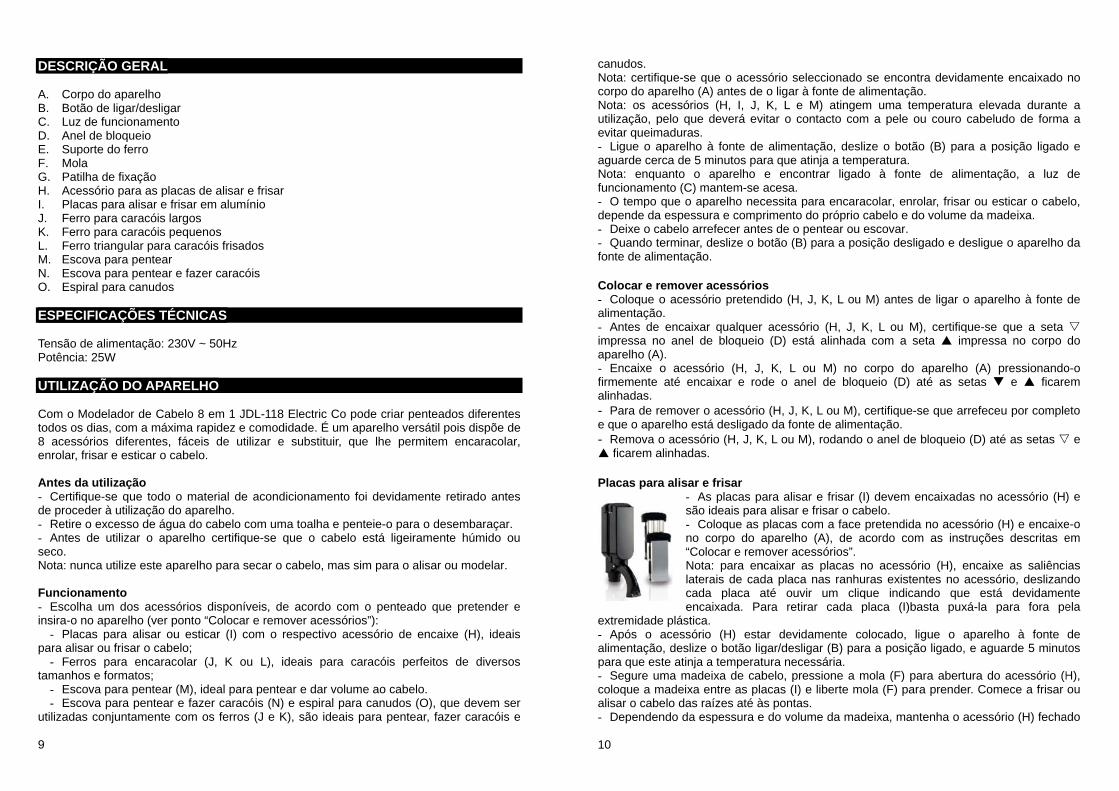
a alisar e frisar - As placas pasão ideais para- Coloque as no corpo do a“Colocar e remNota: para enlaterais de cadcada placa aencaixada. Pa
e plástica. acessório (H) esta
o, deslize o botão ligte atinja a temperatma madeixa de cab
madeixa entre as plaelo das raízes até àndo da espessura e
sório seleccionado o ligar à fonte de aK, L e M) atingem
vitar o contacto com
e alimentação, deslara que atinja a temp
e encontrar ligadacesa. cessita para encararimento do próprio ces de o pentear ou botão (B) para a pos
s dido (H, J, K, L ou
r acessório (H, J, Ko (D) está alinhada
, K, L ou M) no de o anel de bloq
o (H, J, K, L ou M), o da fonte de alime
K, L ou M), rodando
ara alisar e frisar (Ia alisar e frisar o caplacas com a face aparelho (A), de a
mover acessórios”. ncaixar as placas nda placa nas ranhuaté ouvir um cliqara retirar cada p
ar devidamente cogar/desligar (B) partura necessária. belo, pressione a macas (I) e liberte mo
às pontas. e do volume da mad
se encontra devidaalimentação. m uma temperaturm a pele ou couro
ize o botão (B) parperatura. o à fonte de alim
acolar, enrolar, frisacabelo e do volumeescovar. sição desligado e d
M) antes de ligar o
K, L ou M), certifiqa com a seta im
corpo do aparelhoqueio (D) até as se
certifique-se que arntação. o anel de bloqueio
I) devem encaixadaabelo.
pretendida no acesacordo com as inst
no acessório (H), euras existentes no aque indicando queplaca (I)basta pux
olocado, ligue o ara a posição ligado,
mola (F) para abertola (F) para prende
deixa, mantenha o a
amente encaixado
ra elevada durantecabeludo de forma
ra a posição ligado
mentação, a luz
ar ou esticar o cabee da madeixa.
esligue o aparelho
o aparelho à fonte
que-se que a seta mpressa no corpo
o (A) pressionandoetas e ficare
rrefeceu por comple
o (D) até as setas
as no acessório (H
ssório (H) e encaixetruções descritas e
encaixe as saliêncacessório, deslizane está devidamenxá-la para fora pe
aparelho à fonte e aguarde 5 minut
tura do acessório (Her. Comece a frisar
acessório (H) fecha
no
e a a a
o e
de
elo,
da
de
do
o-o em
eto
e
) e
e-o em
ias ndo nte ela
de tos
H), ou
ado
11
durante 5 a será necess- Para obtesobreponhachegar à po Ferros para
- Encaixe odescritas em- Após o fealimentaçãopara que est- Segure um(G), coloquemadeixa comraiz ou até àColoque o fcabelo parapretenda en- Dependenmadeixa, retcabelo e mePara caracóNota: Os ferevitar que da Escova parA escova paescova pararespectivamacessórios”.
10 segundos. Quansário para obter um er um ondulado co-o na extremidade nta do cabelo.
a encaracolar Os ferroscom o diâque prete- Ferro ppara cara- Ferro ppara cara- Ferro tfrisados c
o acessório (J, K oum “Colocar e removeerro (J, K ou L) e
o, deslize o botão ligte atinja a temperatma madeixa de cabe a madeixa sobrem a patilha (G). Enrà altura desejada. Cferro (J, K ou L) p
a dentro, e coloque rolar o cabelo para
ndo da espessuratire o ferro (J, K ouenor a madeixa, meóis mais apertados rrros (J, K e L) atinganifiquem a superfí
ra pentear, escova ara pentear (M) ena pentear e fazer
mente nos ferros (J e
- Escolha pretendido:
- Escova lhe volume;
- Escova fazer caracó
- Espiral p- Encaixe a
K
nto mais fino for o cbom resultado. ntínuo, pressione ainferior da madeix
s (J, K e L) são ideâmetro e formato m
ende: para caracóis largoacóis mais largos; para caracóis pequeacóis mais pequenotriangular para caracom efeito ziguezagu L) no corpo do aper acessórios”. estar devidamente gar/desligar (B) partura necessária. belo, pressione a me o ferro (J, K ou role a madeixa à voCertifique-se que epor baixo da made o ferro (J, K ou Lfora. e comprimento d
u L) do cabelo apósenos tempo será nreduza a espessuragem temperaturas ecie onde os irá pous
para pentear e fazcaixa directamenter caracóis (N) e ae K) - ver as instruç
a escova (M, N
para pentear (M) é
para pentear e fazóis no cabelo; para canudos (O) é a escova pretendida
cabelo e menor a m
a mola (F) para abxa frisada. Repita e
eais para criar caramais apropriado pa
os (J) com diâmetr
enos (K), com diâmes; acóis frisados (L) égue. parelho (A), de acor
colocado, ligue o ra a posição ligado,
ola (F) para levantaL) e liberte a mola
olta do ferro (J, K ounrola a madeixa naixa de cabelo, cas
L) por cima da mad
do cabelo, bem cs 5 a 8 segundos. Qecessário para obte
a da madeixa a encaelevadas durante osar, abra o suporte
zer caracóis e espie no corpo do aparea espiral para cações descritas em “
ou O) de acord
é ideal para pentea
zer caracóis (N) é
ideal para fazer caa (M, N ou O), ligue
madeixa, menos tem
brir o acessório (H)este procedimento a
acóis. Escolha o feara o tipo de caracó
ro de 19 mm é ide
etro de 16 mm é ide
é ideal para caracó
rdo com as instruçõ
aparelho à fonte e aguarde 5 minut
ar a patilha de fixaça (F) para prenderu L), das pontas atéa direcção pretendidso pretenda enrolardeixa de cabelo, ca
como do volume Quanto mais fino foer um bom resultadaracolar. funcionamento. Pado ferro (E).
iral para canudoselho, enquanto quenudos (O) encaixaColocar e remover
do com o pentea
ar o seu cabelo e d
ideal para pentear
nudos no cabelo. o aparelho à fonte
mpo
) e até
rro óis
eal
eal
óis
ões
de tos
ção r a é à da. r o aso
da r o do.
ara
e a am os
ado
ar-
r e
de
12
alimentação. Deslize o botão ligar/desligar (B) para a posição ligado, e aguarde 5 minutos para que atinja a temperatura necessária. - Para enrolar o cabelo com as escovas (M ou N), segure uma madeixa, coloque-a sobre a escova (M ou N) e enrole-a das pontas até à raiz ou até à altura desejada. Certifique-se que enrola a madeixa na direcção pretendida. - Para fazer canudos, segure uma madeixa, coloque-a sobre a escova (O) e enrole-a das pontas até à raiz ou até à altura desejada. Certifique-se que enrola a madeixa na direcção pretendida. - Dependendo da espessura e comprimento do cabelo e do volume da madeixa, retire a escova (M, N ou O) do cabelo após 10 segundos. Quanto mais fino for o cabelo e menor a madeixa, menos tempo será necessário para obter um bom resultado. Tecnologia de aquecimento PTC (Coeficiente de Temperatura Positivo) - A tecnologia PTC favorece um processo de aquecimento controlado e uniforme, mantendo a temperatura constante após atingir o nível de aquecimento necessário, mesmo que o aparelho se mantenha ligado por um longo período de tempo, sem o risco de sobreaquecimento. Arrumação - Guarde este aparelho num local seco e ventilado, afastado de cosméticos, de fontes de calor e da luz solar directa e de forma a não acumular pó. DICAS - Utilize uma escova de cerdas macias para pentear o cabelo e faça-o em diversas direcções, da esquerda para direita, da direita para a esquerda, de frente para trás e de trás para frente; pois ajuda a massajar o couro cabeludo e a manter uma boa irrigação sanguínea no bulbo capilar. - Quando utilizar os ferros para encaracolar (J, K e L), a escova para fazer caracóis (N) e a espiral para canudos (O), as madeixas de cabelo não devem ser muito espessas. Quanto mais fina for a madeixa de cabelo, mais apertado ficará o caracol. Quando utilizar as placas para alisar e frisar (I), as madeixas de cabelo não devem ter mais do que 5 a 6 cm de espessura para que os resultados sejam perfeitos. - Quando desenrolar uma madeixa de cabelo, certifique-se que mantém o acessório afastado dos cabelos que estiverem por baixo para não danificar o efeito do penteado. - Deixe o cabelo arrefecer antes de o pentear ou escovar. - Utilize apenas produtos de modelação especificamente criados para este fim. Utilize um produto apenas se a embalagem indicar claramente que pode ser usado com um modelador. - Se utilizar este tipo de produtos, limpe sempre o aparelho e as placas (H e I) após o seu arrefecimento para evitar danos. RESOLUÇÃO DE PROBLEMAS - Sempre que utilizar este aparelho e detectar alguma irregularidade no seu funcionamento, consulte a tabela que se segue para perceber as causas e as soluções para as resolver. Caso não seja possível, contacte o Serviço de Informação ao Cliente ou dirija-se à loja onde adquiriu o aparelho.
13
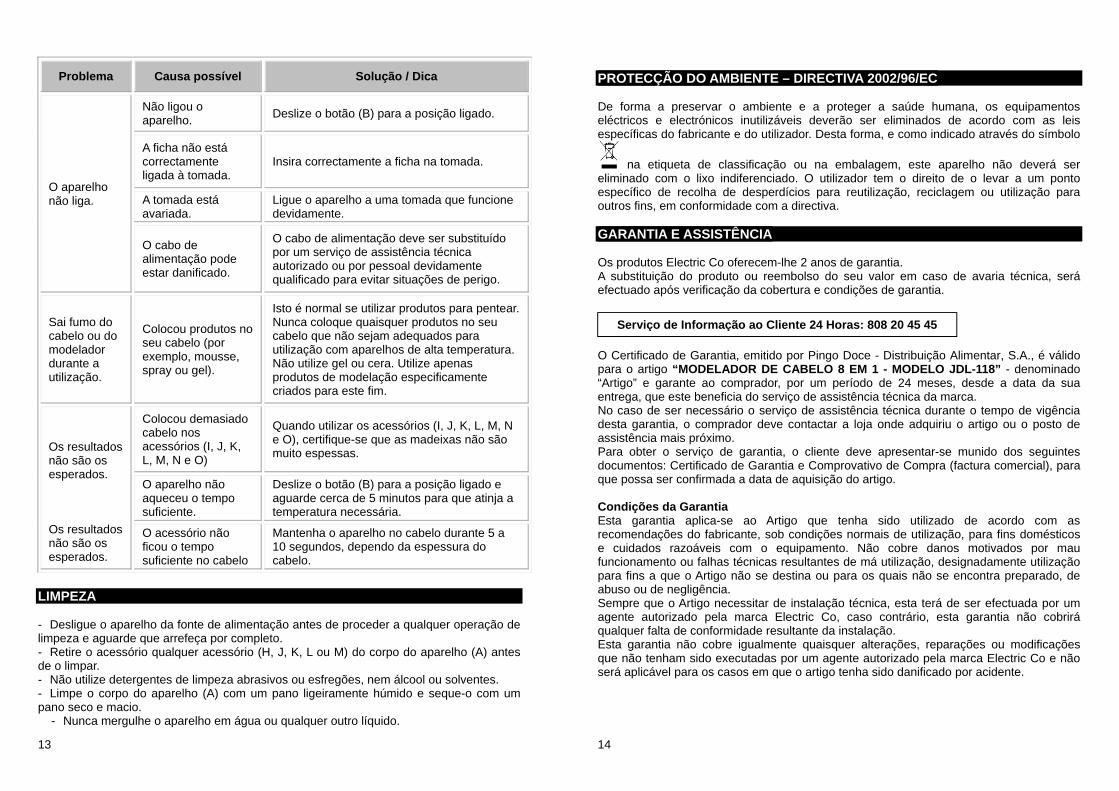
Problema Causa possível Solução / Dica
O aparelho não liga.
Não ligou o aparelho. Deslize o botão (B) para a posição ligado.
A ficha não está correctamente ligada à tomada.
Insira correctamente a ficha na tomada.
A tomada está avariada.
Ligue o aparelho a uma tomada que funcione devidamente.
O cabo de alimentação pode estar danificado.
O cabo de alimentação deve ser substituído por um serviço de assistência técnica autorizado ou por pessoal devidamente qualificado para evitar situações de perigo.
Sai fumo do cabelo ou do modelador durante a utilização.
Colocou produtos no seu cabelo (por exemplo, mousse, spray ou gel).
Isto é normal se utilizar produtos para pentear. Nunca coloque quaisquer produtos no seu cabelo que não sejam adequados para utilização com aparelhos de alta temperatura. Não utilize gel ou cera. Utilize apenas produtos de modelação especificamente criados para este fim.
Os resultados não são os esperados. Os resultados não são os esperados.
Colocou demasiado cabelo nos acessórios (I, J, K, L, M, N e O)
Quando utilizar os acessórios (I, J, K, L, M, N e O), certifique-se que as madeixas não são muito espessas.
O aparelho não aqueceu o tempo suficiente.
Deslize o botão (B) para a posição ligado e aguarde cerca de 5 minutos para que atinja a temperatura necessária.
O acessório não ficou o tempo suficiente no cabelo
Mantenha o aparelho no cabelo durante 5 a 10 segundos, dependo da espessura do cabelo.
LIMPEZA - Desligue o aparelho da fonte de alimentação antes de proceder a qualquer operação de limpeza e aguarde que arrefeça por completo. - Retire o acessório qualquer acessório (H, J, K, L ou M) do corpo do aparelho (A) antes de o limpar. - Não utilize detergentes de limpeza abrasivos ou esfregões, nem álcool ou solventes. - Limpe o corpo do aparelho (A) com um pano ligeiramente húmido e seque-o com um pano seco e macio.
- Nunca mergulhe o aparelho em água ou qualquer outro líquido.
14
PROTECÇÃO DO AMBIENTE – DIRECTIVA 2002/96/EC De forma a preservar o ambiente e a proteger a saúde humana, os equipamentos eléctricos e electrónicos inutilizáveis deverão ser eliminados de acordo com as leis específicas do fabricante e do utilizador. Desta forma, e como indicado através do símbolo
na etiqueta de classificação ou na embalagem, este aparelho não deverá ser eliminado com o lixo indiferenciado. O utilizador tem o direito de o levar a um ponto específico de recolha de desperdícios para reutilização, reciclagem ou utilização para outros fins, em conformidade com a directiva. GARANTIA E ASSISTÊNCIA Os produtos Electric Co oferecem-lhe 2 anos de garantia. A substituição do produto ou reembolso do seu valor em caso de avaria técnica, será efectuado após verificação da cobertura e condições de garantia.
O Certificado de Garantia, emitido por Pingo Doce - Distribuição Alimentar, S.A., é válido para o artigo “MODELADOR DE CABELO 8 EM 1 - MODELO JDL-118” - denominado “Artigo” e garante ao comprador, por um período de 24 meses, desde a data da sua entrega, que este beneficia do serviço de assistência técnica da marca. No caso de ser necessário o serviço de assistência técnica durante o tempo de vigência desta garantia, o comprador deve contactar a loja onde adquiriu o artigo ou o posto de assistência mais próximo. Para obter o serviço de garantia, o cliente deve apresentar-se munido dos seguintes documentos: Certificado de Garantia e Comprovativo de Compra (factura comercial), para que possa ser confirmada a data de aquisição do artigo. Condições da Garantia Esta garantia aplica-se ao Artigo que tenha sido utilizado de acordo com as recomendações do fabricante, sob condições normais de utilização, para fins domésticos e cuidados razoáveis com o equipamento. Não cobre danos motivados por mau funcionamento ou falhas técnicas resultantes de má utilização, designadamente utilização para fins a que o Artigo não se destina ou para os quais não se encontra preparado, de abuso ou de negligência. Sempre que o Artigo necessitar de instalação técnica, esta terá de ser efectuada por um agente autorizado pela marca Electric Co, caso contrário, esta garantia não cobrirá qualquer falta de conformidade resultante da instalação. Esta garantia não cobre igualmente quaisquer alterações, reparações ou modificações que não tenham sido executadas por um agente autorizado pela marca Electric Co e não será aplicável para os casos em que o artigo tenha sido danificado por acidente.
Serviço de Informação ao Cliente 24 Horas: 808 20 45 45
15
INDEX Pág. INTRODUCTION 16
IMPORTANT SAFETY INSTRUCTIONS 16
COMPONENTS DIAGRAM 21
GENERAL DESCRIPTION 22
TECHNICAL SPECIFICATIONS 22
PREPARING FOR USE 22
BEFORE USING 22
OPERATION 22
INSERT AND REMOVE ACCESSORIES 23
STRAIGHTENING AND CRIMPING PLATES 23
CURLING IRONS 24 COMBING BRUSH, COMBING AND CURLING BUSH AND RINGLET SPIRAL 24
PTC HEATING TECHNOLOGY (POSITIVE TEMPERATURE COEFFICIENT) 25
STORAGE 25
HINTS 25
TROUBLESHOOTING 25
CLEANING 26
PROTECTION OF THE ENVIRONMENT – 2002/96/EC 24
GUARANTEE AND TECHNICAL SUPPORT 27
GUARANTEE CONDITIONS 27
GUARANTEE CERTIFICATE 28
INTRODUCTION Thank you for your preference, this Electric Co appliance will certainly make your daily routine easier. Carefully read this instruction manual before using the appliance to get the best results from it and keep this instruction manual for future reference. SAFETY INSTRUCTIONS
THIS APPLIANCE IS EXCLUSIVELY FOR DOMESTIC USE! To reduce the risk of personal injury or property damage, when using electrical appliances, basic safety precautions should always be followed, including the following: - Before using the appliance, check that the supply voltage details marked on the appliance agree with those of the electricity supply. The label is placed on the appliance. If you have any doubts apply to a skilled electrician for help. - This appliance can be used by children aged from 8 years and above and persons with reduced physical, sensory or mental capabilities or lack of experience and knowledge if they have been given supervision or instruction concerning use of the appliance in a safe way and understand the hazards involved. Children shall not play with the appliance. Cleaning and maintenance shall not be made by children without supervision. - Children are not aware of potential hazards when using electrical appliances. They should be supervised to ensure that they do not play with the appliance. This appliance is not a toy and must be kept away from children. - After unpacking the appliance, check that it is undamaged and that no parts are missing. If you have any doubts, contact the Customer Support Line. All packaging ex. plastic bags, Styrofoam, tape, etc., should be kept away from reach of
17
children, as it could be dangerous and cause suffocation. Only use accessories recommended by the manufacturer and those provided with the appliance, otherwise they could constitute a danger to the user and risk to damage the appliance. - Never leave the appliance unsupervised during operation. - Do not open or undertake any repairs on the appliance. By failing to observe this rule, you risk your safety and the warranty may become invalid. Only qualified technicians can repair the appliance. - Do not operate this appliance if it is damaged, if it is not working properly or if detected any damaged on the supply cord or plug. If is detected any damage or any malfunction, you must contact the store where you bought the appliance or a qualified technician in order to repair the appliance or replace supply cord. Assure that only original parts or components are used. - This appliance is exclusively for domestic use. Any other use must be considered improper and therefore dangerous. The manufacturer cannot be held responsible for any injuries or damage resulting from improper use. - To avoid fire accidents or electrical shocks, make sure that no fluids enter in contact with the electrical parts of the appliance or in contact with the supply cord. Do not expose the appliance to humidity or dusty environments, do not use it outdoors and keep it away from any objects filled with fluids, such as washbasins, vases, flowerpots, etc., and never use it near bathtubs, showers and swimming pools. If any fluid accidentally spills on the appliance’s electrical parts, remove the plug from the wall socket and go to the store where the appliance was bought or get it repaired by a qualified technician.
18
- Do not touch on the appliance or its plug with wet hands, humid feet, or barefoot, to avoid the risk of electrical shocks. - If the appliance falls into water, never remove it while it’s still connected to the wall socket. - If the appliance presents humidity, remove the plug form the wall socket and allow it to dry properly before connecting it again. - Always disconnect the appliance from wall socket when not in use, even if for a moment, and at the end of each use. Take extra care when using the appliance in a bathroom, since the proximity of water presents a hazard, even when it is switched off on the on/off button. - Periodically check the supply cord for any damages. If the supply cord is damaged, contact the store where the appliance was bought or a qualified technician for repairing or replacement in order to avoid an hazard. - Do not place any objects on top of the supply cord, such as carpets or rugs. Never bend or twist the supply cord and make sure it does not come into contact with sharp edges, hot surfaces or where people may walk past and trip. Do not leave the supply cord hanging in such a position that a child may reach it. - Always hold the plug to disconnect it from the wall socket and not by the supply cord. - Never move the appliance by pulling the supply cord. Make sure the supply cord doesn’t get caught in any way and do not wind it around the appliance. - Whenever you wish to clean or store the appliance and if you do not intend to use it for a long period of time, make sure it is
19
switched off, the plug is removed from the wall socket and that has cooled down completely. - During usage, the appliance and accessories become hot, keep them away from surfaces that are not resistant to heat, do not leave them near clothes, paper or other combustible objects and never cover them. - The appliance and the accessories become very hot during and after operation, which is normal and results from its proper function. Always disconnect the appliance from the wall socket and wait until it has cooled down completely before you change accessories, clean it or store it. Prevent contact with the skin as this can cause burns. - Never use the appliance on artificial hair. - Do not apply hair products directly on the accessories. Do not direct any spray can or water mister into the appliance or accessories. Do not store near cosmetics since they can damage the main body or accessories. - Keep the appliance and its accessories clean and free from dust, never store it in damp areas, and do not expose it directly to sunlight or near heat sources. - This appliance belongs to Class II (appliance double insulated), and it is not necessary to connect it to a wall socket with earth connection. - For additional protection it is recommended the installation of a residual current device (circuit breaker) with a rated residual operating current not exceeding 30 mA is advisable in the electrical circuit supplying the bathroom. Ask your installer for advice.
20
WARNINGDO NOTBATHTUBVESSELS ELECTRICIMMERSEOTHER LIQ
GS! T USE THS, SHOWERCONTAINING
CAL SHOCKE THE APPLIAQUID.
IS APPLIANRS, BASINS G WATER. K HAZARD ANCE IN WAT
NCE NEAROR OTHER
- NEVERTER OR ANY
R R
R Y
21
COMPONE
H
ENTS DIAGRAM
I
E
G
J K
G CD
L M
F A B
M N OO
22
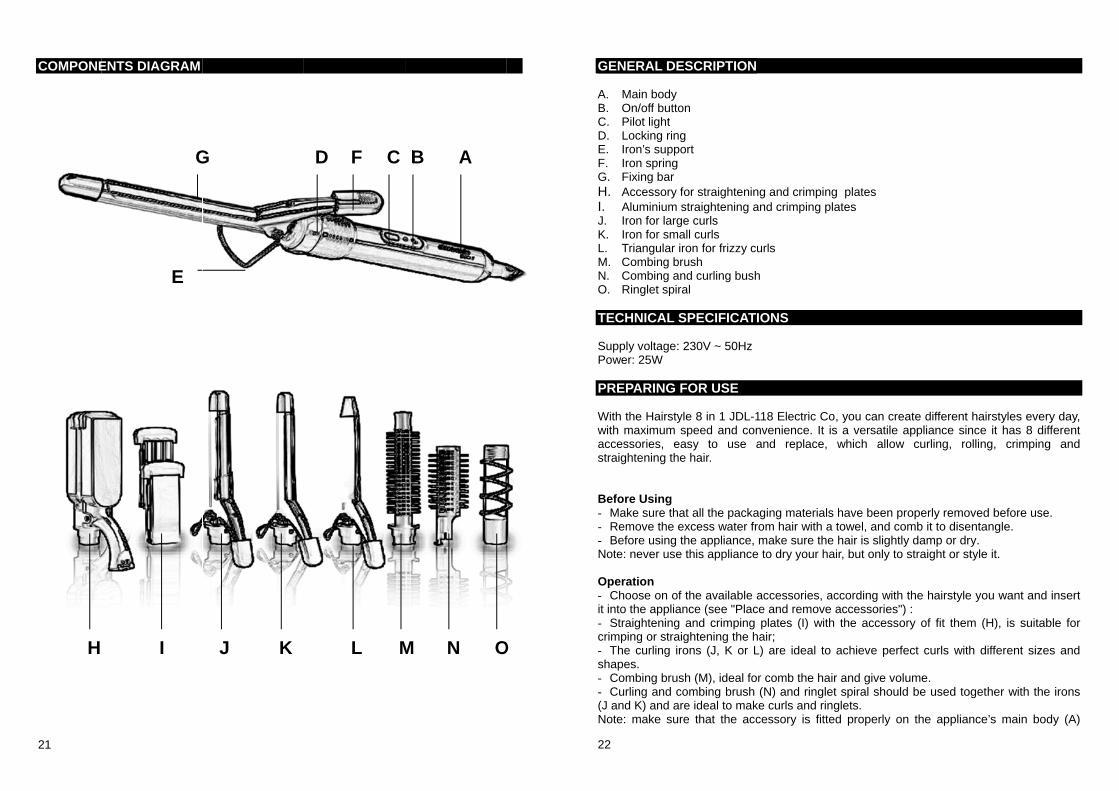
GENERAL DESCRIPTION A. Main body B. On/off button C. Pilot light D. Locking ring E. Iron’s support F. Iron spring G. Fixing bar H. Accessory for straightening and crimping plates I. Aluminium straightening and crimping plates J. Iron for large curls K. Iron for small curls L. Triangular iron for frizzy curls M. Combing brush N. Combing and curling bush O. Ringlet spiral TECHNICAL SPECIFICATIONS Supply voltage: 230V ~ 50Hz Power: 25W PREPARING FOR USE With the Hairstyle 8 in 1 JDL-118 Electric Co, you can create different hairstyles every day, with maximum speed and convenience. It is a versatile appliance since it has 8 different accessories, easy to use and replace, which allow curling, rolling, crimping and straightening the hair. Before Using - Make sure that all the packaging materials have been properly removed before use. - Remove the excess water from hair with a towel, and comb it to disentangle. - Before using the appliance, make sure the hair is slightly damp or dry. Note: never use this appliance to dry your hair, but only to straight or style it. Operation - Choose on of the available accessories, according with the hairstyle you want and insert it into the appliance (see "Place and remove accessories") : - Straightening and crimping plates (I) with the accessory of fit them (H), is suitable for crimping or straightening the hair; - The curling irons (J, K or L) are ideal to achieve perfect curls with different sizes and shapes. - Combing brush (M), ideal for comb the hair and give volume. - Curling and combing brush (N) and ringlet spiral should be used together with the irons (J and K) and are ideal to make curls and ringlets. Note: make sure that the accessory is fitted properly on the appliance’s main body (A)
23
before conn- Connect t5 minutes toNote: while tNote: the acMake sure to- The necesfrom the dephair. - Allow the - When youappliance fro
Insert and r- Insert the socket. - Before inslocking ring - Insert the it is duly plac- To removethat the app- Remove tis aligned wi Straightenin
- After the on/off button- Hold a lobetween thethe hair from- Keep the hair and thewill be the st- To obtain (H) and placuntil you rea
ecting it to the wall he appliance to a w
o reach the temperathe appliance is concessories (H, I, J, o keep them away fssary time for the apending on the thic
hair to cool down bu finish, slide the om the wall socket.
remove accessoriedesired accessory
serting the accesso(D) is aligned with taccessory (H, J, K,ced and rotate the le the accessory (H, liance is disconnecthe accessory (H, J,ith the arrow .
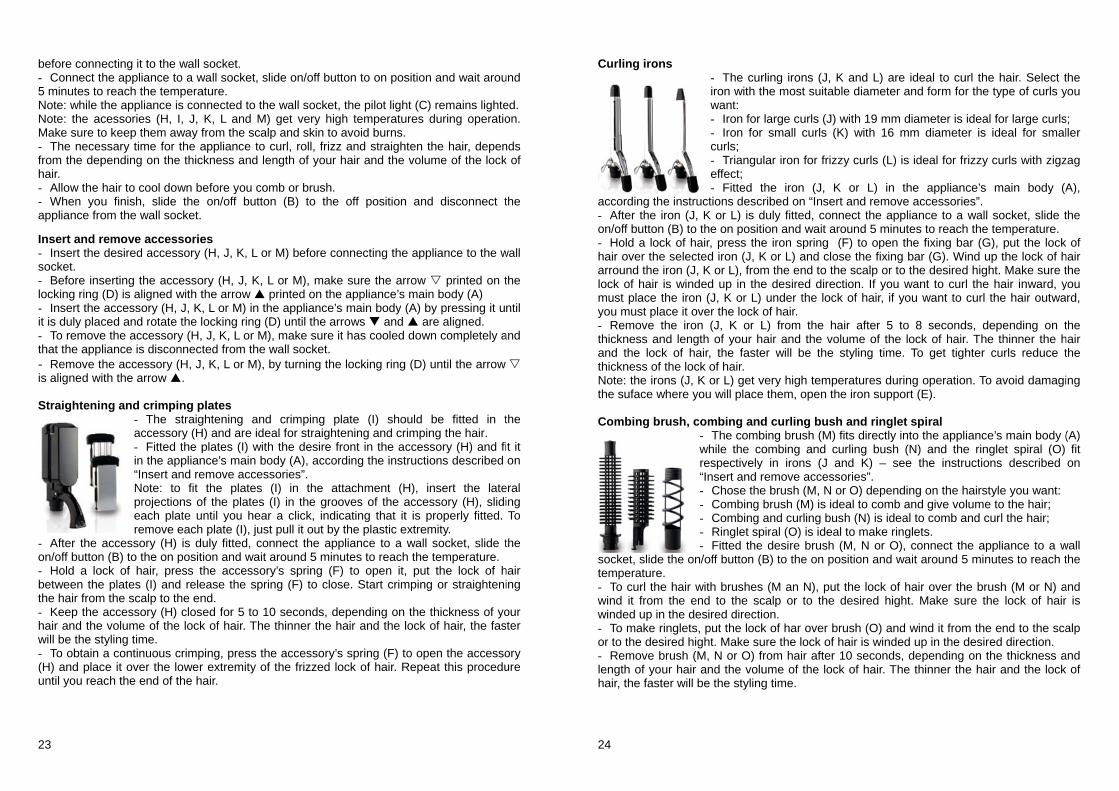
ng and crimping p- The straigaccessory (H- Fitted the pin the applian“Insert and reNote: to fit projections oeach plate uremove each
accessory (H) is dun (B) to the on positock of hair, press te plates (I) and relem the scalp to the en
accessory (H) close volume of the locktyling time. a continuous crimp
ce it over the lowerach the end of the h
socket. wall socket, slide on/ature. nnected to the wall sK, L and M) get vfrom the scalp and sappliance to curl, rockness and length o
efore you comb or bon/off button (B)
es (H, J, K, L or M) be
ory (H, J, K, L or M)the arrow printed, L or M) in the applocking ring (D) untiJ, K, L or M), make
ted from the wall so, K, L or M), by turn
plates ghtening and crimpH) and are ideal for splates (I) with the dnce’s main body (A)emove accessories”
the plates (I) in f the plates (I) in thntil you hear a clic plate (I), just pull it uly fitted, connect tion and wait aroundhe accessory’s spr
ease the spring (F) nd. ed for 5 to 10 secok of hair. The thinne
ping, press the accer extremity of the friair.
/off button to on pos
socket, the pilot lighery high temperatuskin to avoid burns.oll, frizz and straighof your hair and the
brush. to the off position
efore connecting the
), make sure the ard on the appliance’s liance’s main body l the arrows and e sure it has cooled ocket. ning the locking ring
ping plate (I) shostraightening and crdesire front in the a), according the inst”. the attachment (H
he grooves of the ack, indicating that it
out by the plastic ethe appliance to a d 5 minutes to reachring (F) to open it,to close. Start crim
onds, depending on er the hair and the l
essory’s spring (F) tizzed lock of hair. R
sition and wait arou
ht (C) remains lighteures during operatio
hten the hair, depenvolume of the lock
n and disconnect t
e appliance to the w
rrow printed on tmain body (A)
(A) by pressing it u are aligned.
down completely a
g (D) until the arrow
ould be fitted in trimping the hair. ccessory (H) and fitructions described
H), insert the lateaccessory (H), slidit is properly fitted.extremity. wall socket, slide t
h the temperature. , put the lock of h
mping or straighteni
the thickness of yolock of hair, the fas
to open the accessoRepeat this procedu
und
ed. on.
nds k of
the
wall
the
ntil
and
the
t it on
eral ing To
the
hair ing
our ter
ory ure
24
Curling iron
according th- After the on/off button- Hold a lochair over thearround the lock of hair must place tyou must pla- Remove tthickness anand the locthickness of Note: the irothe suface w Combing br
socket, slidetemperature- To curl thewind it fromwinded up in- To make ror to the des- Remove blength of yohair, the fast
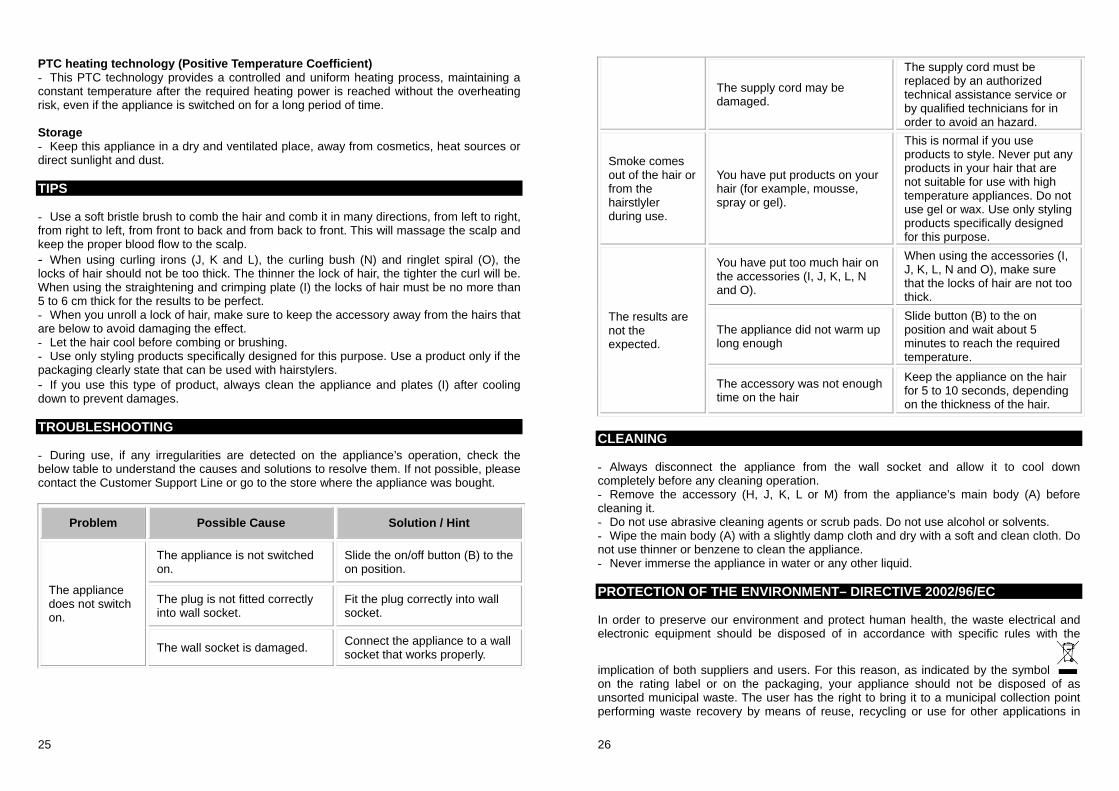
ns - The curiron with twant: - Iron for - Iron forcurls; - Triangueffect; - Fitted t
he instructions desciron (J, K or L) is dn (B) to the on positck of hair, press thee selected iron (J, Kiron (J, K or L), fromis winded up in thethe iron (J, K or L)ace it over the lock the iron (J, K or Lnd length of your hk of hair, the faste
f the lock of hair. ons (J, K or L) get vwhere you will place
rush, combing and- The combwhile the corespectively“Insert and r- Chose the- Combing - Combing - Ringlet sp- Fitted the
e the on/off button (Be. e hair with brushes
m the end to the scn the desired directiringlets, put the locksired hight. Make subrush (M, N or O) fur hair and the voluter will be the styling
rling irons (J, K andhe most suitable dia
large curls (J) with r small curls (K) wi
lar iron for frizzy cu
the iron (J, K or ribed on “Insert and
duly fitted, connect ion and wait arounde iron spring (F) toK or L) and close thm the end to the scae desired direction.under the lock of h
of hair. L) from the hair afair and the volume
er will be the stylin
very high temperatue them, open the iro
d curling bush andbing brush (M) fits dombing and curling
y in irons (J and Kremove accessoriese brush (M, N or O) brush (M) is ideal toand curling bush (N
piral (O) is ideal to m desire brush (M, NB) to the on position
s (M an N), put thecalp or to the desiron. k of har over brush ure the lock of hair ifrom hair after 10 seume of the lock of g time.
d L) are ideal to cuameter and form fo
19 mm diameter is ith 16 mm diamete
urls (L) is ideal for fr
L) in the appliand remove accessoriethe appliance to a
d 5 minutes to reacho open the fixing bahe fixing bar (G). Walp or to the desired If you want to curhair, if you want to
fter 5 to 8 seconde of the lock of hairng time. To get tig
ures during operation support (E).
d ringlet spiral directly into the applg bush (N) and theK) – see the instrs”. depending on the h
o comb and give voN) is ideal to comb amake ringlets. N or O), connect thn and wait around 5
lock of hair over thred hight. Make su
(O) and wind it froms winded up in the deconds, depending hair. The thinner th
url the hair. Select tr the type of curls y
ideal for large curlser is ideal for smal
rizzy curls with zigz
ce’s main body (Aes”. wall socket, slide t
h the temperature. ar (G), put the lockind up the lock of hd hight. Make sure trl the hair inward, ycurl the hair outwa
ds, depending on tr. The thinner the hhter curls reduce t
on. To avoid damagi
iance’s main body (e ringlet spiral (O) uctions described
hairstyle you want: lume to the hair;
and curl the hair;
he appliance to a w5 minutes to reach t
he brush (M or N) aure the lock of hair
m the end to the scadesired direction. on the thickness a
e hair and the lock
the you
s; ller
zag
A),
the
of hair the you rd,
the hair the
ing
(A) fit
on
wall the
and r is
alp
and of
25
PTC heating technology (Positive Temperature Coefficient) - This PTC technology provides a controlled and uniform heating process, maintaining a constant temperature after the required heating power is reached without the overheating risk, even if the appliance is switched on for a long period of time. Storage - Keep this appliance in a dry and ventilated place, away from cosmetics, heat sources or direct sunlight and dust. TIPS - Use a soft bristle brush to comb the hair and comb it in many directions, from left to right, from right to left, from front to back and from back to front. This will massage the scalp and keep the proper blood flow to the scalp. - When using curling irons (J, K and L), the curling bush (N) and ringlet spiral (O), the locks of hair should not be too thick. The thinner the lock of hair, the tighter the curl will be. When using the straightening and crimping plate (I) the locks of hair must be no more than 5 to 6 cm thick for the results to be perfect. - When you unroll a lock of hair, make sure to keep the accessory away from the hairs that are below to avoid damaging the effect. - Let the hair cool before combing or brushing. - Use only styling products specifically designed for this purpose. Use a product only if the packaging clearly state that can be used with hairstylers. - If you use this type of product, always clean the appliance and plates (I) after cooling down to prevent damages. TROUBLESHOOTING - During use, if any irregularities are detected on the appliance’s operation, check the below table to understand the causes and solutions to resolve them. If not possible, please contact the Customer Support Line or go to the store where the appliance was bought.
Problem Possible Cause Solution / Hint
The appliance does not switch on.
The appliance is not switched on.
Slide the on/off button (B) to the on position.
The plug is not fitted correctly into wall socket.
Fit the plug correctly into wall socket.
The wall socket is damaged. Connect the appliance to a wall socket that works properly.
26
The supply cord may be damaged.
The supply cord must be replaced by an authorized technical assistance service or by qualified technicians for in order to avoid an hazard.
Smoke comes out of the hair or from the hairstlyler during use.
You have put products on your hair (for example, mousse, spray or gel).
This is normal if you use products to style. Never put any products in your hair that are not suitable for use with high temperature appliances. Do not use gel or wax. Use only styling products specifically designed for this purpose.
The results are not the expected.
You have put too much hair on the accessories (I, J, K, L, N and O).
When using the accessories (I, J, K, L, N and O), make sure that the locks of hair are not too thick.
The appliance did not warm up long enough
Slide button (B) to the on position and wait about 5 minutes to reach the required temperature.
The accessory was not enough time on the hair
Keep the appliance on the hair for 5 to 10 seconds, depending on the thickness of the hair.
CLEANING - Always disconnect the appliance from the wall socket and allow it to cool down completely before any cleaning operation. - Remove the accessory (H, J, K, L or M) from the appliance’s main body (A) before cleaning it. - Do not use abrasive cleaning agents or scrub pads. Do not use alcohol or solvents. - Wipe the main body (A) with a slightly damp cloth and dry with a soft and clean cloth. Do not use thinner or benzene to clean the appliance. - Never immerse the appliance in water or any other liquid. PROTECTION OF THE ENVIRONMENT– DIRECTIVE 2002/96/EC In order to preserve our environment and protect human health, the waste electrical and electronic equipment should be disposed of in accordance with specific rules with the
implication of both suppliers and users. For this reason, as indicated by the symbol on the rating label or on the packaging, your appliance should not be disposed of as unsorted municipal waste. The user has the right to bring it to a municipal collection point performing waste recovery by means of reuse, recycling or use for other applications in

27
accordance with the directive. WARRANTY AND TECHNICAL SUPPORT Electric Co products have a 2 year guarantee. In the event of technical malfunction, the product will only be replaced or a refund made after verification that the product is covered by the guarantee.
The guarantee certificate issued by Pingo Doce - Distribuição Alimentar, S.A., is valid for the product “8 IN 1 HAIRSTYLER – MODEL JDL-118” referred to as “product” and it guarantees technical assistance service by the brand within 24 months since the product is delivered to the buyer. If the technical assistance service is required during the guarantee period, the buyer must contact the seller or the nearest technical assistance service. In order to benefit the product’s guarantee, the buyer must present the following documents: Guarantee Certificate and Purchase Receipt (commercial invoice), to confirm the purchase date. Guarantee Conditions This guarantee applies to products which have been used according to the manufacturer’s recommendations under normal conditions of domestic use and when reasonable care has been taken of the equipment. This guarantee does not cover damage as a result of malfunctions or technical defects from misuse, namely when the product has been used for other purposes or in any circumstances other than those for which it was intended, neither does the guarantee cover negligence or abuse. Whenever the product requires technical installation, this must be performed by authorised Electric Co agents, otherwise this guarantee does not cover any unconformity that could be as a result of improper installation. This guarantee does not cover any changes, repairs or alterations that were not prosecuted or done by an authorised Electric Co agent and does not cover cases in which the product has been accidentally damaged.
24 Hour Customer Support Line: 808 20 45 45
VISITE O SI
VISIT: www
Este certtempo de This guara A fim de factura e e In order tothis form d Artigo (Pr Loja (Stor Morada (A Data de c Modelo nr Número d
ITE: www.pingodo.pingodoce.pt
ificado de garantvigência da mesm
antee certificate mu
poder recorrer aoeste formulário, de
o apply for the afterduly filled.
roduct): MODELAD
re): ____________
Address): _______
ompra (Date of pu
r. (Model nr.): JDL-
de série (Serial num
oce.pt
tia deverá ser mama.
st be kept during th
os serviços de assevidamente preen
r sales service, you
DOR DE CABELO 8
________________
________________
urchase): ________
-118
mber) – se aplicáv
antido pelo cliente
e whole guarantee
sistência técnica, chido.
u must keep the inv
8 EM 1 / 8 IN 1 HAIR
_________________
________________
________________
el (if applicable): _
e durante todo o
time.
deverá guardar a
voice purchase and
RSTYLER
________________
________________
________________
_______________
o
_
_

30

31
32