or 952 pbx - gb · 6. se fizer uma ligação com uma mangueira de metal flexível, ... para o bocal...
TRANSCRIPT

PT FOGÃO PORTA BOTIJA ORIMA 90x60
MANUAL DE INSTRUÇÕES
Estimado Cliente, O nosso obejtivo é fazer com que obtenha os melhores resultados com o nosso aparelho. Este é produzido em modernas instalações, num ambiente de trabalho cuidadoso e tendo sempre presente o conceito de qualidade máxima. Assim, recomendamos que leia este manual de instruções atentamente antes de proceder à sua utilização e guarde-o para futuras referências. ATENÇÃO! ESTE APARELHO DEVERÁ SER INSTALADO DE ACORDO COM AS NORMAS EM VIGOR E EM LOCAIS BEM VENTILADOS.

ÍNDICE
Parte 1 Indice Parte 2 Avisos Importantes Parte 3 Instalação do Fogão Parte 4 Instalação dos pés do fogão Parte 5 Informações Técnicas Parte 6 Alteração dos bicos Parte 7 Descrição do painel de comando Parte 8 Descrição das secções do forno Parte 9 Utilização do grupo de queimadores Parte 10 Modo de utilização do fogão Orima Parte 11 Utilização de protecção dos botões Parte 12 Manutenção e Limpeza Parte 13 Reciclagem

Ligações Elétricas e Segurança O fogão Orima vem equipado e configurado de acordo com as condições indicadas na matrícula de classificação, que se situa na parte de trás do aparelho. A partir desta matrícula poderá saber que tipo de gás (LPG ou NG) este aparelho se encintra configurado. 1. O seu forno Orima está ajustado para uma Voltagem de 230 Volt, 50 Hz. para 1 fase 230V/400V, 50 Hz para 3 fases.
2. Se a corrente eléctrica do fusível em sua casa for inferior a 16 Amperes ( para 1 fase) 32 Amperes (para 3 fases) ,
contacte um Técnico qualificado para a instalação de fusível de 16/32 Amperes.
3. A ligação elétrica do forno só deve ser feita através das tomadas e com o sistema ligação à terra instalado em
conformidade com os regulamentos. Se não tiver uma tomada apropriado com o sistema de ligação à terra no local onde o forno será colocado, contacte imediatamente um electricista qualificado. O fabricante não se responsabiliza por danos que possam surgir por causa da falta das mesmas. O cabo de alimentação não deve tocar as partes quentes do aparelho.
4. Mantenha a mangueira de gás e cabos eléctricos do seu fogão longe das zonas quentes; não deixã-los tocar no aparelho. Mantê-los longe de lados afiados e superfícies aquecidas.
5. Quando verificar que o cabo de alimentação se encontra danificado deverá substituí-lo, para tal contacte um Técnico
qualificado.
6. Certifique-se de que o aparelho está desligado antes de substituir a lâmpada para evitar a possibilidade de choque eléctrico.
AVISOS IMPORTANTES

7. Certifique-se de que o fogão está instalado correctamente para os requisitos locais (por exemplo, os injectores devem ser adequados para o tipo de gás local e pressão do gás).
8. Ligue o seu Fogão Orima para gás LPG numa distância o mais curta possível e sem qualquer vazamento. Minímo de 40
cm – Máx 125 cm.
9. Ao fazer verificação de vazamento de gás, nunca utilize qualquer tipo de chama como: isqueiros, fósforos, cigarro ou similares.
10. Este aparelho é somente para uso doméstico,não Industrial.
11. Durante a utilização do seu Fogão Orima poderá criar-se humidade e calor onde este se encontra instalado, certifique-se
de a sua cozinha é bem ventilada.
12. Manter as aberturas de ventilação limpas e sem obstruções.
13. Quando o forno estiver a ser utilizado, as partes mais acessíveis poderão ficar quentes, deverá manter as crianças afastadas e das áreas onde haja corrente eléctrica.
14. Nunca tocar com as mãos ou outro utensílio no vidro do Forno quando este estiver quente.
15. Antes de utilizar o seu aparelho manter afastado do mesmo, cortinas, tule, ou pápeis inflamáveis. Não manter materiais
inflamáveis dentro ou perto do aparelho.
16. Deverá utilizar a placa de segurança do painel de comandos quando o grelhador estiver a ser utilizado.
17. As fitas de gás estão fixadas por feichos. Não ligue antes de pressionar o botão.
18. A válvula do forno tem sistema de segurança. As chamas são matidas cerca de 3-5 seg. Se o queimador do forno não acender, repita este procedimento 5 a 6 vezes. Se o problema persistir, entre em contacto com um Técnico qualificado.
19. Coloque o tabuleiro por baixo da grelha e adicione 200 ml de água quqndo estiver a fazer frango assado.
20. Certifique-se de que o espeto se encontra bem fixado nos respectivos sectores quando o grelhador estiver a ser
utilizado.
21. Os queimadores inferiores e superiores não são para serem utilizados simultaneamente. O queimador inferior é para cozinhar e o queimador superior é para fritar e alourar.
22. AVISO: o aparelho e partes acessíveis aquecem durante a sua utilização. Cuidados devem ser tomados para evitar que
toquem nas resistências. Crianças com menos de 8 anos de idade devem ser mantidas longe do aparelho a menos que sejam continuamente supervisionadas.
23. AVISO: Proceder cozinhados em um fogão com gordura ou óleo pode ser perigoso e resultar em incêndio. NUNCA
tenete apagar o fogo com água, desligue o aparelho e, em seguida, cobrir a chama com uma tampa ou um cobertor de fogo.
24. AVISO: Perigo de incêndio: Não armazenar itens nas superfícies do aparelho.
25. Este aparelho não deve ser utilizado por pessoas (incluindo crianças) com reduzidas capacidades físicas, sensoriais ou
mentais, ou falta de experiência e conhecimento, amenos que tenham recebido supervisão ou instruções sobre o uso do aparelho por uma pessoa responsável pela sua segurança.
26. Este aparelho pode ser utilizado por crianças com idade a partir de 8 anos ou mais e pessoas com reduzidas
capacidades físicas, sensoriais ou mentais ou falta de experiência e conhecimento se tiverem recebido supervisão ou instruções sobre o uso do aparelho de uma forma segura e entender os riscos envolventes. As crianças não devem brincar com o aparelho. A limpeza e manutenção não deverão ser feitas por crianças sem supervisão.

Ligação Eléctrica e Segurança 1. O seu forno é ajustado em conformidade com 230 Volt 16 Amperes (para 3 fases 230V/400V 32 Amperes) Se a
corrente eléctrica for diferente destes valores, contacte um Técnico qualificado. 2. A ligação eléctrica do aparelho deverá ser feita somente em tomadas com ligação à terra em conformidade com os
regulamentos em vigor. Se naõ houver nenhuma tomada adequada com sistema de aterramento no local onde o forno for instalado, contacte imediatamente um Electricista qualificado. O Fabricante não se responsabiliza por danos que possam surgir devido à falha de cumprimento desta regra.
3. O cabo electrico não deverá estar em contacto com as partes quentes do aparelho. 4. Alguns aparelhos vêm sem o jogo de ligação. Neste caso, por favor, utilize um cabo flexível para ser ligado a uma fase
mono:H05 VV-F 3 G 4 mm2 ou para 3 fases: H05 VV-F 5 G 1.5 mm2
Ligação do Gás e Segurança 1. Antes de ligar o seu aparelho ao fornecimento de gás, verifique se o tipo de gás e especificações de pressão indicado na
placa de identificação corresponde com o seu fornecimento de gás. Se necessário, consulte um serviço autorizado para ajustar o tipo de gás que necessita.
2. Este aparelho deve ser instalado de acordo com as normas em vigor e serão utilizadas apenas em espaços bem ventilados. Leia as instruções antes de instalar ou utilizar o aparelho. No interesse da segurança, este aparelho deve ser instalado por um Técnico qualificado, tal como previsto nos regulamentos de segurança de gás actuais.
3. O aparelho não deverá ser instalado em compartimentos sem janela ou outra abertura controlável. Se estiver instalado em um compartimento sem uma porta que abra directamente para o exterior, uma abertura permanente será necessária. A circulação de ar deverá ser de 2 m3/h por kW dos queimadores.
4. A ligação do gás deve ser realizada a partir da direita ou esquerda. Por este motivo, alterar o bocal da mangueira, ficha e selos de segurança.
5. Por favor utilize uma mangueira flexível para a ligação do gás. 6. Se fizer uma ligação com uma mangueira de metal flexível, coloque uma vedação entre as principais condutas de gás.
INSTALAÇÃO DO SEU FORNO

7. O diâmetro interior do tubo flexível, para o bocal da mangueira de gás butano deverá deve ser de 6mm para os tubos do
tipo de gás de casa. O diâmetro interior do tubo flexível, para o bocal da mangueira para gás natural, deverá ser de 15mm. A mangueira deverá ser firmemente instalada no bocal da mangueira, apertando com uma braçadeira.
8. A mangueira deverá ser substituída antes da sua última data de expiração. 9. O diâmetro da garrafa de gás deve ser no máximo de 300 mm. 10. Cuidado! Faça a ligação do forno para a válvula de entrada de gás, o comprimento da mangueira deve ser curto e ter a
certeza de que não há vazamento. A mangueira utilizada não deve ser superior a 125 cm para salvarguardar a segurança da mesma.
11. REINSPECIONE A LIGAÇÃO DO GÁS. 12. Ao colocar o fogão no local escolhido, verifique se este fica ao nível da bancada. Caso seja necessário ajuste os
respectivos pés para a altura desejada. NÃO DEIXE QUE A MANGUEIRA DO GÁS E OS CABOS ELÉCTRICOS ATRAVESSE AS ÁREAS AQUECIDAS, ESPECIALMENTE ATRAVÉS DA PARTE DO TRÁS DO FORNO. NÃO MEXA NA BOTIJA O GÁS COM O FORNO LIGADO, VISTO SE O FORÇAR PODERÁ SOLTAR A MANGUEIRA, PODENDO OCORRER UMA FUGA DE GÁS.

Para instalar os pés do Fogão Orima, siga as instruções: 1. O suporte de fixação do pé é instalado no forno a partir do fundo do forno, indicado na Figura 1. As porcas são centradas sobre
estes suportes, afim de aparafusar os pés (Figura 2). Completar o processo de instalação dos pés por aparafusamento das porcas nos respectivos suportes (Figura 3).
2. Poderá nivelar o seu fogão girando os pés aparafusados de acordo com o tipo de superfície onde este se encontra instalado. 3. Se o seu fogão tiver pés de borracha como indica a Figura 4, poderá ajustá-los girando-os no sentido dos ponteiros do relógio ou
em sentido contrário.
INSTALAÇÃO DOS PÉS DO FOGÃO

Figura1 Figura 2 Figura 3 Figura 4
Antes de proceder às ligações do seu aparelho, certifique-se que: Antes da primeira utilização, leia com atençao o manual de instruções. Neste Manual, encontram-se informações importantes para a sua segurança, como utilizar e como fazer a manutenção do seu fogão Orima. A conversão para o gás natural será feita através da troca do material auxiliar (injectores) entregue na recepção do fogão com um kit equivalente ao que foi instalado no fogão e mencionado no manual de instruções. O ajustamento deverá ser feito de acordo com a chama alta em conformidade com os dados abaixo mencionados, girando no sentido contrário dos ponteiros do relógio no eixo da torneira.
INFORMAÇÕES TÉCNICAS
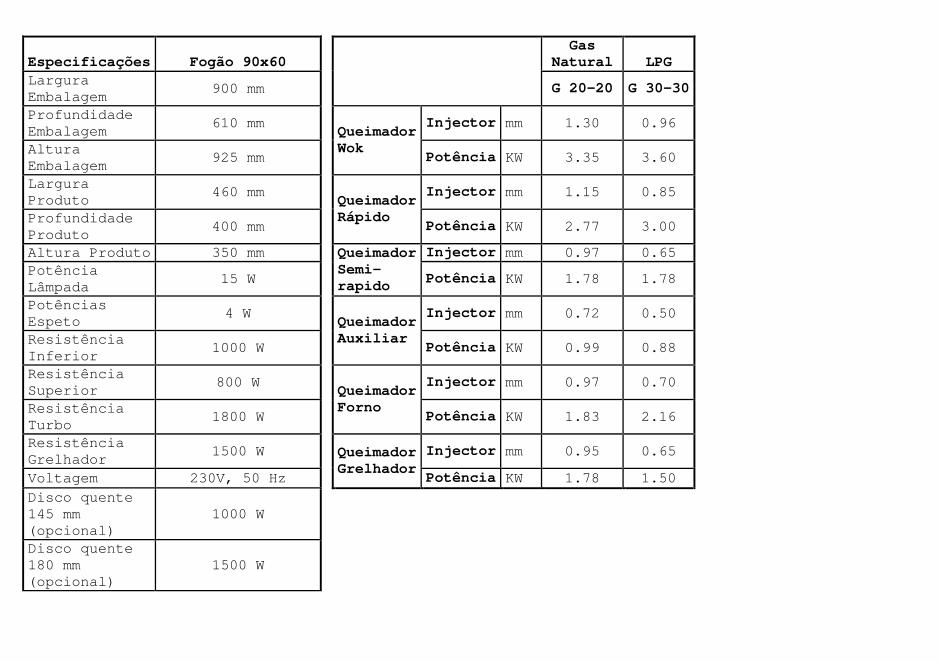
Especificações Fogão 90x60
Gas Natural LPG
Largura
Embalagem 900 mm G 20-20 G 30-30
Profundidade
Embalagem 610 mm
Queimador Wok
Injector mm 1.30 0.96
Altura
Embalagem 925 mm Potência KW 3.35 3.60
Largura
Produto 460 mm
Queimador Rápido
Injector mm 1.15 0.85
Profundidade
Produto 400 mm Potência KW 2.77 3.00
Altura Produto 350 mm Queimador Semi-rapido
Injector mm 0.97 0.65
Potência
Lâmpada 15 W Potência KW 1.78 1.78
Potências
Espeto 4 W
Queimador Auxiliar
Injector mm 0.72 0.50
Resistência
Inferior 1000 W Potência KW 0.99 0.88
Resistência
Superior 800 W
Queimador Forno
Injector mm 0.97 0.70
Resistência
Turbo 1800 W Potência KW 1.83 2.16
Resistência
Grelhador 1500 W Queimador
Grelhador Injector mm 0.95 0.65
Voltagem 230V, 50 Hz Potência KW 1.78 1.50
Disco quente
145 mm
(opcional)
1000 W
Disco quente
180 mm
(opcional)
1500 W
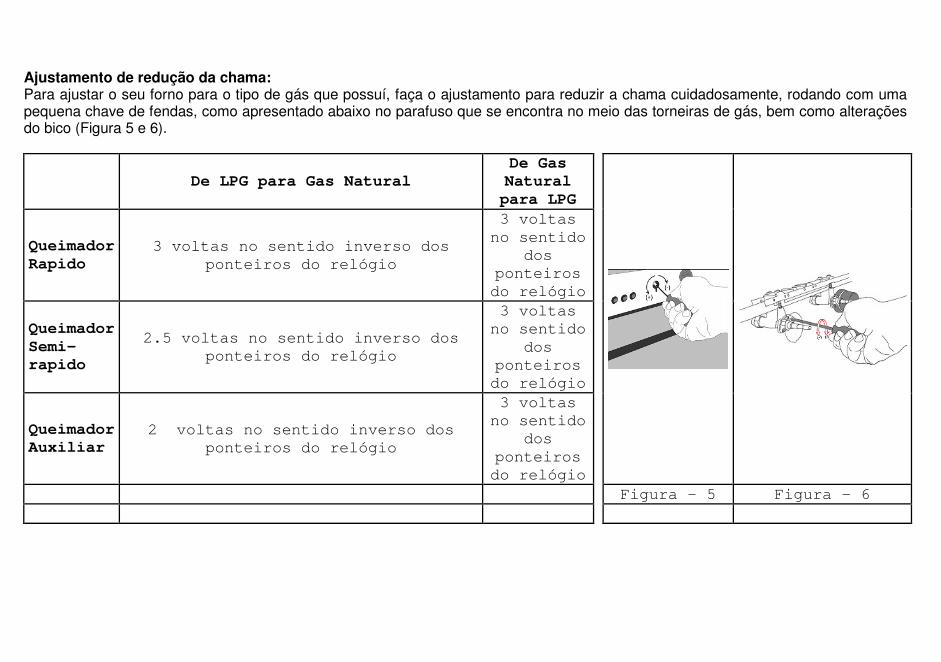
Ajustamento de redução da chama: Para ajustar o seu forno para o tipo de gás que possuí, faça o ajustamento para reduzir a chama cuidadosamente, rodando com uma pequena chave de fendas, como apresentado abaixo no parafuso que se encontra no meio das torneiras de gás, bem como alterações do bico (Figura 5 e 6).
De LPG para Gas Natural De Gas Natural para LPG
Queimador Rapido
3 voltas no sentido inverso dos
ponteiros do relógio
3 voltas
no sentido
dos
ponteiros
do relógio
Queimador Semi-rapido
2.5 voltas no sentido inverso dos
ponteiros do relógio
3 voltas
no sentido
dos
ponteiros
do relógio
Queimador Auxiliar
2 voltas no sentido inverso dos
ponteiros do relógio
3 voltas
no sentido
dos
ponteiros
do relógio
Figura - 5 Figura - 6
Alteração dos bicos:
1. Remova a tampa do grelhador do forno que se encontra fixado com parafusos na cavidade (Figura 10). 2. Desaperte o parafuso que fixa o grelhador do forno na cavidade, libertando assim a mesma da cavidade
(Figura 11). 3. O eléctrodo de ignição e o termopar são fixados por um clipe. Cuidadosamente, desengate-o a partir do clipe e
retire o queimador e a ligação entre si, como demonstra a Figura 12. 4. O queimador permanece desligado após a remoção do eléctrodo de ignição e do termopar. Retire o
queimador, elevando-o ligeiramente para a direita e aplique força de tracção (Figura 13). 5. O injector do grelhador do forno é facilmente alcançado após a grelha do mesmo ser removida (Figura 14). 6. Uma chave de 7mm deve ser utilizada para proceder à substituição do injector (Figura 15). 7. O grelhador não tem uma cobertura. Existem parafusos que fixam o mesmo à cavidade, desaperte-os com
uma chave de fendas de estrela.
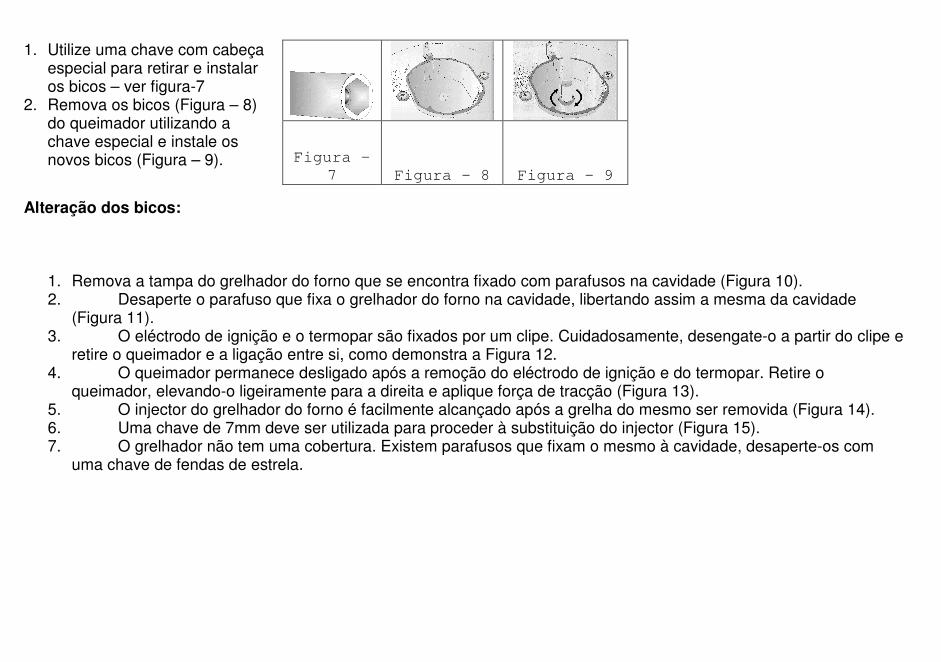
1. Utilize uma chave com cabeça especial para retirar e instalar os bicos – ver figura-7
2. Remova os bicos (Figura – 8) do queimador utilizando a chave especial e instale os novos bicos (Figura – 9).
Figura -
7 Figura - 8 Figura - 9
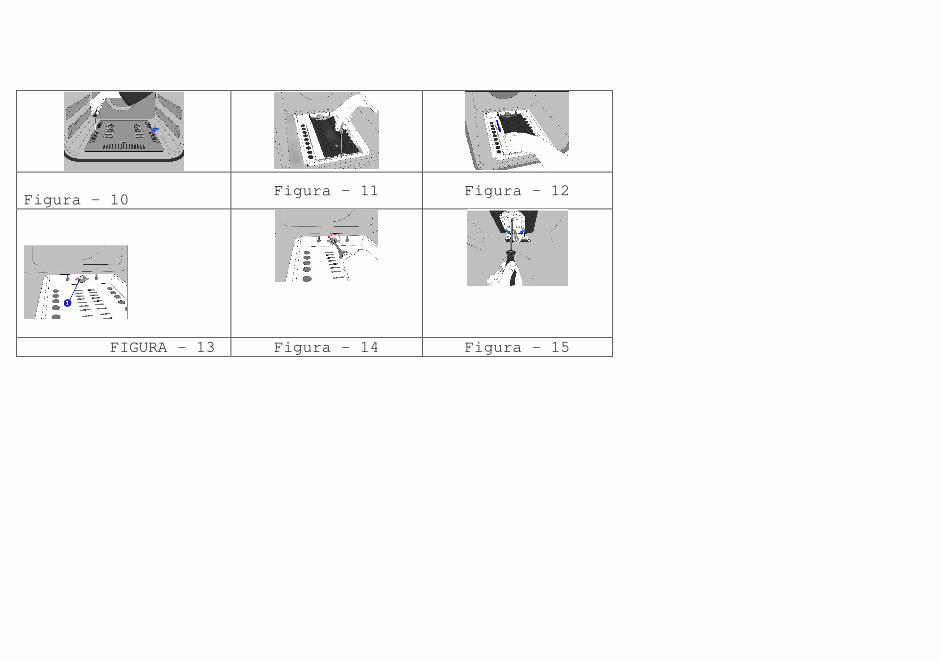
Figura - 10 Figura - 11 Figura - 12
FIGURA - 13 Figura - 14 Figura - 15
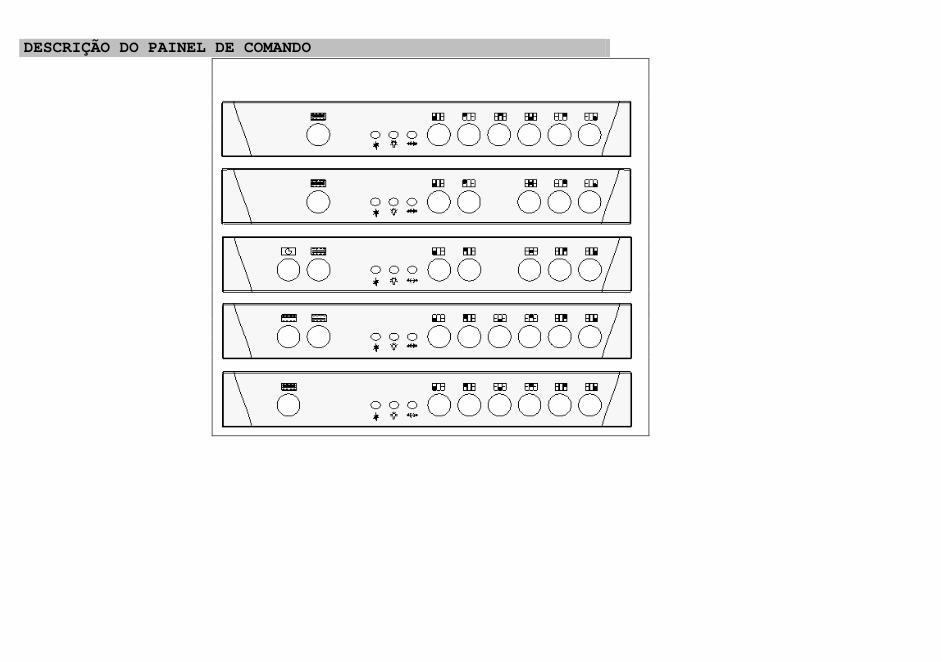
DESCRIÇÃO DO PAINEL DE COMANDO
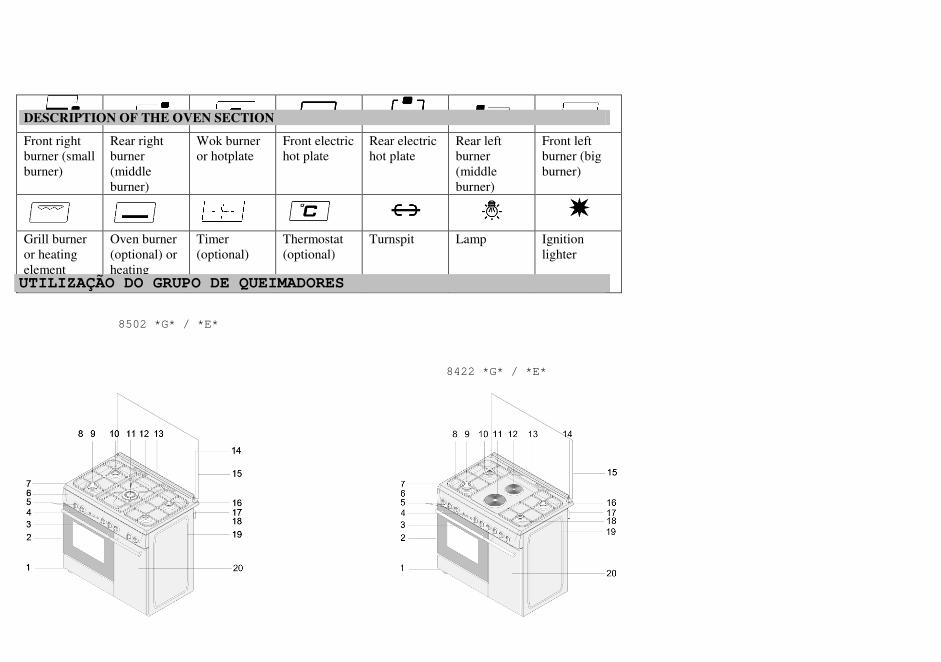
Front right
burner (small
burner)
Rear right
burner
(middle
burner)
Wok burner
or hotplate
Front electric
hot plate
Rear electric
hot plate
Rear left
burner
(middle
burner)
Front left
burner (big
burner)
Grill burner
or heating
element
Oven burner
(optional) or
heating
element
Timer
(optional)
Thermostat
(optional)
Turnspit Lamp Ignition
lighter
DESCRIPTION OF THE OVEN SECTION
8502 *G* / *E*
8422 *G* / *E*
UTILIZAÇÃO DO GRUPO DE QUEIMADORES

ISQUEIROESPETO LÂMPADARELÓGIO
(OPCIONAL)
TERMOSTATO
(OPCIONAL)
QUEIMADOR
GRELHADOR
OU RESISTÊNCIA
QUEIMADOR
FORNO (OPCIONAL)
OU RESISTÊNCIA
QUEIMADOR
ESQUERDO DE TRÁS
(MÉDIO)
QUEIMADOR
ESQUERDO FRONTAL
(PEQUENO)
DESCRIÇÃO DAS SECÇÕES DO FORNO
QUEIMADOR
DIREITO FRONTAL
(PEQUENO)
QUEIMADOR
DIREITO DE TRÁS
(MÉDIO)
QUEIMADOR
WOK OU
DISCO ELÉCTRICO
DISCO ELÉCTRICO
FRONTAL
DISCO ELÉCTRICO
DE TRÁS
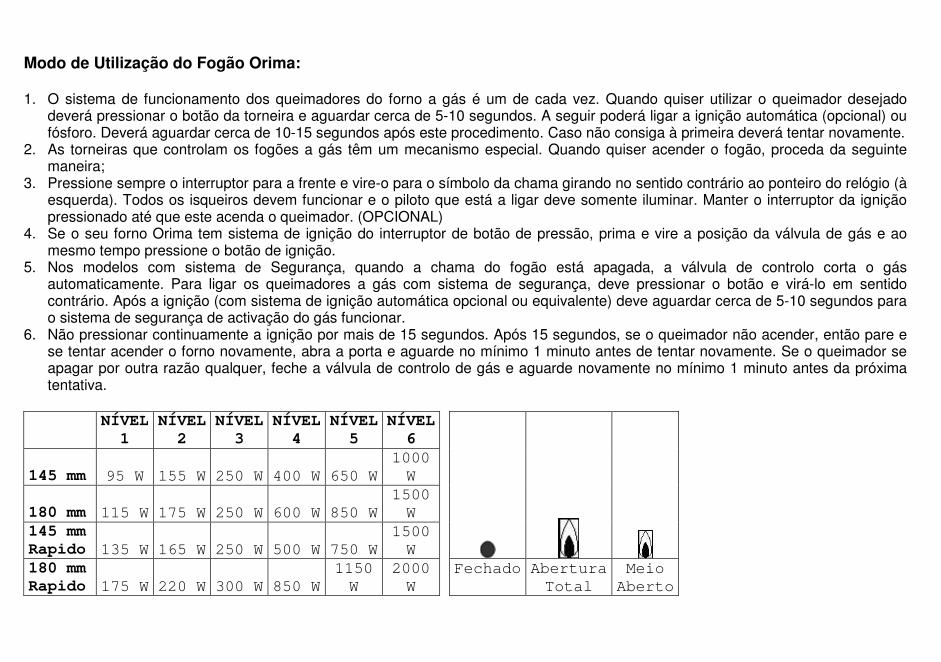
Modo de Utilização do Fogão Orima: 1. O sistema de funcionamento dos queimadores do forno a gás é um de cada vez. Quando quiser utilizar o queimador desejado
deverá pressionar o botão da torneira e aguardar cerca de 5-10 segundos. A seguir poderá ligar a ignição automática (opcional) ou fósforo. Deverá aguardar cerca de 10-15 segundos após este procedimento. Caso não consiga à primeira deverá tentar novamente.
2. As torneiras que controlam os fogões a gás têm um mecanismo especial. Quando quiser acender o fogão, proceda da seguinte maneira;
3. Pressione sempre o interruptor para a frente e vire-o para o símbolo da chama girando no sentido contrário ao ponteiro do relógio (à esquerda). Todos os isqueiros devem funcionar e o piloto que está a ligar deve somente iluminar. Manter o interruptor da ignição pressionado até que este acenda o queimador. (OPCIONAL)
4. Se o seu forno Orima tem sistema de ignição do interruptor de botão de pressão, prima e vire a posição da válvula de gás e ao mesmo tempo pressione o botão de ignição.
5. Nos modelos com sistema de Segurança, quando a chama do fogão está apagada, a válvula de controlo corta o gás automaticamente. Para ligar os queimadores a gás com sistema de segurança, deve pressionar o botão e virá-lo em sentido contrário. Após a ignição (com sistema de ignição automática opcional ou equivalente) deve aguardar cerca de 5-10 segundos para o sistema de segurança de activação do gás funcionar.
6. Não pressionar continuamente a ignição por mais de 15 segundos. Após 15 segundos, se o queimador não acender, então pare e se tentar acender o forno novamente, abra a porta e aguarde no mínimo 1 minuto antes de tentar novamente. Se o queimador se apagar por outra razão qualquer, feche a válvula de controlo de gás e aguarde novamente no mínimo 1 minuto antes da próxima tentativa.
NÍVEL 1
NÍVEL 2
NÍVEL 3
NÍVEL 4
NÍVEL 5
NÍVEL 6
145 mm 95 W 155 W 250 W 400 W 650 W
1000
W
180 mm 115 W 175 W 250 W 600 W 850 W
1500
W
145 mm Rapido 135 W 165 W 250 W 500 W 750 W
1500
W
180 mm Rapido 175 W 220 W 300 W 850 W
1150
W
2000
W
Fechado Abertura
Total
Meio
Aberto
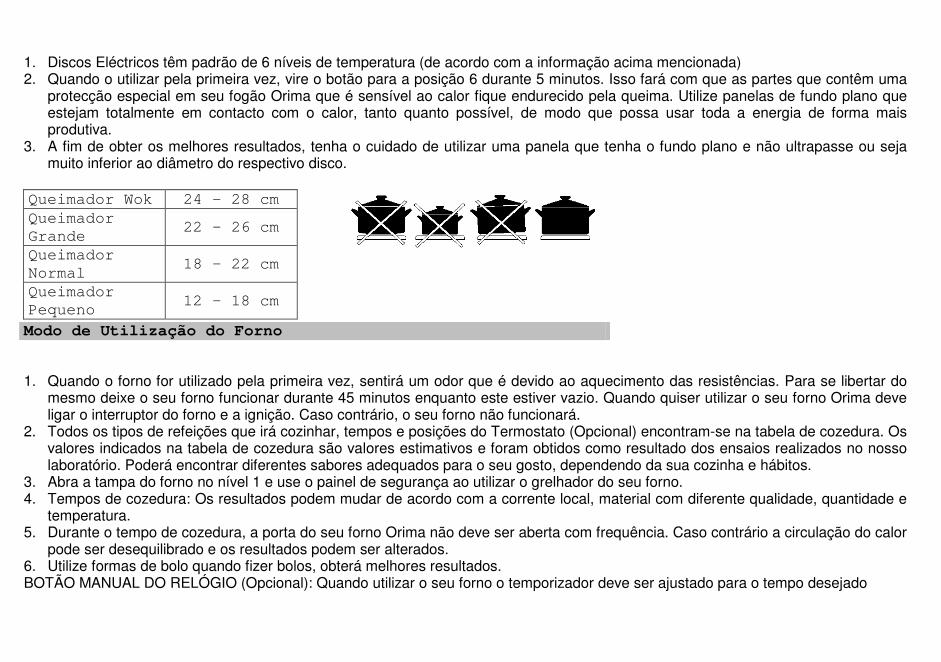
1. Discos Eléctricos têm padrão de 6 níveis de temperatura (de acordo com a informação acima mencionada) 2. Quando o utilizar pela primeira vez, vire o botão para a posição 6 durante 5 minutos. Isso fará com que as partes que contêm uma
protecção especial em seu fogão Orima que é sensível ao calor fique endurecido pela queima. Utilize panelas de fundo plano que estejam totalmente em contacto com o calor, tanto quanto possível, de modo que possa usar toda a energia de forma mais produtiva.
3. A fim de obter os melhores resultados, tenha o cuidado de utilizar uma panela que tenha o fundo plano e não ultrapasse ou seja muito inferior ao diâmetro do respectivo disco.
Queimador Wok 24 - 28 cm
Queimador
Grande 22 - 26 cm
Queimador
Normal 18 - 22 cm
Queimador
Pequeno 12 - 18 cm
1. Quando o forno for utilizado pela primeira vez, sentirá um odor que é devido ao aquecimento das resistências. Para se libertar do
mesmo deixe o seu forno funcionar durante 45 minutos enquanto este estiver vazio. Quando quiser utilizar o seu forno Orima deve ligar o interruptor do forno e a ignição. Caso contrário, o seu forno não funcionará.
2. Todos os tipos de refeições que irá cozinhar, tempos e posições do Termostato (Opcional) encontram-se na tabela de cozedura. Os valores indicados na tabela de cozedura são valores estimativos e foram obtidos como resultado dos ensaios realizados no nosso laboratório. Poderá encontrar diferentes sabores adequados para o seu gosto, dependendo da sua cozinha e hábitos.
3. Abra a tampa do forno no nível 1 e use o painel de segurança ao utilizar o grelhador do seu forno. 4. Tempos de cozedura: Os resultados podem mudar de acordo com a corrente local, material com diferente qualidade, quantidade e
temperatura. 5. Durante o tempo de cozedura, a porta do seu forno Orima não deve ser aberta com frequência. Caso contrário a circulação do calor
pode ser desequilibrado e os resultados podem ser alterados. 6. Utilize formas de bolo quando fizer bolos, obterá melhores resultados. BOTÃO MANUAL DO RELÓGIO (Opcional): Quando utilizar o seu forno o temporizador deve ser ajustado para o tempo desejado
Modo de Utilização do Forno

GUIA CULINÁRIA
Refeições Poisção da Grelha
Tempo de Cozedura(min.)
Bolo cremoso 2 30 - 35
Pastelaria 2 35 - 45
Biscoitos 3 20 - 25
Bolachas 3 20 - 35
Bolo 2 25 - 35
Pastelaria
Trançada 2 30 - 40
Pastelaria fina 2 35 - 45
Pastelaria com
sabores 2 20 - 30
Cordeiro 3 20 - 25
Vitela 3 30 - 40
Carne carneiro 3 30 - 40
Galinha (aos
bocados) 3 30 - 40
Peixe 3 20 - 30
Nota: Os valores na tabela são os resultados obtidos nos nossos laboratórios. Poderá encontrar sabores diferentes e adequados ao seu gosto pela experiência. Antes de cozinhar deverá fazer uma aquecimento preliminar de pelo menos 5-10 minutos.

1. O painel de Segurança foi desenhado para proteger o painel de controlo e os botões quando o forno está no modo de Grelhador (Figura 1).
2. Utilize este painel de Segurança afim de evitar o calor danificar o painel de controlo e os botões quando o forno está em modo de Grelhador.
AVISO: As partes acessíveis podem ficar quentes quando o grelhador estiver a ser utilizado. Mantenha as crianças longe do alcance do mesmo. 3. Coloque o painel de protecção sob o painel de controlo através da abertura do forno de vidro – tampa frontal (Figura 2) 4. Fixe o painel de Segurança entre o forno e a tampa frontal e feche suavemente a tampa. (Figura 3) 5. Ao utilizar o Grelhador é importante manter a tampa aberta na distância especificada. 6. Obterá melhores resultados utilizando o painel de Segurança e ao mesmo tempo protegerá o painel de controlo e os botões do seu
fogão Orima.
Figura 1 Figura 2 Figura 3
UTILIZAÇÃO DE PROTECÇÃO DOS BOTÕES
1. Desligue a ficha de fornecimento de electricidade para o forno da tomada e corte o gás fechando a válvula de gás. 2. Nunca limpe a parte interior, painel, tampa, tabuleiros e todas as outras partes do forno utilizando escovas duras, palha-
de-aço ou facas. Não usar produtos abrasivos, agentes que risquem e detergentes. 3. Após a limpeza das partes interiores do forno com um pano com sabão, lave-o e, em seguida, seque bem com um pano
macio. 4. Limpe as superfícies de vidro com agentes de limpeza especiais para o efeito. 5. Lave as tampas dos queimadores, às vezes com água e sabão e limpe os orifícios de gás através de um pincel. 6. Nunca utilize produtos inflamáveis como o ácido, gasolina ou derivados para limpar o forno. 7. Não limpe o forno com limpeza a vapor. 8. Não lave qualquer parte do seu forno na máquina de lavar louça. 9. Ao limpar o vidro frontal do forno, deve remover as anilhas de fixação que fixam o vidro interior com uma chave de
fendas, limpar e lava-lo completamente. Após a secagem, coloque a junta adequadamente e re-instale o vidro. 10. Enquanto o forno estiver a funcionar ou logo depois que comece, este fica extremamente quente. Deve evitar tocar nos
elementos de aquecimento. 11. Antes de abrir a tampa superior do forno, limpe o líquido derramado para fora da tampa. Antes de fechar a tampa
certifique-se que a mesa de trabalho já se encontra fria.
MANUTENÇÃO E LIMPEZA
RECICLAGEM
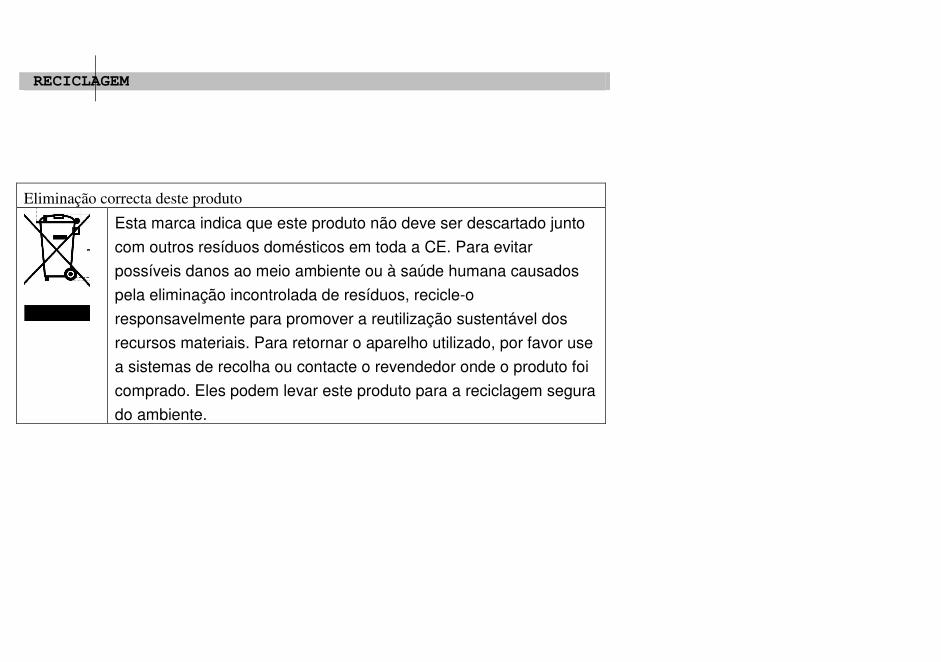
Eliminação correcta deste produto
Esta marca indica que este produto não deve ser descartado junto
com outros resíduos domésticos em toda a CE. Para evitar
possíveis danos ao meio ambiente ou à saúde humana causados
pela eliminação incontrolada de resíduos, recicle-o
responsavelmente para promover a reutilização sustentável dos
recursos materiais. Para retornar o aparelho utilizado, por favor use
a sistemas de recolha ou contacte o revendedor onde o produto foi
comprado. Eles podem levar este produto para a reciclagem segura
do ambiente.
GB
90x60 FREE STANDING GAS-ELECTRIC COOKER ORIMA WITH BOTTLE COMPARTMENT
USER MANUAL
Dear User, It is our ultimate desire that you achieve the best performance from our product, which has been passed through meticulous quality control checks and is manufactured in modern facilities. To this effect, we recommend that you read the entire guide carefully before operating the product and keep it as a reference. ATTENTION! THIS APPLIANCE SHALL BE INSTALLED IN ACCORDANCE WITH THE REGULATIONS IN FORCE AND ONLY USED IN A WELL VENTILATED LOCATION. READ THE INSTRUCTIONS BEFORE INSTALLING OR USING THIS APPLIANCE.
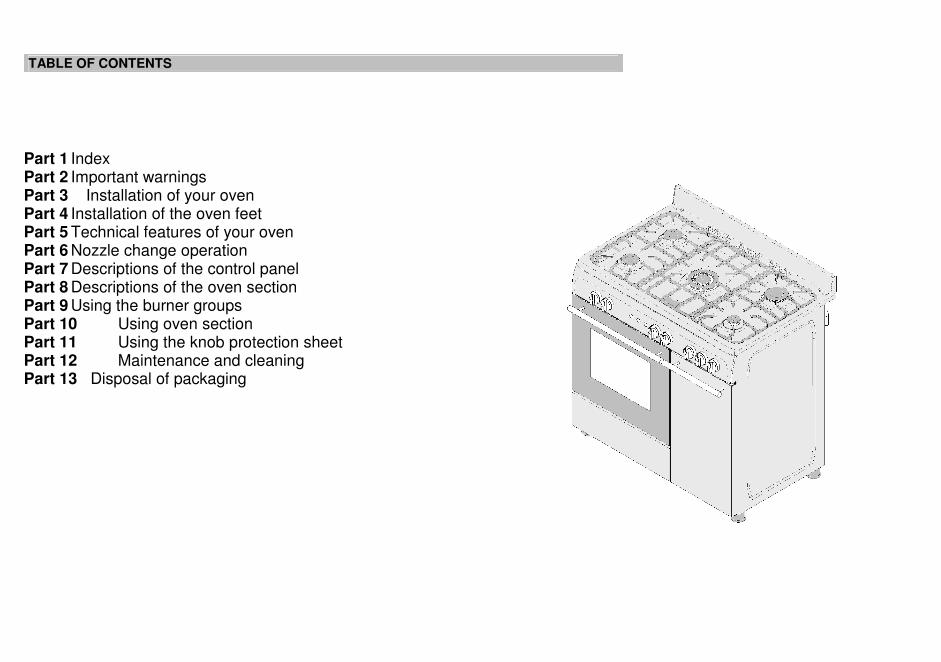
TABLE OF CONTENTS
Part 1 Index Part 2 Important warnings Part 3 Installation of your oven Part 4 Installation of the oven feet Part 5 Technical features of your oven Part 6 Nozzle change operation Part 7 Descriptions of the control panel Part 8 Descriptions of the oven section Part 9 Using the burner groups Part 10 Using oven section Part 11 Using the knob protection sheet Part 12 Maintenance and cleaning Part 13 Disposal of packaging

The cooker is supplied setup according to the conditions shown on the rating label which is stuck to the rear of the appliance. From this sticker you can learn for which gas type (LPG or NG) this appliance is configured when supplied.
1. Power supply voltage of your oven is 230V, 50 Hz for mono phase and 230V/400V, 50Hz for 3 phases. 2. If the current rate of the fuse in your installation is less than 16 Ampere (for mono phase) 32 Ampere (for 3 phase), make
a qualified electrician fit a 16 / 32 Ampere fuse. 3. Since the plug of your oven has earth system, ensure using socket with earth system. If it is used without earth system,
our firm is not responsible for any loss which may arise. 4. Keep the gas hose and electrical cable of your oven away from the hot areas; do not let them touch the appliance. Keep
them away from sharp sides and heated surfaces. 5. When the supply cable gets defective, get it replaced by conducting our service as soon as possible. 6. Ensure that the appliance is switched off before replacing the lamp to avoid the possibility of electric shock.
7. Be sure that the cooker is configured correctly for local requirements (for example, the jets must be suitable for local gas type and gas pressure)
8. Connect your oven to LPG cock in shortest way and without any leakage. Minimum 40 cm - Max. 125 cm 9. When making gas leakage check, never use any flame type like those of lighter, matches, cigarette fire or similar ones. 10. All our appliances are only for domestic use, not for commercial use. 11. Usage of your appliance creates moisture and heath in the room it is placed, make sure that your kitchen is ventilated
well. 12. Maintain the natural ventilation ducts properly. 13. When the oven is being used, the reachable parts may be hot, children should be kept off from hot surfaces and the
areas where charged with electricity. 14. When the oven is hot never touch the oven glass by hand or touch by means of a tool. 15. Before starting to use your appliance, keep curtain, tulle, paper or inflammable things away from your appliance. Do not
keep flammable materials inner side of or around the appliance. 16. You must use the safety sheath of control panel when the oven section is in grill mode. 17. Gas tapes are secured by locks. Do not turn before pressing the button. 18. Oven valve has safety cock. Flames are kept about 3-5 sec. If the oven burner can not flame, repeat this procedure 5-6
times. If the problem persists, please contact with the nearest service.
IMPORTANT WARNINGS
19. Please place the tray to the lowest shelf and add 200 ml water when you cook something in chicken roast section. 20. Make sure that rear pulley section of the grill swelling is fixed on V-bed on the grill when you use the grill swelling. 21. It is not suitable to operate both lower and upper burners simultaneously. The lower burner is designed for cooking and
upper burner is designed for frying. 22. WARNING: The appliance and its accessible parts become hot during use. Care should be taken to avoid touching
heating elements. Children less than 8 years of age shall be kept away unless continuously supervised 23. WARNING: Unattended cooking on a hob with fat or oil can be dangerous and may result in fire. NEVER try to extinguish
a fire with water, but switch off the appliance and then cover flame e.g. with a lid or a fire blanket. 24. WARNING: Danger of fire: do not store items on the cooking surfaces. 25. This appliance is not intended for use by persons (including children) with reduced physical, sensory or mental
capabilities, or lack of experience and knowledge, unless they have been given supervision or instruction concerning use of the appliance by a person responsible for their safety
26. This appliance can be used by children aged from 8 years and above and persons with reduced physical, sensory or mental capabilities or lack of experience and knowledge if they have been given supervision or instruction concerning use of the appliance in a safe way and understand the hazards involved. Children shall not play with the appliance. Cleaning and user maintenance shall not be made by children without supervision.
Electrical Connection and Security 1. Your oven is adjusted in compliance with 230 Volt 16 Ampere electric supplies. (For 3 phase 230V/400V 32 Ampere) If
the mains are different from these values, contact your authorized service. 2. Electrical connection of the oven should only be made by the sockets with earth system installed in compliance with the
regulations. If there is no proper socket with earth system in the place where the oven will be placed, immediately contact a qualified electrician. Manufacturer shall never be responsible from the damages that will arise because of the sockets connected to the appliance with no earth system.
3. Electrical cable should not touch the hot parts of the appliance. 4. Some models are supplied without a plug-an-lead set. In this case please use a flexible cable to suitable for connection to
mono phase: H05 VV-F 3 G 4 mm2 or for 3 phase: H05 VV-F 5 G 1.5 mm2
INSTALLATION OF YOUR OVEN

Gas Connection and Security 1. Before your appliance is connected to the gas supply, ensure that the gas category and pressure specifications shown in
the data plate corresponds with your gas supply. If necessary call authorized service for adjusting to gas category. 2. This appliance shall be installed in accordance with the regulations in force and only used in a well ventilated space.
Read the instructions before installing or using this appliance. In the interest of safety this appliances must be installed and / or serviced by a competent person as stated in the gas safety regulations current editions.
3. The appliance must not be installed in a room without a window or other controllable opening. If is installed in a room without a door which opens directly to the outside, a permanent opening is required. The air circulation should be 2 m3/h per kW of burners.
4. The gas connection should be performed from the right or left. For this reason, change the hose nozzle, plug and the seals.
5. Please use flexible hose for gas connection. 6. If you make a connection with a flexible metal hose, locate a seal between the main gas pipes. 7. The inner diameter of the flexible hose, which the butane hose nozzle is connected, should be 6mm for the house-type
gas tubes. The inner diameter of the flexible hose, which the natural hose nozzle is connected, should be 15mm.The hose should tightly be fitted to the hose nozzle by squeezing with a clamp.
8. The hose should be replaced before its last expiry date. 9. The gas bottle diameter shall be max. 300 mm. 10. Caution! Make the oven connection to the gas inlet valve, the hose length must be short and be sure that there is no
leakage. The hose used should not be longer than 125 cm for safety. 11. RE-INSPECT THE GAS CONNECTION. 12. When placing your oven to its location, ensure that it is at the counter level. Bring it to the counter level by adjusting the
feet if necessary.
DO NOT MAKE GAS HOSE and ELECTRICAL CABLE OF YOUR OVEN GO THROUGH THE HEATED AREAS, ESPECIALLY THROUGH THE REAR SIDE OF THE OVEN. DO NOT MOVE GAS CONNECTED OVEN. SINCE THE FORCING SHALL LOOSEN THE HOSE, GAS LEAKAGE MAY OCCUR.
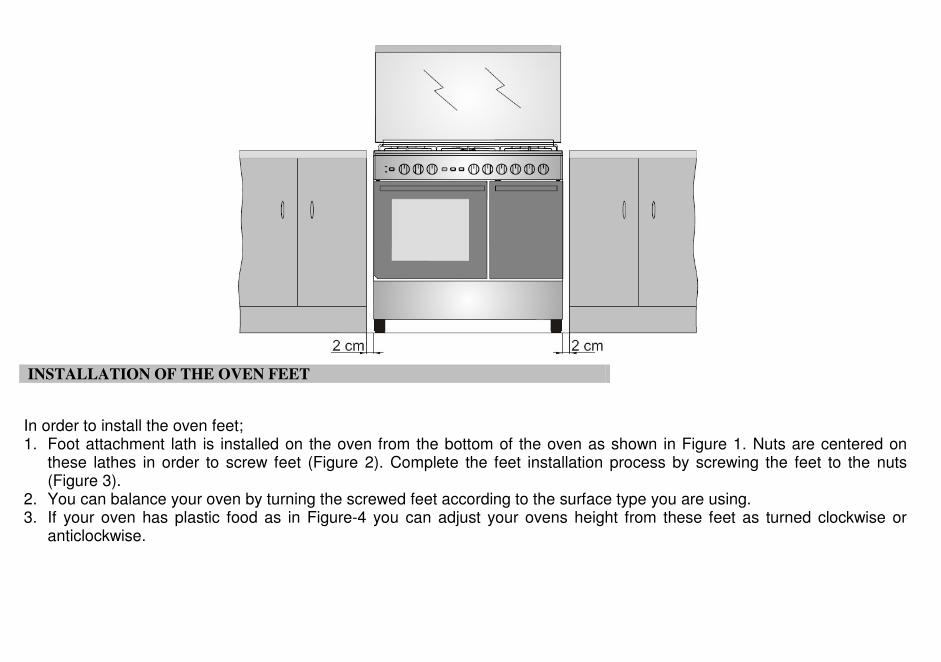
In order to install the oven feet; 1. Foot attachment lath is installed on the oven from the bottom of the oven as shown in Figure 1. Nuts are centered on
these lathes in order to screw feet (Figure 2). Complete the feet installation process by screwing the feet to the nuts (Figure 3).
2. You can balance your oven by turning the screwed feet according to the surface type you are using. 3. If your oven has plastic food as in Figure-4 you can adjust your ovens height from these feet as turned clockwise or
anticlockwise.
INSTALLATION OF THE OVEN FEET

Figure 1Figure 2 Figure 3 Figure 4
Before making the connections of your appliance: Before starting to use the appliance, read the user manual of the appliance carefully. In this user Manual, there are important information regarding your, our customers' security, how you will use it and how you will make its maintenance. The conversion to the natural gas will be made by exchanging the auxiliary material (injector) given in the delivery of the oven with the equivalent one which was installed to the oven and mentioned in the user manual Idling adjustment will be made according to the flame high pursuant to the below data by turning counter clockwise of the adjustment screw in the tap shaft.
TECHNICAL FEATURES OF YOUR OVEN

Specifications 90x60 Cooker
Natural
gas LPG
Outer width 900 mm G 20-20 G 30-30
Outer depth 610 mm Wok
Burner
Injector mm 1.30 0.96
Outer height 925 mm Power KW 3.35 3.60
Inner width 460 mm Rapid
Burner
Injector mm 1.15 0.85
Inner depth 400 mm Power KW 2.77 3.00
Inner height 350 mm Semi-
rapid
Burner
Injector mm 0.97 0.65
Lamp power 15 W Power KW 1.78 1.78
Turnspit power 4 W Auxiliary
Burner
Injector mm 0.72 0.50
Bottom heating
element 1000 W Power KW 0.99 0.88
Top heating
element 800 W
Oven
Burner
Injector mm 0.97 0.70
Turbo heating
element 1800 W Power KW 1.83 2.16
Grill heating
element 1500 W Grill
Burner
Injector mm 0.95 0.65
Supply voltage 230V, 50 Hz Power KW 1.78 1.50
Hot plate 145
mm (opt) 1000 W
Hot plate 180
mm (opt) 1500 W
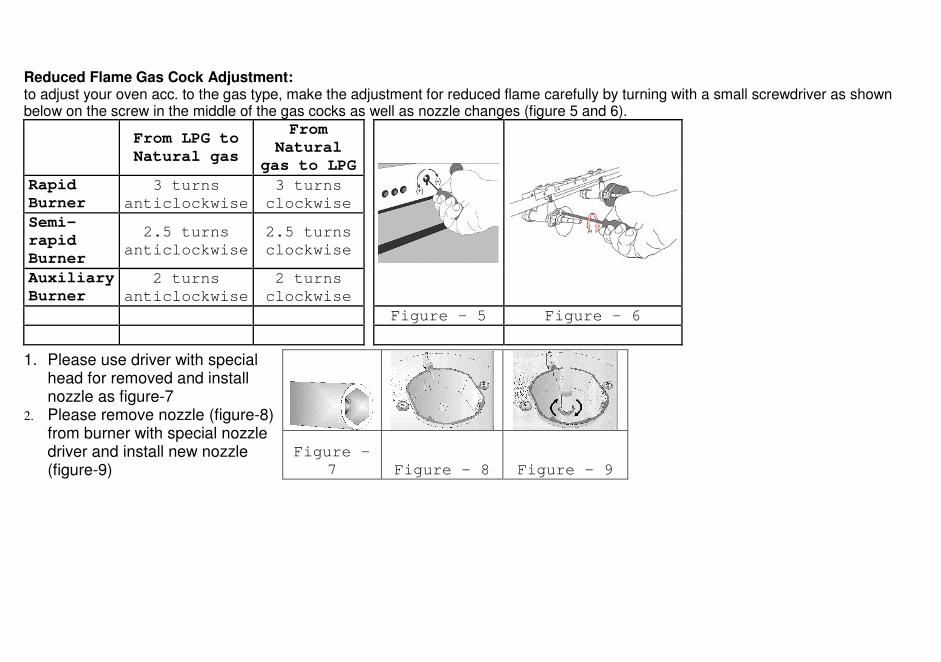
Reduced Flame Gas Cock Adjustment: to adjust your oven acc. to the gas type, make the adjustment for reduced flame carefully by turning with a small screwdriver as shown below on the screw in the middle of the gas cocks as well as nozzle changes (figure 5 and 6).
From LPG to
Natural gas
From
Natural
gas to LPG
Rapid
Burner
3 turns
anticlockwise
3 turns
clockwise
Semi-
rapid
Burner
2.5 turns
anticlockwise
2.5 turns
clockwise
Auxiliary
Burner
2 turns
anticlockwise
2 turns
clockwise
Figure - 5 Figure - 6
1. Please use driver with special head for removed and install nozzle as figure-7
2. Please remove nozzle (figure-8) from burner with special nozzle driver and install new nozzle (figure-9)
Figure -
7 Figure - 8 Figure - 9
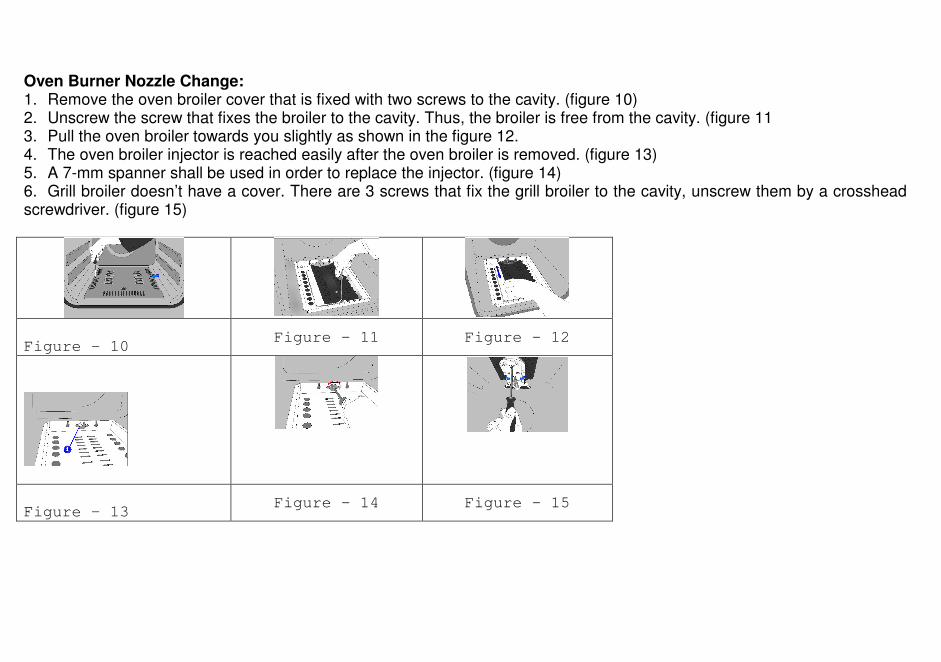
Oven Burner Nozzle Change: 1. Remove the oven broiler cover that is fixed with two screws to the cavity. (figure 10) 2. Unscrew the screw that fixes the broiler to the cavity. Thus, the broiler is free from the cavity. (figure 11 3. Pull the oven broiler towards you slightly as shown in the figure 12. 4. The oven broiler injector is reached easily after the oven broiler is removed. (figure 13) 5. A 7-mm spanner shall be used in order to replace the injector. (figure 14) 6. Grill broiler doesn’t have a cover. There are 3 screws that fix the grill broiler to the cavity, unscrew them by a crosshead screwdriver. (figure 15)
Figure - 10 Figure - 11 Figure - 12
Figure - 13 Figure - 14 Figure - 15
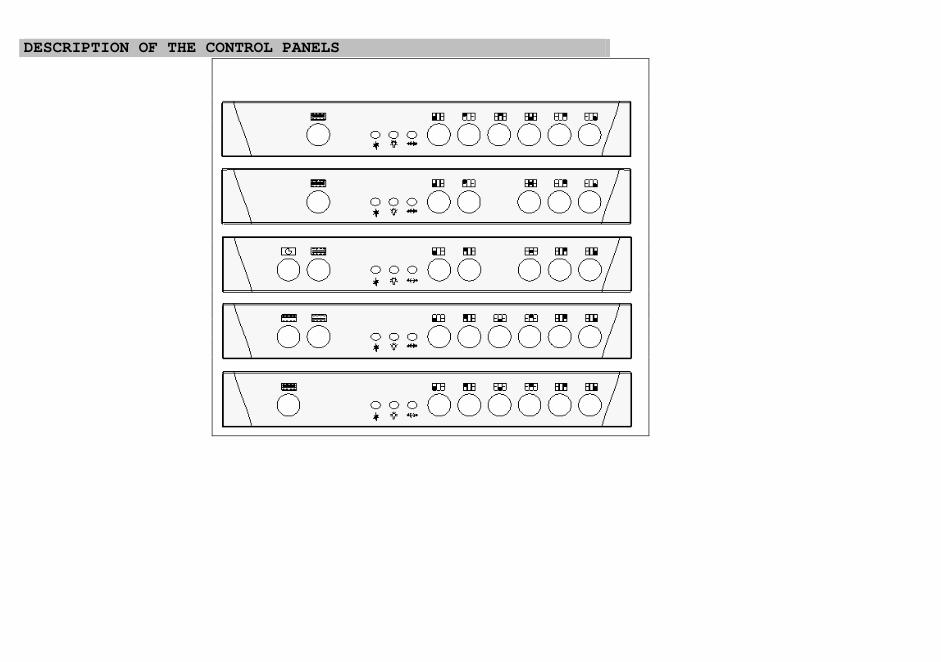
DESCRIPTION OF THE CONTROL PANELS
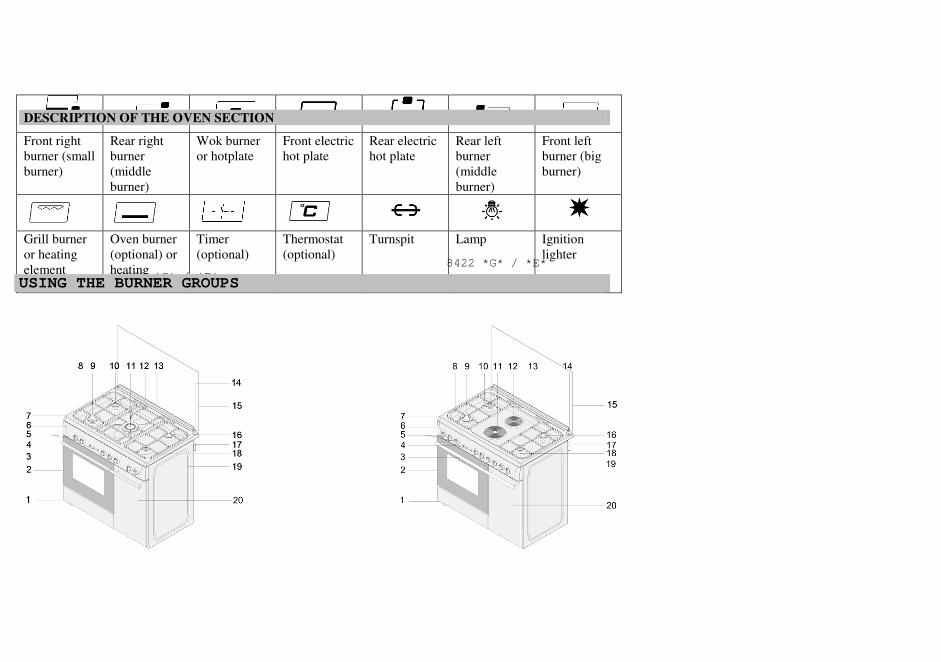
Front right
burner (small
burner)
Rear right
burner
(middle
burner)
Wok burner
or hotplate
Front electric
hot plate
Rear electric
hot plate
Rear left
burner
(middle
burner)
Front left
burner (big
burner)
Grill burner
or heating
element
Oven burner
(optional) or
heating
element
Timer
(optional)
Thermostat
(optional)
Turnspit Lamp Ignition
lighter
DESCRIPTION OF THE OVEN SECTION
8502 *G* / *E*
8422 *G* / *E*
USING THE BURNER GROUPS

Using Gas Cooker: 1. Our gas ovens top and bottom burner working system is one by one. When you want use your preference burner, before
you must make press the tap knob and wait nearly 5-10 second. Then you can to inflame trough with automatic ignition system (optional) or match. You must wait 10-15 second after inflame to have press by tap knob and after you can make allow the knob. If you can not made this operation you must try again.
2. The cocks controlling the gas cookers have special mechanism. In order to light the cooker; 3. Always press on the switch forward and bring it to flame symbol by turning anticlockwise (left). All of the lighters shall
operate and the cooker you controlled shall light only. Keep the switch pressed until ignition is performed. (OPTIONAL) 4. If your oven has ignition system from push button switch please press and turn gas valve open position and same time
press ignition button. 5. In models with security system, when flame of the cooker is extinguished, control valve cuts off the gas automatically. For
operate the burners with gas security system you must make press the knob and turn antilock wise. After the ignition (with optional automatic ignition system or match) you must wait nearly 5-10 second for gas security systems activation.
6. Do not continuously operate the igniter for more than 15 seconds. After 15 seconds, if the burner does not ignite, then stop and if you are trying to ignite the oven then open the door and wait a minimum of one minute before trying again. If the burner is extinguished for of the any reason, close the gas control valve and wait a minimum of one minute before trying again.

LEVEL
1
LEVEL
2
LEVEL
3
LEVEL
4
LEVEL
5
LEVEL
6
145 mm 95 W 155 W 250 W 400 W 650 W
1000
W
180 mm 115 W 175 W 250 W 600 W 850 W
1500
W
145 mm
Rapid 135 W 165 W 250 W 500 W 750 W
1500
W
180 mm
Rapid 175 W 220 W 300 W 850 W
1150
W
2000
W
Closed Fully
open
Half
open
1. Electric Hotplates have standard of 6 temperature levels (as described herein above) 2. When using first time, operate your electric hotplate in position 6 for 5 minutes. This will make the agent on your hotplate
which is sensitive to heat get hardened by burning. Use flat bottomed saucepans which fully contact with the heat as much as you can, so that you can use the energy more productively.
3. In order to obtain maximum output, be careful that the saucepan which will be used should be flat bottomed, and use the saucepans with dimensions given below.
Wok Burner 24 - 28 cm
Big Burner 22 - 26 cm
Normal Burner 18 - 22 cm
Small Burner 12 - 18 cm
USING OVEN SECTION

1. When your oven is operated first time, an odor will be spread out which will be sourced from using the heating elements. In order to get rid of this, operate it for 45 minutes while it is empty. In order to make cooking in your oven; oven switch must have been rotated and ignition must have been made. Otherwise, your oven will not run.
2. Kinds of meals you will cook, cooking times and Thermostat positions (Optional) were given in cooking table. The values given in the cooking table are characteristic values and were obtained as a result of the tests performed in our laboratory. You can find different flavors suitable for your taste depending on your cooking and using habits.
3. Open the oven cover at level 1 and use the safety panel when grilling on your oven 4. Cooking times: The results may change according to the local voltage and material having different quality, amount, and
temperatures. 5. During the time when cooking is being performed in the oven, the lid of the oven shouldn't be opened frequently.
Otherwise circulation of the heat may be imbalanced and the results may change. 6. Cake forms while cooking cake gives better result. 7. MECHANIC TIMER KNOB (Optional): In order to operate the oven, timer switch should be adjusted to desired time.
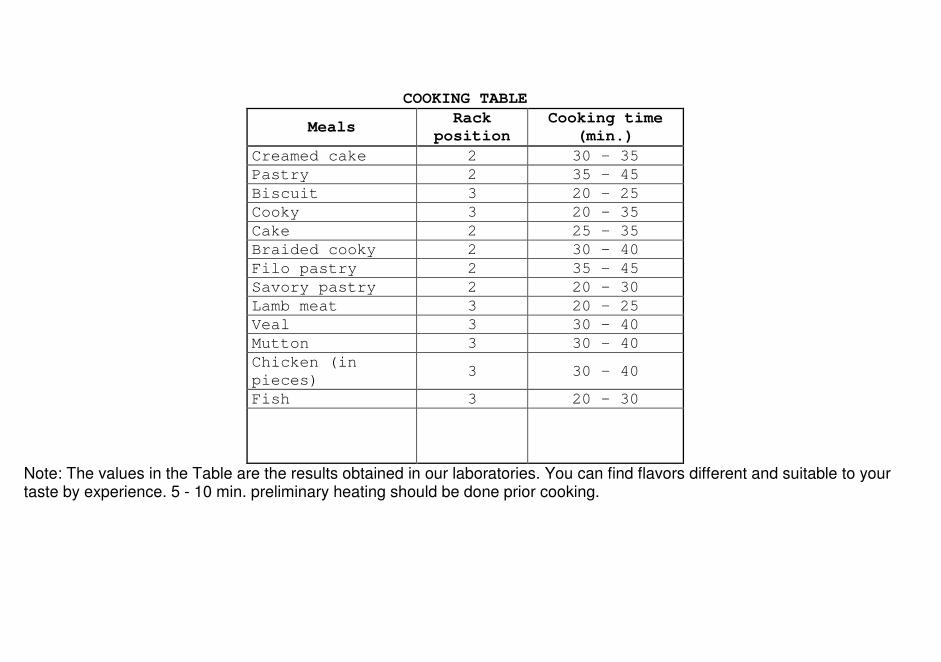
COOKING TABLE
Meals Rack
position
Cooking time
(min.)
Creamed cake 2 30 - 35
Pastry 2 35 - 45
Biscuit 3 20 - 25
Cooky 3 20 - 35
Cake 2 25 - 35
Braided cooky 2 30 - 40
Filo pastry 2 35 - 45
Savory pastry 2 20 - 30
Lamb meat 3 20 - 25
Veal 3 30 - 40
Mutton 3 30 - 40
Chicken (in
pieces) 3 30 - 40
Fish 3 20 - 30
Note: The values in the Table are the results obtained in our laboratories. You can find flavors different and suitable to your taste by experience. 5 - 10 min. preliminary heating should be done prior cooking.
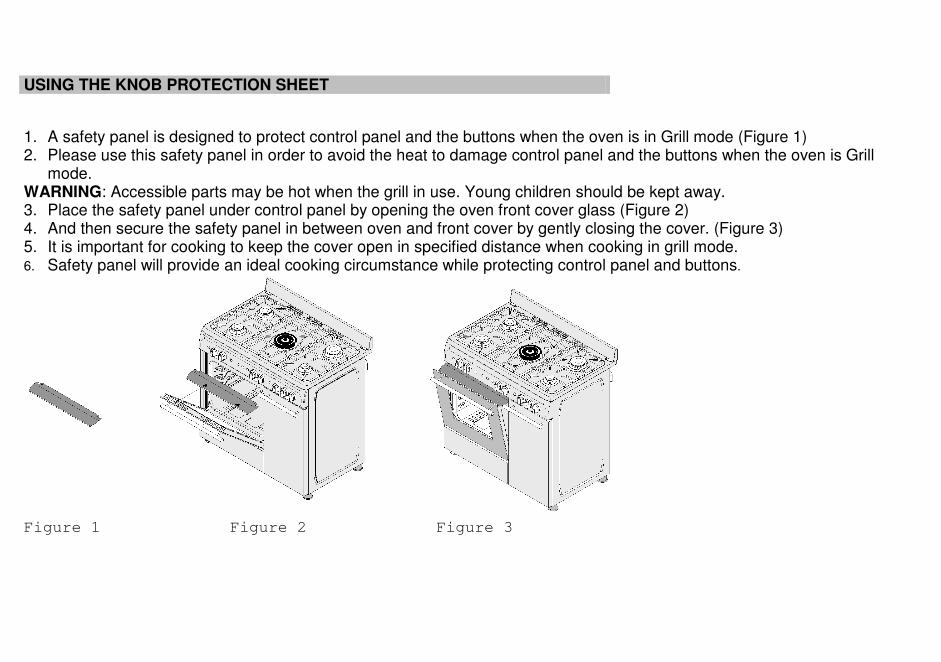
1. A safety panel is designed to protect control panel and the buttons when the oven is in Grill mode (Figure 1) 2. Please use this safety panel in order to avoid the heat to damage control panel and the buttons when the oven is Grill
mode. WARNING: Accessible parts may be hot when the grill in use. Young children should be kept away. 3. Place the safety panel under control panel by opening the oven front cover glass (Figure 2) 4. And then secure the safety panel in between oven and front cover by gently closing the cover. (Figure 3) 5. It is important for cooking to keep the cover open in specified distance when cooking in grill mode. 6. Safety panel will provide an ideal cooking circumstance while protecting control panel and buttons.
Figure 1 Figure 2 Figure 3
USING THE KNOB PROTECTION SHEET

1. Disconnect the plug supplying electricity for the oven from the socket and cutoff the gas by closing the gas valve. 2. Never clean the interior part, panel, lid, trays and all other parts of the oven by the tools like hard brush, cleaning mesh or
knife. Do not use abrasive, scratching agents and detergents. 3. After cleaning the interior parts of the oven with a soapy cloth, rinse it and then dry thoroughly with a soft cloth. 4. Clean the glass surfaces with special glass cleaning agents. 5. Wash the heads of the burners sometimes with soapy water and clean the gas ducts by means of a brush. 6. Never use inflammable agents like acid, thinner and gasoline when cleaning your oven. 7. Do not clean your oven with steam cleaners. 8. Don't wash any part of your oven in dishwasher. 9. In order to clean the front glass lid of the oven; remove the fixing washers fixing the inner glass by means of a
screwdriver, clean and rinse it thoroughly. After drying, place the gasket properly and re-install the glass. 10. While oven is operating or shortly after it starts operating, it is extremely hot. You must avoid touching heating elements. 11. Before opening the upper lid of the oven, clean spilled liquid off the lid. Also, before closing the lid, ensure that the cooker
table is cooled enough.
MAINTENANCE and CLEANING
The packaging materials protect the appliance during transport.
By recycling the packaging it is possible to save raw materials and reduce waste volumes. If you dispose of the packaging yourself, ask local authorities for the location of the nearest collection centre.
DISPOSAL OF ELECTRICAL AND ELECTRONIC APPLIANCES
This appliance is marked in compliance with European Directive 2002/96/EC, Waste Electrical and Electronic Equipment (WEEE). By making sure that this product is properly disposed of, the user contributes to preventing potential environmental and health damage.
The symbol
on the product or on the documentation that goes with it indicates that this product must not be diposed of as the usual domestic waste. Instead, it must be delivered to the appropriate collection center for recycling of electrical and electronic equipment. Dispose of it in accordance with local standards for waste disposal. For further information on treatment, recycling and reuse of this product, contact the proper local authority, the home waste collection service or the retailer where the product was purchased.
DISPOSAL OF PACKAGING