instruÇÕes de seguranÇa - orima.pt · painel de comandos — descriÇÃo de simbolos e...
TRANSCRIPT
1
INSTRUÇÕES DE SEGURANÇA Leia atentamente o manual de instruções. O não cumprimento das instruções pode dar origem a ferimentos, danos no aparelho e perda do direito à assistência gratuita ao abrigo da garantia. Recomendamos que guarde o manual de instruções enquanto estiver na posse do aparelho. Quando vender o aparelho, passe o manual de instruções ao novo proprietário.
AVISO!
Não tape os orifícios de ventilação no topo e nas laterais do aparelho.
Não utilize meios mecânicos nem dispositivos eléctricos para acelerar o processo de descongelação quando limpar o compartimento do congelador.
Se o cabo eléctrico de alimentação estiver danificado, a sua substituição deverá ser feita pelo fabricante, agente de serviço ou uma pessoa com qualificações semelhantes para evitar acidentes.
– A eliminação do aparelho deve ser feita de acordo com as regras nacionais. Não danifique o sistema de refrigeração do aparelho. Contém gás refrigerante R600a.
Se o sistema de refrigeração estiver danificado: Não utilize chamas desprotegidas. Evite faíscas ― não ligue aparelhos eléctricos nem acessórios de iluminação. Ventile imediatamente a divisão.
Não deixe as crianças brincar com o aparelho nem ligá-lo ou desligá-lo da tomada. Não deixe as crianças brincar com o material de embalagem do aparelho.
– O aparelho não deve ser usado por crianças ou indivíduos com incapacidades mentais, a menos que alguém responsável pela sua segurança os tenham previamente ensinado a operar o aparelho.
Se o aparelho tiver estado ao frio (temperatura não superior a +12 °C), deverá aguardar duas
horas antes de o ligar à alimentação da rede. O aparelho não deve ser ligado à rede sem primeiro remover todos os materiais de embalagem e
de transporte. Uma vez o aparelho desembalado, certifique-se de que está completo e de que o corpo e o cabo
eléctrico não estão danificados. É proibido utilizar um aparelho tecnicamente danificado.
LIGAÇÃO À REDE ELÉCTRICA
O aparelho tem que ser ligado a uma tomada eléctrica ligada à terra. A tomada eléctrica ligada à terra através da qual o aparelho é ligado à alimentação de rede deve estar num lugar acessível.
SE O APARELHO FOR PRODUZIDO COM O CABO DE ALIMENTAÇÃO ESPECIAL, APENAS PODERÁ SER SUBSTITUÍDO POR OUTRO IGUAL FORNECIDO PELO FABRICANTE.
POR RAZÕES DE SEGURANÇA, O CABO DE ALIMENTAÇÃO DEVERÁ SER SUBSTITUIDO SÓ POR UM TÉCNICO QUALIFICADO.
– NÃO UTILIZE extensões ou adaptadores.
A frequência e potência da alimentação eléctrica em sua casa tem que respeitar os parâmetros de dados gerais do aparelho conforme indicados na rótulo do produto.
Quando posicionar o aparelho, tenha cuidado para não entalar o cabo eléctrico danificando-o. Não coloque objectos pesados como, por exemplo, dispositivos de
2
refrigeração, mobiliário ou outros electrodomésticos junto do aparelho de tal forma que entalem e danifiquem o cabo eléctrico. Pode provocar um curto-circuito e incêndio.
– Tenha o cuidado de se certificar que o cabo eléctrico não fica entalado pela parede de trás do aparelho nem danificado de qualquer outra forma. Uma ficha danificada pode provocar um incêndio!
SE O APARELHO FOR DESLIGADO NA TOMADA (PARA LIMPAR, MUDAR PARA OUTRO LUGAR,
ETC.), PODE SER LIGADO REPETIDAMENTE AO FIM DE 15 MIN. O aparelho deve apenas ser utilizado para guardar e congelar alimentos. Este aparelho não foi concebido para guardar substâncias explosivas como latas de aerossóis com
propulsor inflamável. É proibido guardar gasolina ou outros líquidos inflamáveis próximo do aparelho. O aparelho não pode ser eliminado queimando-o. Não coloque dispositivos eléctricos ligados (como microondas, secadores de cabelo, ferros,
cafeteiras eléctricas ou outros aparelhos eléctricos) em cima do aparelho porque podem provocar a ignição de peças plásticas.
Não coloque pratos com líquidos em cima do aparelho, nem jarras com flores ou outros recipientes com líquidos em cima do aparelho.
Não suba para cima do aparelho nem se sente em cima dele, não se apoie ou pendure nas portas do aparelho e não deixe que as crianças façam o mesmo.
SE O APARELHO ESTIVER AVARIADO E NÃO FOR POSSÍVEL REPARÁ-LO COM AS RECOMENDAÇÕES POR NÓS FORNECIDAS, DESLIGUE-O DA TOMADA, ABRA AS PORTAS E CONTACTE O ESPECIALISTA DA ASSISTÊNCIA. SOMENTE UM REPRESENTANTE DA ASSISTÊNCIA PODE SOLUCIONAR TODOS OS PROBLEMAS TÉCNICOS OU AVARIAS RELACIONADAS COM A CONSTRUÇÃO.
ATENÇÃO! NÃO ABRIR A TAMPA DE ILUMINAÇÃO DO LED. Em caso de ava r ia contactar um Técn ico qua l i f i cado .
INFORMAÇÃO PARA PROTECÇÃO DO AMBIENTE Este símbolo indica que quando o aparelho já não for preciso, não pode ser eliminado juntamente com outro lixo municipal diverso. Deve ser recolhido e eliminado separadamente, isto é, em contentores especialmente marcados com este símbolo em áreas de recolha de lixo de grandes dimensões, utilizando o serviço de recolha.
Para obter informações completas sobre onde deixar o aparelho velho com segurança, contacte as autoridades governamentais locais, a loja onde comprou o aparelho ou os representantes do fabricante. Se decidiu deitar fora o aparelho, torne impossível a sua utilização para evitar quaisquer possíveis acidentes. Desligue a ficha na tomada e depois corte o cabo. Rasgue e tire a junta vedante. Parta o fecho da porta. AVISO! Não desmonte o aparelho. Passe-o para as empresas de reciclagem.
3
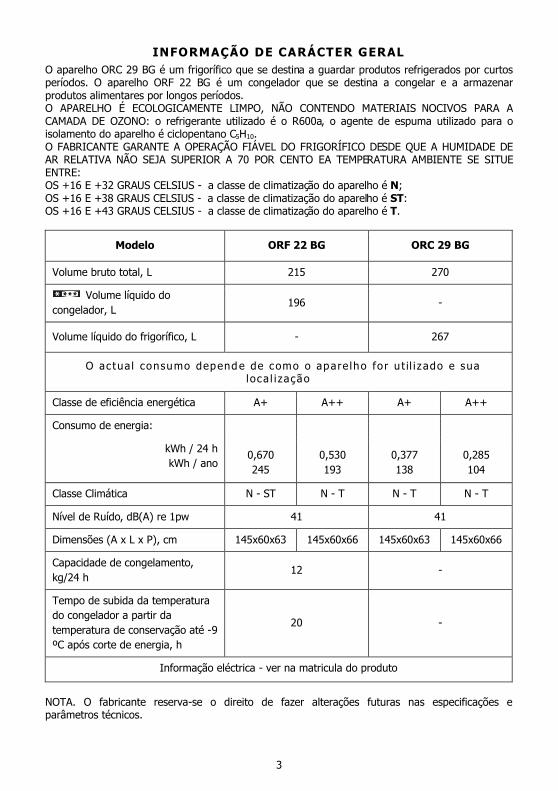
INFORMAÇÃO DE CARÁCTER GERAL O aparelho ORC 29 BG é um frigorífico que se destina a guardar produtos refrigerados por curtos períodos. O aparelho ORF 22 BG é um congelador que se destina a congelar e a armazenar produtos alimentares por longos períodos. O APARELHO É ECOLOGICAMENTE LIMPO, NÃO CONTENDO MATERIAIS NOCIVOS PARA A CAMADA DE OZONO: o refrigerante utilizado é o R600a, o agente de espuma utilizado para o isolamento do aparelho é ciclopentano C5H10. O FABRICANTE GARANTE A OPERAÇÃO FIÁVEL DO FRIGORÍFICO DESDE QUE A HUMIDADE DE AR RELATIVA NÃO SEJA SUPERIOR A 70 POR CENTO EA TEMPERATURA AMBIENTE SE SITUE ENTRE: OS +16 E +32 GRAUS CELSIUS - a classe de climatização do aparelho é N; OS +16 E +38 GRAUS CELSIUS - a classe de climatização do aparelho é ST: OS +16 E +43 GRAUS CELSIUS - a classe de climatização do aparelho é T.
Modelo ORF 22 BG ORC 29 BG
Volume bruto total, L 215 270
Volume líquido do congelador, L
196 -
Volume líquido do frigorífico, L - 267
O ac tua l consumo depend e de como o apare lho fo r u t il i z ado e sua loca l i zação
Classe de eficiência energética A+ A++ A+ A++
Consumo de energia:
0,670 245
0,530 193
0,377 138
0,285 104
kWh / 24 h kWh / ano
Classe Climática N - ST N - T N - T N - T
Nível de Ruído, dB(A) re 1pw 41 41
Dimensões (A x L x P), cm 145x60x63 145x60x66 145x60x63 145x60x66
Capacidade de congelamento, kg/24 h
12 -
Tempo de subida da temperatura do congelador a partir da temperatura de conservação até -9 ºC após corte de energia, h
20 -
Informação eléctrica - ver na matricula do produto
NOTA. O fabricante reserva-se o direito de fazer alterações futuras nas especificações e parâmetros técnicos.
4
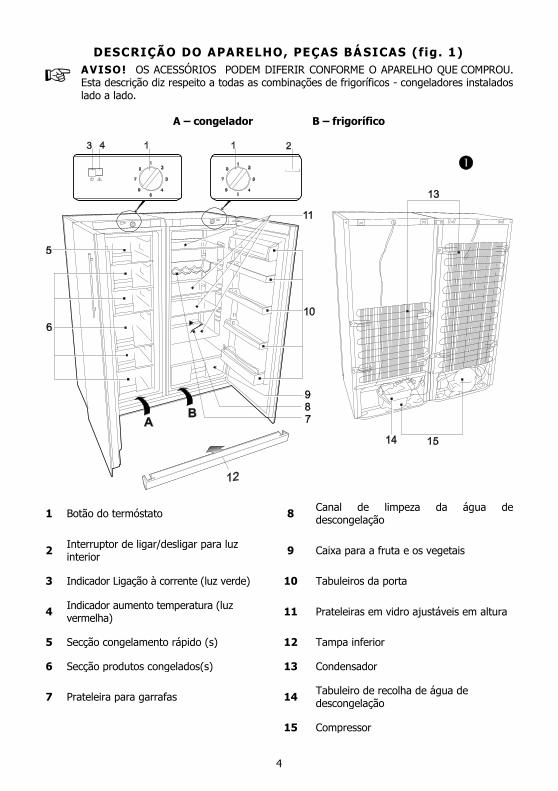
DESCRIÇÃO DO APARELHO, PEÇAS BÁSICAS (fig. 1) AVISO! OS ACESSÓRIOS PODEM DIFERIR CONFORME O APARELHO QUE COMPROU. Esta descrição diz respeito a todas as combinações de frigoríficos - congeladores instalados lado a lado.
A – congelador B – frigorífico
1 Botão do termóstato 8 Canal de limpeza da água de descongelação
2 Interruptor de ligar/desligar para luz interior 9 Caixa para a fruta e os vegetais
3 Indicador Ligação à corrente (luz verde) 10 Tabuleiros da porta
4 Indicador aumento temperatura (luz vermelha) 11 Prateleiras em vidro ajustáveis em altura
5 Secção congelamento rápido (s) 12 Tampa inferior
6 Secção produtos congelados(s) 13 Condensador
7 Prateleira para garrafas 14 Tabuleiro de recolha de água de descongelação
15 Compressor
5
REVISÃO DE CONTROLO MECÂNICO (fig. 1) PAINEL DE COMANDOS — DESCRIÇÃO DE SIMBOLOS E FUNCIONAMENTO
1 BOTÃO TERMOSTATO. A temperatura no aparelho é controlada usando o botão do termóstato, rodando-o de um lado
para o outro. Mais informações em “Regulação de Temperatura”.
3 INDICADOR LIGAÇÃO À CORRENTE com o símbolo Quando o aparelho está ligado à rede eléctrica, a luz indicadora verde está iluminada.
4 INDICADOR DE AUMENTO DE TEMPERATURA com o símbolo Quando a temperatura no congelador sobe acima – 9 ºC, o indicador luminoso vermelho se acende. Isto indica que: O congelador foi desligado por um longo período de tempo, isto é, o congelador é ligado
pela primeira vez, após o descongelamento ou depois de uma falha eléctrica. A porta do congelador é aberta ou está sendo aberta com muita frequência. Colocou uma grande quantidade de produtos alimentares descongelados no seu Congelador
Orima. O sistema de congelamento está a falhar ou seja, o indicador não desliga após 6 horas,
ouve-se o compressor a funcionar ou o compressor não desliga. Neste caso deverá contactar um Técnico qualificado (mas primeiro certifique-se que os três itens acima indicados foram tidos em conta).
POSICIONAMENTO Coloque o aparelho numa divisão seca e bem ventilada.
AVISO! O aparelho não deve ser utilizado numa divisão não aquecida ou alpendre. Coloque o aparelho afastado de fontes de calor como fogões/fornos de cozinha, radiadores ou luz directa do sol. AVISO! O apare lho não deve f i car encostado a tubos de aquecimento, gás ou canos de água, nem a outros aparelhos e léctr icos.
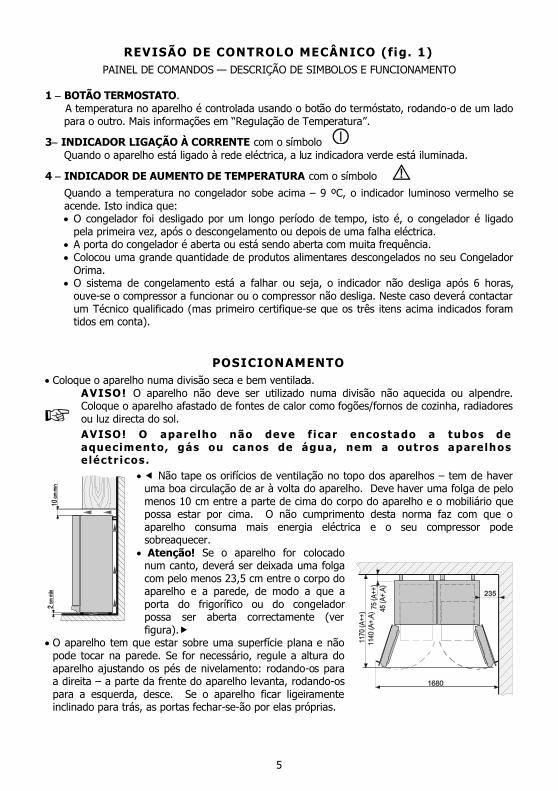
Não tape os orifícios de ventilação no topo dos aparelhos – tem de haver uma boa circulação de ar à volta do aparelho. Deve haver uma folga de pelo menos 10 cm entre a parte de cima do corpo do aparelho e o mobiliário que possa estar por cima. O não cumprimento desta norma faz com que o aparelho consuma mais energia eléctrica e o seu compressor pode sobreaquecer.
Atenção! Se o aparelho for colocado num canto, deverá ser deixada uma folga com pelo menos 23,5 cm entre o corpo do aparelho e a parede, de modo a que a porta do frigorífico ou do congelador possa ser aberta correctamente (ver figura).
O aparelho tem que estar sobre uma superfície plana e não pode tocar na parede. Se for necessário, regule a altura do aparelho ajustando os pés de nivelamento: rodando-os para a direita – a parte da frente do aparelho levanta, rodando-os para a esquerda, desce. Se o aparelho ficar ligeiramente inclinado para trás, as portas fechar-se-ão por elas próprias.
6
LIGAR O FRIGORÍFICO E O CONGELADOR E PREPARÁ -LOS PA RA A COLOCAÇÃO EM SERVIÇO
IMPORTANTE! RECOMENDAMOS que contacte um agente certificado que execute a ligação do frigorífico ORC-29 BG e do congelador ORF-22 BG. Tenha em atenção, por favor, que este trabalho não está coberto pela nossa garantia. IMPORTANTE! Se decidir ligar estes aparelhos e prepará-los para os colocar a funcionar sozinho, recomendamos que solicite a ajuda de alguém.
Irá necessitar de: uma chave de parafusos Phillips PH2, uma chave de caixa Nº 8 em T e outra chave Nº 10. Nunca coloque os aparelhos horizontalmente quando os estiver a ligar. Preparar os aparelhos para a colocação em serviço 1. Retire os aparelhos das embalagens. Retire os aparelhos das respectivas bases em
poliestireno. Retire toda a fita adesiva utilizada para a embalagem. 2. Quando colocar os aparelhos nos locais adequados, incline-os ligeiramente para trás: as rodas
traseiras ajudá-lo-ão a colocar os aparelhos mais facilmente nos devidos lugares. Nunca levante nem empurre o frigorífico ou congelador, pois podem partir-se. Pegue antes pelas pegas.
3. Retire a fita adesiva encarnada: esta destina-se apenas ao transporte dos aparelhos. 4. Deite fora adequadamente o material da embalagem. 5. Retire os suportes 1 do saco e instale-os nas ranhuras 2
existentes na parte superior traseira dos aparelhos (ver figura). 6. Coloque o frigorífico e o congelador a cerca de 1 metro afastados
da parede onde ficarão instalados. Instale os aparelhos lado a lado, deixando o congelador do lado direito e o frigorífico do lado esquerdo.
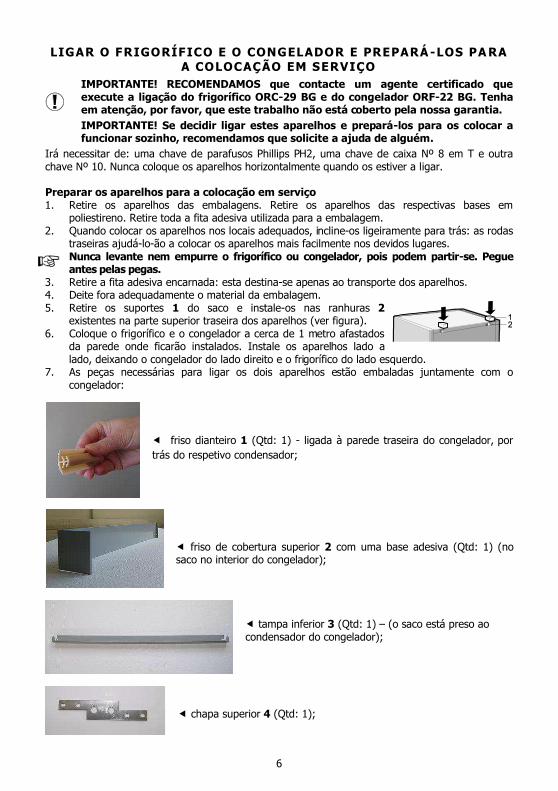
7. As peças necessárias para ligar os dois aparelhos estão embaladas juntamente com o congelador:
friso dianteiro 1 (Qtd: 1) - ligada à parede traseira do congelador, por trás do respetivo condensador;
friso de cobertura superior 2 com uma base adesiva (Qtd: 1) (no saco no interior do congelador);
tampa inferior 3 (Qtd: 1) – (o saco está preso ao condensador do congelador);
chapa superior 4 (Qtd: 1);
7
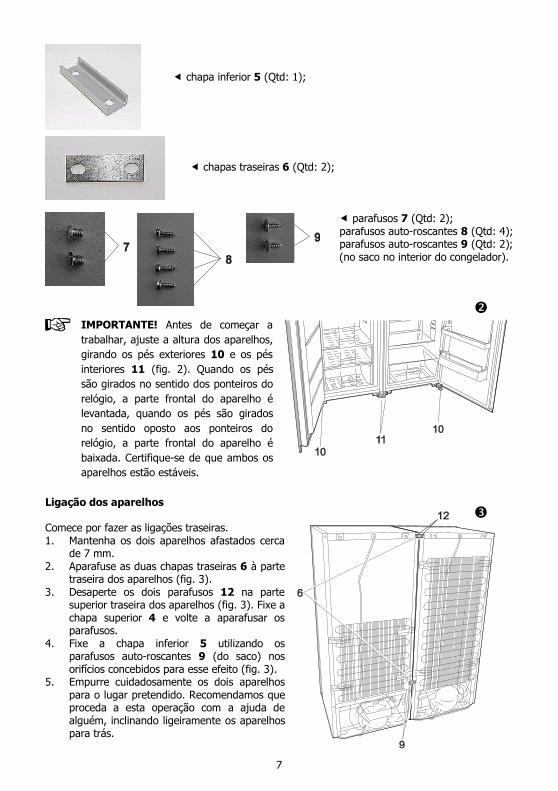
chapa inferior 5 (Qtd: 1);
chapas traseiras 6 (Qtd: 2);
parafusos 7 (Qtd: 2); parafusos auto-roscantes 8 (Qtd: 4); parafusos auto-roscantes 9 (Qtd: 2); (no saco no interior do congelador).
IMPORTANTE! Antes de começar a trabalhar, ajuste a altura dos aparelhos, girando os pés exteriores 10 e os pés interiores 11 (fig. 2). Quando os pés são girados no sentido dos ponteiros do relógio, a parte frontal do aparelho é levantada, quando os pés são girados no sentido oposto aos ponteiros do relógio, a parte frontal do aparelho é baixada. Certifique-se de que ambos os aparelhos estão estáveis.
Ligação dos aparelhos Comece por fazer as ligações traseiras. 1. Mantenha os dois aparelhos afastados cerca
de 7 mm. 2. Aparafuse as duas chapas traseiras 6 à parte
traseira dos aparelhos (fig. 3). 3. Desaperte os dois parafusos 12 na parte
superior traseira dos aparelhos (fig. 3). Fixe a chapa superior 4 e volte a aparafusar os parafusos.
4. Fixe a chapa inferior 5 utilizando os parafusos auto-roscantes 9 (do saco) nos orifícios concebidos para esse efeito (fig. 3).
5. Empurre cuidadosamente os dois aparelhos para o lugar pretendido. Recomendamos que proceda a esta operação com a ajuda de alguém, inclinando ligeiramente os aparelhos para trás.
8
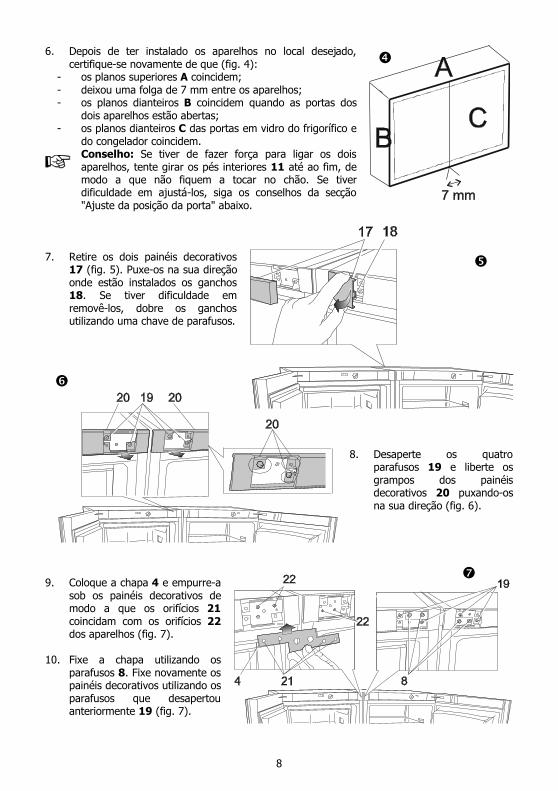
6. Depois de ter instalado os aparelhos no local desejado, certifique-se novamente de que (fig. 4):
- os planos superiores A coincidem; - deixou uma folga de 7 mm entre os aparelhos; - os planos dianteiros B coincidem quando as portas dos
dois aparelhos estão abertas; - os planos dianteiros C das portas em vidro do frigorífico e
do congelador coincidem. Conselho: Se tiver de fazer força para ligar os dois aparelhos, tente girar os pés interiores 11 até ao fim, de modo a que não fiquem a tocar no chão. Se tiver dificuldade em ajustá-los, siga os conselhos da secção "Ajuste da posição da porta" abaixo.
7. Retire os dois painéis decorativos
17 (fig. 5). Puxe-os na sua direção onde estão instalados os ganchos 18. Se tiver dificuldade em removê-los, dobre os ganchos utilizando uma chave de parafusos.
8. Desaperte os quatro
parafusos 19 e liberte os grampos dos painéis decorativos 20 puxando-os na sua direção (fig. 6).
9. Coloque a chapa 4 e empurre-a
sob os painéis decorativos de modo a que os orifícios 21 coincidam com os orifícios 22 dos aparelhos (fig. 7).
10. Fixe a chapa utilizando os
parafusos 8. Fixe novamente os painéis decorativos utilizando os parafusos que desapertou anteriormente 19 (fig. 7).
9
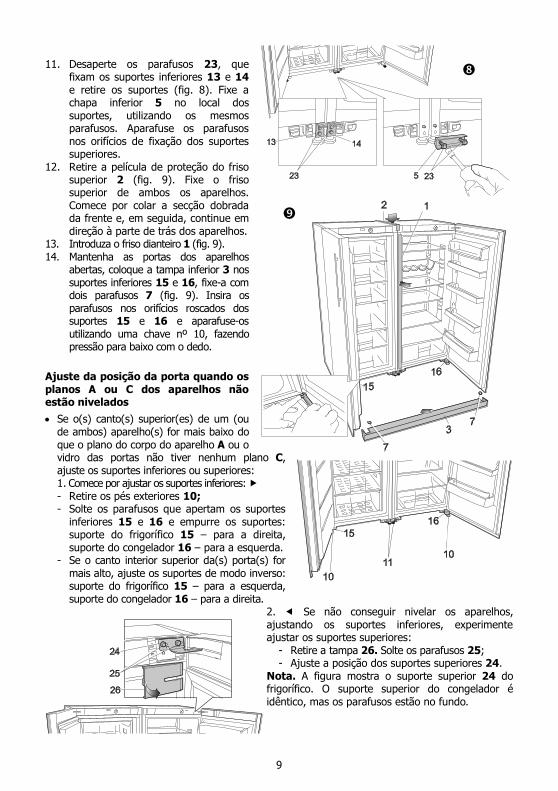
11. Desaperte os parafusos 23, que
fixam os suportes inferiores 13 e 14 e retire os suportes (fig. 8). Fixe a chapa inferior 5 no local dos suportes, utilizando os mesmos parafusos. Aparafuse os parafusos nos orifícios de fixação dos suportes superiores.
12. Retire a película de proteção do friso superior 2 (fig. 9). Fixe o friso superior de ambos os aparelhos. Comece por colar a secção dobrada da frente e, em seguida, continue em direção à parte de trás dos aparelhos.
13. Introduza o friso dianteiro 1 (fig. 9). 14. Mantenha as portas dos aparelhos
abertas, coloque a tampa inferior 3 nos suportes inferiores 15 e 16, fixe-a com dois parafusos 7 (fig. 9). Insira os parafusos nos orifícios roscados dos suportes 15 e 16 e aparafuse-os utilizando uma chave nº 10, fazendo pressão para baixo com o dedo.
Ajuste da posição da porta quando os planos A ou C dos aparelhos não estão nivelados
Se o(s) canto(s) superior(es) de um (ou de ambos) aparelho(s) for mais baixo do que o plano do corpo do aparelho A ou o vidro das portas não tiver nenhum plano C, ajuste os suportes inferiores ou superiores: 1. Comece por ajustar os suportes inferiores: - Retire os pés exteriores 10; - Solte os parafusos que apertam os suportes
inferiores 15 e 16 e empurre os suportes: suporte do frigorífico 15 – para a direita, suporte do congelador 16 – para a esquerda.
- Se o canto interior superior da(s) porta(s) for mais alto, ajuste os suportes de modo inverso: suporte do frigorífico 15 – para a esquerda, suporte do congelador 16 – para a direita.
2. Se não conseguir nivelar os aparelhos, ajustando os suportes inferiores, experimente ajustar os suportes superiores:
- Retire a tampa 26. Solte os parafusos 25; - Ajuste a posição dos suportes superiores 24.
Nota. A figura mostra o suporte superior 24 do frigorífico. O suporte superior do congelador é idêntico, mas os parafusos estão no fundo.
10
REGULAÇÃO DA TEMPERATURA A Temperatura definida para o Congelador pelo fabricante é de -18 0C A temperatura no compartimento do frigorífico é controlada pelo botão de termóstato 1 (fig. 1) rodando-o para um lado ou para outro. A indicação da temperatura em dígitos é mostrada ao lado do botão do termóstato. A temperatura é regulada na escala de sete algarismos. 0 = Compressor está desligado. AVISO! Corrente eléctrica não está desligada. 1 = temperatura mais elevada (menor arrefecimento) 7 = temperatura mais baixa (maior arrefecimento) Se os produtos alimentares no compartimento do frigorífico estiverem frios demais, regule o botão do termóstato para 1-3. Se os produtos alimentares no compartimento do frigorífico não estiverem a ser suficientemente arrefecidos, regule o botão do termóstato para 3-5 ou 4-7. Regu le a tempera tu ra do apare lho de acordo com aqu il o que p rec isa !
A TEMPERATURA NO COMPARTIMENTO DO FRIGORÍFICO PODE VARIAR DEPENDENDO DA TEMPERATURA AMBIENTE, DA QUANTIDADE DE PRODUTOS ALIMENTARES, DA TEMPERATURA DOS PRODUTOS ALIMENTARES E DA FREQUÊNCIA COM QUE A PORTA DO APARELHO É ABERTA E FECHADA.
Por conseguinte, recomendamos: Coloque o aparelho afastado de fontes de calor, Alimentos colocados no aparelho não devem estar mais quentes do que a temperatura ambiente, A porta do aparelho não deve ser deixada aberta mais tempo do que o necessário para tirar ou
colocar produtos alimentares no seu interior. SE A DIVISÃO ESTIVER FRESCA, O APARELHO ARREFECE MENOS. POR CONSEGUINTE, A TEMPERATURA NO APARELHO PODE SUBIR. Utilize a roda do termóstato para regular para uma temperatura mais baixa.
CONSERVAÇÃO DE PRODUTOS ALIMENTARES NO
COMPARTIMENTO DO FRIGORÍFICO O compartimento do frigorífico destina-se à conservação de curta duração de produtos alimentares frescos. Não coloque produtos alimentares quentes no compartimento do frigorífico – tem que deixá-los
arrefecer até à temperatura ambiente. Cumpra rigorosamente o prazo de validade do produto alimentar indicado pelo fabricante na
embalagem do produto. Se colocar numa das prateleiras vários pratos cheios de líquido, poderá ocorrer uma
condensação e formarem-se gotas, que podem escorrer para a prateleira de baixo. Para evitar isso, coloque alguns dos recipientes com líquido noutras prateleiras.
CONGELAR PRODUTOS ALIMENTARES NO COMPARTIMENTO DO CONGELADOR
No compartimento do congelador, a secção de congelamento rápido está marcada com o símbolo. Para congelar alimentos, coloque os alimentos frescos num ou dois compartimentos na secção de congelação rápida. Quando os alimentos estiverem congelados devem ser retirados das secção de congelação rápida e colocados na(s) gaveta(s) da secção de armazenamento.
NÃO EXCEDA A QUANTIDADE MÁXIMA DE PRODUTOS CONGELADOS INDICADA NO QUADRO DOS DADOS GERAIS (ver página 3).
Deixe uma folga não inferior a 2,5 cm entre os produtos alimentares que estão a ser congelados e a divisória superior.
Não coloque produtos alimentares sem estarem acondicionados nas secções do congelador.

11
Os alimentos frescos para congelar não devem tocar nos produtos alimentares já congelados. Não congele produtos alimentares que estejam a uma temperatura superior à temperatura
ambiente. Não congele produtos alimentares líquidos em recipientes ou garrafas de vidro. Cumpra rigorosamente as datas de validade dos produtos alimentares congelados indicadas pelo
fabricante na embalagem do produto. RECOMENDAMOS QUE TANTO O PEIXE COMO AS SALSICHAS CONGELADOS SEJAM
CONSERVADOS NO COMPARTIMENTO DO CONGELADOR POR UM PRAZO NÃO SUPERIOR A 6 MESES; QUEIJO, AVES, PORCO, BORREGO – NÃO MAIS DE 8 MESES; BIFE, FRUTA E LEGUMES – NÃO MAIS DE 12 MESES.
DESCONGELAR O COMPARTIMENTO DO FRIGORÍFICO O compartimento do frigorífico descongela automaticamente. As gotas de gelo que se formam na parede do fundo do compartimento de refrigeração descongelam durante o tempo em que o compressor não está a trabalhar e a água de descongelação escorre pelo canal de escoamento da água de descongelação para o tabuleiro em cima do compressor, onde evapora.
DESCONGELAR O COMPARTIMENTO DO CONGELADOR O compartimento do congelador deve ser descongelado não menos de duas vezes por ano ou sempre que haja uma camada de gelo com mais de 5 mm de espessura. Execute as acções a seguir pela ordem indicada: AVISO! Desl igue o apare lho no interruptor e t i re a f icha da tomada. Retire os produtos alimentares do compartimento do congelador. Os produtos alimentares
congelados não aquecerão demasiado enquanto está a descongelar o compartimento do congelador se os cobrir com um pano grosso e os mantiver num local fresco.
Puxe para fora o canal da água de descongelação, rode-o 180° e pendure-o. Coloque um recipiente debaixo do canal da água de descongelação.
Coloque um prato debaixo dos canais da água de descongelação. Deixe a porta do compartimento do congelador aberta. Quando o
gelo derreter, limpe e seque as superfícies e acessórios do compartimento do congelador.
Retire o canal da água de descongelação, rode-o novamente 180° e volte a colocá-lo no seu lugar original.
Feche a porta do compartimento do congelador. Ligue a ficha na tomada e depois ligue o aparelho.
LIMPEZA E CUIDADOS A TER LIMPE REGULARMENTE O APARELHO.
Lembre-se que antes de descongelar o compartimento do congelador e de limpar a parte de trás do corpo do aparelho, tem que desligar a ficha do aparelho na tomada.
Proteja as superfícies interiores do aparelho bem como as peças de plástico de gorduras, ácidos e molhos. No caso de derrame acidental – limpe imediatamente com água quente com sabão ou detergente de lavar a loiça. Seque com um pano.
Limpe as superfícies interiores do aparelho com água quente com sabão. Também se pode utilizar detergente de lavar a loiça. Utilize um pano para secar as superfícies interiores e exteriores.
Limpe regularmente as juntas herméticas das portas. Seque com um pano.
12
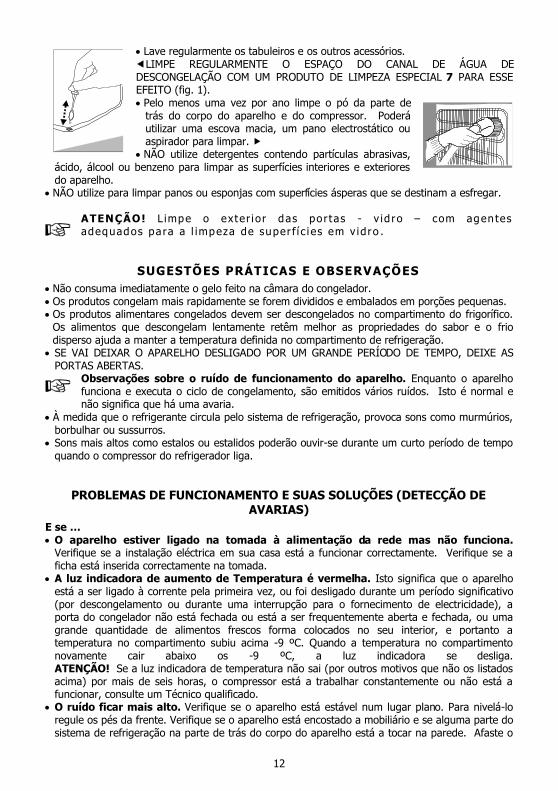
Lave regularmente os tabuleiros e os outros acessórios. LIMPE REGULARMENTE O ESPAÇO DO CANAL DE ÁGUA DE DESCONGELAÇÃO COM UM PRODUTO DE LIMPEZA ESPECIAL 7 PARA ESSE EFEITO (fig. 1). Pelo menos uma vez por ano limpe o pó da parte de
trás do corpo do aparelho e do compressor. Poderá utilizar uma escova macia, um pano electrostático ou aspirador para limpar.
NÃO utilize detergentes contendo partículas abrasivas, ácido, álcool ou benzeno para limpar as superfícies interiores e exteriores do aparelho.
NÃO utilize para limpar panos ou esponjas com superfícies ásperas que se destinam a esfregar. ATENÇÃO! L impe o exter i or das portas - v id ro – com agen tes adequados pa ra a l impeza de super f í c i es em v idro .
SUGESTÕES PRÁTICAS E OBSERVAÇÕES Não consuma imediatamente o gelo feito na câmara do congelador. Os produtos congelam mais rapidamente se forem divididos e embalados em porções pequenas. Os produtos alimentares congelados devem ser descongelados no compartimento do frigorífico.
Os alimentos que descongelam lentamente retêm melhor as propriedades do sabor e o frio disperso ajuda a manter a temperatura definida no compartimento de refrigeração.
SE VAI DEIXAR O APARELHO DESLIGADO POR UM GRANDE PERÍODO DE TEMPO, DEIXE AS PORTAS ABERTAS.
Observações sobre o ruído de funcionamento do aparelho. Enquanto o aparelho funciona e executa o ciclo de congelamento, são emitidos vários ruídos. Isto é normal e não significa que há uma avaria.
À medida que o refrigerante circula pelo sistema de refrigeração, provoca sons como murmúrios, borbulhar ou sussurros.
Sons mais altos como estalos ou estalidos poderão ouvir-se durante um curto período de tempo quando o compressor do refrigerador liga.
PROBLEMAS DE FUNCIONAMENTO E SUAS SOLUÇÕES (DETECÇÃO DE AVARIAS)
E se … O aparelho estiver ligado na tomada à alimentação da rede mas não funciona.
Verifique se a instalação eléctrica em sua casa está a funcionar correctamente. Verifique se a ficha está inserida correctamente na tomada.
A luz indicadora de aumento de Temperatura é vermelha. Isto significa que o aparelho está a ser ligado à corrente pela primeira vez, ou foi desligado durante um período significativo (por descongelamento ou durante uma interrupção para o fornecimento de electricidade), a porta do congelador não está fechada ou está a ser frequentemente aberta e fechada, ou uma grande quantidade de alimentos frescos forma colocados no seu interior, e portanto a temperatura no compartimento subiu acima -9 ºC. Quando a temperatura no compartimento novamente cair abaixo os -9 ºC, a luz indicadora se desliga. ATENÇÃO! Se a luz indicadora de temperatura não sai (por outros motivos que não os listados acima) por mais de seis horas, o compressor está a trabalhar constantemente ou não está a funcionar, consulte um Técnico qualificado.
O ruído ficar mais alto. Verifique se o aparelho está estável num lugar plano. Para nivelá-lo regule os pés da frente. Verifique se o aparelho está encostado a mobiliário e se alguma parte do sistema de refrigeração na parte de trás do corpo do aparelho está a tocar na parede. Afaste o
13
aparelho do mobiliário ou das paredes. Verifique se a causa do ruído crescente se deve a garrafas, latas ou pratos no aparelho que podem estar em contacto entre si.
Aparecer água na parte debaixo do compartimento do frigorífico. Verifique se o espaço do canal de água de descongelação não está bloqueado. Limpe o espaço do canal de água de descongelação com um produto de limpeza para esse efeito.
Aparecer água nas prateleiras de vidro temperado. Produtos ou pratos com alimentos no compartimento de refrigeração estão a tocar na parede do fundo do compartimento. Não deixe que produtos ou pratos com alimentos toquem na parede do fundo.
Aparecer água debaixo do aparelho. O tabuleiro de recolha de água de descongelação escorregou para fora do compressor. Coloque o tabuleiro em cima do compressor.
Quando a porta do aparelho é aberta, a junta vedante de borracha é puxada para fora. A junta está suja com alimentos pegajosos (gordura, geleia). Limpe a junta vedante e a respectiva ranhura com água quente contendo sabão ou detergente de lavar a loiça e depois passe um pano para secar. Monte a junta vedante de borracha no lugar.
Temperatura elevada no aparelho, as pausas de funcionamento do aparelho são curtas. Veja se a porta do aparelho está a fechar bem, se não esteve aberta durante mais tempo do que o necessário ao tirar ou a colocar alimentos ou se foi colocada uma grande quantidade de comida quente no aparelho.
A parte de cima do aparelho tem condensação em cima. A humidade relativa do ar ambiente é superior a 70%. Ventile a divisão onde se encontra o aparelho e, se possível, retire a causa da humidade.
TRANSPORTE O FABRICANTE NÃO SERÁ RESPONSÁVEL POR QUAISQUER DANOS NO APARELHO QUE RESULTEM DO NÃO CUMPRIMENTO DAS INSTRUÇÕES DE TRANSPORTE.
O aparelho deve ser transportado apenas na posição vertical. Durante o transporte, o aparelho deve estar protegido das condições atmosféricas (chuva, neve,
humidade). O aparelho deve estar bem preso durante o transporte para não escorregar nem chocar dentro
do veículo de transporte. Se o aparelho tiver sido transportado numa posição que não na vertical, pode ser ligado à
alimentação da rede ao fim de 4 horas no mínimo. Se não seguir estas instruções, o compressor do aparelho pode avariar.
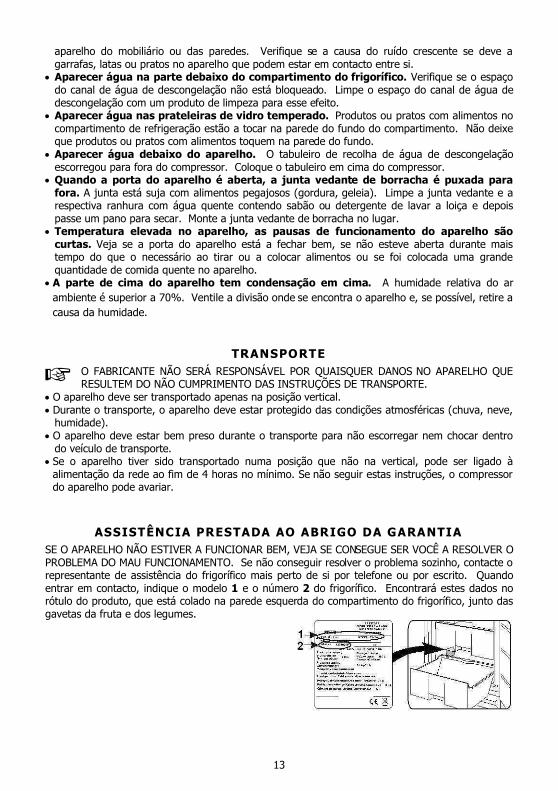
ASSISTÊNCIA PRESTADA AO ABRIGO DA GARANTIA SE O APARELHO NÃO ESTIVER A FUNCIONAR BEM, VEJA SE CONSEGUE SER VOCÊ A RESOLVER O PROBLEMA DO MAU FUNCIONAMENTO. Se não conseguir resolver o problema sozinho, contacte o representante de assistência do frigorífico mais perto de si por telefone ou por escrito. Quando entrar em contacto, indique o modelo 1 e o número 2 do frigorífico. Encontrará estes dados no rótulo do produto, que está colado na parede esquerda do compartimento do frigorífico, junto das gavetas da fruta e dos legumes.
1
IMPORTANT USE AND SAFETY INSTRUCTIONS
CAREFULLY READ THE INSTRUCTION MANUAL. If instructions are not followed, there
is a risk of injury, damage of the appliance and loss of the right to free warranty
service. We recommend to keep the Instruction manual the whole time you have the appliance.
When you sell the appliance pass the Instruction manual to the new owner of the appliance.
WARNING!
– Do not cover the ventilation holes at the top and on the sides of the appliance.
– Do not use any mechanical means or electrical devices to hasten the thawing
process when cleaning the freezer compartment.
– Do not use electrical appliances inside the food storage compartments of the
appliance, unless they are of the type recommended by the manufacturer.
– If the supply cord is damaged it must be replaced by the manufacturer,
manufacturer service agent or a similarly qualified person, in order to avoid a
hazard.
– Disposal of the appliance should be according to national rules.
– Do not damage the appliance refrigeration system. It contains the refrigerant gas
R600a. If the refrigeration system is damaged:
• Do not use any open flame.
• Avoid sparks ― do not turn on any electrical appliances or lighting fixtures.
• Immediately ventilate the room.
– Do not allow children to play with the appliance or to plug it in or unplug from the
electricity supply socket. Do not allow children to play with the packaging material
from the appliance. Packaging materials (e.g. plastic bags, polystyrene) are dangerous for
children. Risk of suffocation! Keep packaging materials out of reach of children.
– The appliance should not be used by children or mentally challenged individuals,
unless they have previously been shown how to operate the appliance by someone
responsible for their safety.
• If the appliance is brought in from the cold (temperature is not higher than +12 °C), you should
wait for two hours before connecting it to the mains. • The appliance should not be connected to the mains until all packing and transport materials
aren’t removed. • Once the appliance is unpacked, make sure that it is complete, that the body and the electrical
cord aren’t damaged. • It is forbidden to use a technically damaged appliance.
CONNECTION TO THE MAINS
– The appliance must be plugged into an earthed electricity supply socket. The
earthed electrical socket by which the appliance is connected to the mains should
be in an accessible place.
– IF THE APPLIANCE IS PRODUCED WITH THE SPECIAL SUPPLY CORD IT CAN BE EXCHANGED
ONLY BY THE SAME SPECIAL SUPPLY CORD PROVIDED BY THE MANUFACTURER.
– TO AVOID HAZARDS, DAMAGED POWER SUPPLY CORDS SHOULD BE REPLACED ONLY BY THE
MANUFACTURER, A MAINTENANCE TECHNICIAN, OR A PERSON WITH AN EQUIVALENT
QUALIFICATION.
2
– DO NOT USE extension cords or connectors (adapters) or couplers.
– The frequency and power of the electricity supply in your house must conform to
the general data parameters of the appliance as it is shown in the product label.
– When positioning the appliance, be careful that the electrical cord isn’t squeezed in
order to avoid its damage. Do not store heavy objects such as cooling devices,
furniture or other domestic devices next the appliance in such a way that they
could squeeze and damage the electrical cord. This can cause a short circuit and a
fire.
– Make sure that the plug of the electrical cord is not squeezed by the back wall of
the appliance or otherwise damaged. A damaged plug can be the cause of a fire!
• IF THE APPLIANCE IS UNPLUGGED (FOR CLEANING, MOVING TO ANOTHER PLACE, ETC.), IT MAY BE REPEATEDLY SWITCHED ON AFTER 15 MIN.
• The appliance should be used only for storing and freezing foodstuffs. • This appliance is not designed for the storage of explosive substances such as aerosol cans with a
flammable propellant.
• It is prohibited to store petrol and other flammable liquids near the appliance.
• The appliance can’t be disposed of by burning. • Do not place any switched on electrical devices (such as microwave ovens, hair dryers, irons,
electric kettles or other electrical devices) on top of the appliance because this may cause ignition of plastic parts.
• Do not place any dishes with liquids on top of the appliance and do not keep flowers in vases or other liquid-filled vessels on the appliance.
• Do not climb on or sit on the appliance, do not lean on or hang on the appliance doors and do not allow children to do this.
IF THE APPLIANCE IS OUT OF ORDER AND IT IS NOT POSSIBLE TO REPAIR IT BY MEANS OF GIVEN RECOMMENDATIONS, UNPLUG IT, OPEN THE DOORS AND CALL THE SERVICE EXPERT. ONLY A SERVICE REPRESENTATIVE CAN REMEDY ALL TECHNICAL OR CONSTRUCTION FAULTS.
WARNING! DO NOT OPEN THE COVER OF THE LED ILLUMINATION. In case that LED i l l um inat ion i s used the serv ice rep resen ta t i ve mus t be con tac ted when the LED l ight i s defected .
ENVIRONMENTAL PROTECTION INFORMATION
This symbol indicates that once the appliance is no longer needed, it cannot be
disposed together with other miscellaneous municipal waste. It should be collected and
eliminated separately, i.e. in containers specially marked with this symbol in large-
dimension rubbish collection areas. Full information on where to submit the old
appliance safety can be obtained from local government authorities, the shop where
you bought the appliance or the manufacturer’s representatives.
If you decided to scrap the appliance, make it impossible to use in order to prevent possible
misadventure. Pull out the electric plug from the electricity supply socket and then cut off the cord.
Tear off the gasket. Break the door lock if any.
WARNING! Do not dismantle the appliance yourself. Pass it on to recycling
companies.
3
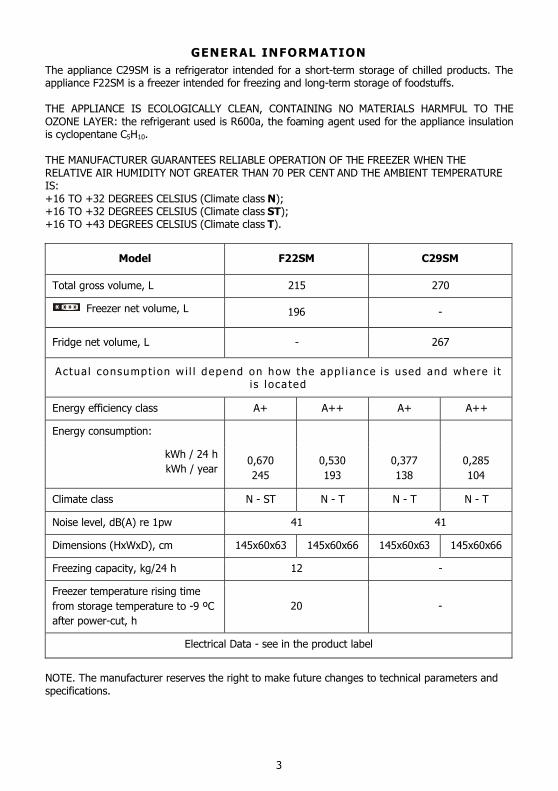
GENERAL INFORMATION
The appliance C29SM is a refrigerator intended for a short-term storage of chilled products. The appliance F22SM is a freezer intended for freezing and long-term storage of foodstuffs. THE APPLIANCE IS ECOLOGICALLY CLEAN, CONTAINING NO MATERIALS HARMFUL TO THE OZONE LAYER: the refrigerant used is R600a, the foaming agent used for the appliance insulation is cyclopentane C5H10. THE MANUFACTURER GUARANTEES RELIABLE OPERATION OF THE FREEZER WHEN THE RELATIVE AIR HUMIDITY NOT GREATER THAN 70 PER CENT AND THE AMBIENT TEMPERATURE IS: +16 TO +32 DEGREES CELSIUS (Climate class N); +16 TO +32 DEGREES CELSIUS (Climate class ST); +16 TO +43 DEGREES CELSIUS (Climate class T).
Model F22SM C29SM
Total gross volume, L 215 270
Freezer net volume, L 196 -
Fridge net volume, L - 267
Actua l consumpt i on w i l l depend on how the app l i ance i s used and where i t i s l oca ted
Energy efficiency class A+ A++ A+ A++
Energy consumption:
kWh / 24 h
kWh / year
0,670
245
0,530
193
0,377
138
0,285
104
Climate class N - ST N - T N - T N - T
Noise level, dB(A) re 1pw 41 41
Dimensions (HxWxD), cm 145x60x63 145x60x66 145x60x63 145x60x66
Freezing capacity, kg/24 h 12 -
Freezer temperature rising time
from storage temperature to -9 ºC
after power-cut, h
20 -
Electrical Data - see in the product label
NOTE. The manufacturer reserves the right to make future changes to technical parameters and specifications.
4
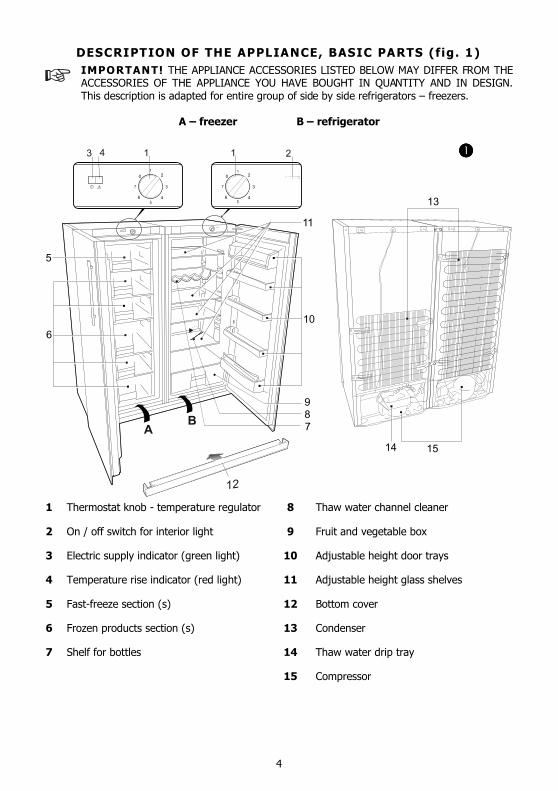
DESCRIPTION OF THE APPLIANCE, BASIC PARTS (fig. 1)
IMPORTANT! THE APPLIANCE ACCESSORIES LISTED BELOW MAY DIFFER FROM THE ACCESSORIES OF THE APPLIANCE YOU HAVE BOUGHT IN QUANTITY AND IN DESIGN. This description is adapted for entire group of side by side refrigerators – freezers.
A – freezer B – refrigerator
����
1 Thermostat knob - temperature regulator 8 Thaw water channel cleaner
2 On / off switch for interior light 9 Fruit and vegetable box
3 Electric supply indicator (green light) 10 Adjustable height door trays
4 Temperature rise indicator (red light) 11 Adjustable height glass shelves
5 Fast-freeze section (s) 12 Bottom cover
6 Frozen products section (s) 13 Condenser
7 Shelf for bottles 14 Thaw water drip tray
15 Compressor
5
REVIEW OF MECHANICAL CONTROL (fig. 1)
CONTROL PANEL — DESCRIPTION OF SYMBOLS AND OPERATIONS 1 −−−− THERMOSTAT KNOB. The temperature in the appliance is controlled using the thermostat
knob by turning it to one side or the other. Temperature values are indicated on the thermostat knob. The temperature in the appliance is reduced by turning the thermostat knob clockwise. More in “Temperature regulation”.
3−−−− ELECTRICITY SUPPLY INDICATOR marked with the symbol
When the appliance is connected to the electricity supply, the green indicator light is illuminated.
4 −−−− THE TEMPERATURE RISE INDICATOR marked with the symbol
When the temperature in the freezer rises above -9 ºC, the red indicator light is illuminated. It indicates that: • The freezer was switched off for a longer time, i.e. the freezer is switched on for the first
time, after defrosting or after losing of voltage. • The door of the freezer is opened or is being opened too frequently. • It is loaded a large amount of unfrozen foodstuffs. • The freezing system is failed, i.e. the indicator does not go out longer 6 hours and it is heard
running compressor or the compressor does not switch off. In this case you should apply to your service agent (at first make sure that three above items were taken into account).
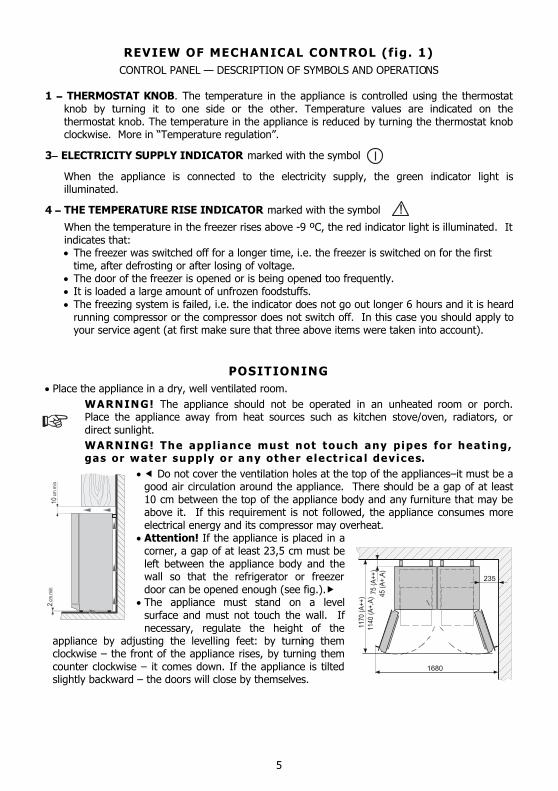
POSITIONING
• Place the appliance in a dry, well ventilated room.
WARNING! The appliance should not be operated in an unheated room or porch. Place the appliance away from heat sources such as kitchen stove/oven, radiators, or direct sunlight.
WARNING! The appl iance must not touch any pipes for heat ing, gas or water supply or any other e lectr ica l devices.
• � Do not cover the ventilation holes at the top of the appliances–it must be a good air circulation around the appliance. There should be a gap of at least 10 cm between the top of the appliance body and any furniture that may be above it. If this requirement is not followed, the appliance consumes more electrical energy and its compressor may overheat.
• Attention! If the appliance is placed in a corner, a gap of at least 23,5 cm must be left between the appliance body and the wall so that the refrigerator or freezer door can be opened enough (see fig.).�
• The appliance must stand on a level surface and must not touch the wall. If necessary, regulate the height of the
appliance by adjusting the levelling feet: by turning them clockwise – the front of the appliance rises, by turning them counter clockwise – it comes down. If the appliance is tilted slightly backward – the doors will close by themselves.
6
CONNECTING REFRIGERATOR AND FREEZER AND PREPARING
THEM FOR OPERATION
IMPORTANT! We RECOMMEND trusting the job of connecting refrigerator
C29SM and freezer F22SM to a service agent. But please note that this job is not
included in our warranty service.
IMPORTANT! If you decide to connect these appliances and prepare them for
operation yourself, we recommend getting someone to help you.
You will need: a Phillips screwdriver PH2, a t-type socket wrench No.8 and a wrench No.10. Never lay the appliances horizontally when connecting them. Preparing the appliances for connecting 1. Unpack the appliances. Take them off the polystyrene bases. Remove all the packing tape. 2. When placing the appliances into their designated place, slightly tilt them backwards: the
wheels at the back will allow you to easily put them into the desired place.
Never lift or push the refrigerator and freezer holding their handles as they may break.
3. Remove the red tape: it is intended for transportation only. 4. Appropriately dispose of the packaging. 5. Take supports 1 out of the bag and insert them into slots 2 at the
top of the back of the appliances (see pic.). 6. Place the refrigerator and freezer about 1 metre off the wall they
will be placed by. Place the appliances side by side, with the freezer on the left and the refrigerator on the right.
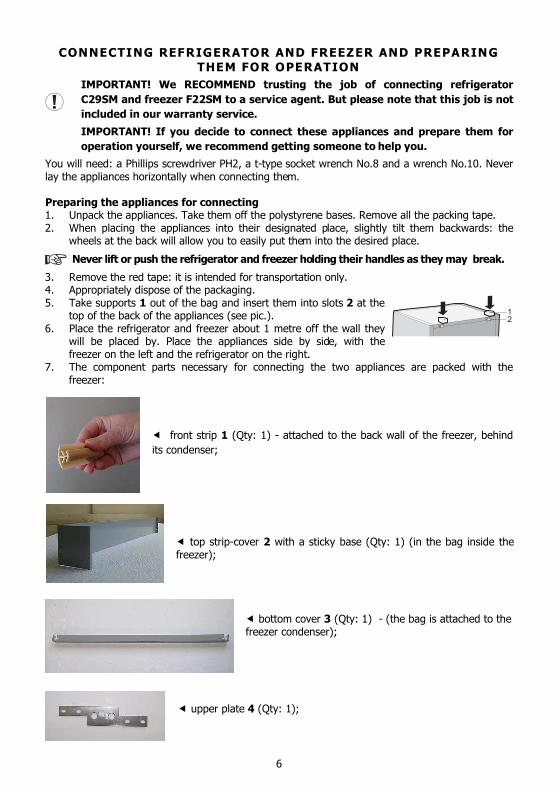
7. The component parts necessary for connecting the two appliances are packed with the freezer:
� front strip 1 (Qty: 1) - attached to the back wall of the freezer, behind
its condenser;
� top strip-cover 2 with a sticky base (Qty: 1) (in the bag inside the freezer);
� bottom cover 3 (Qty: 1) - (the bag is attached to the freezer condenser);
� upper plate 4 (Qty: 1);
7
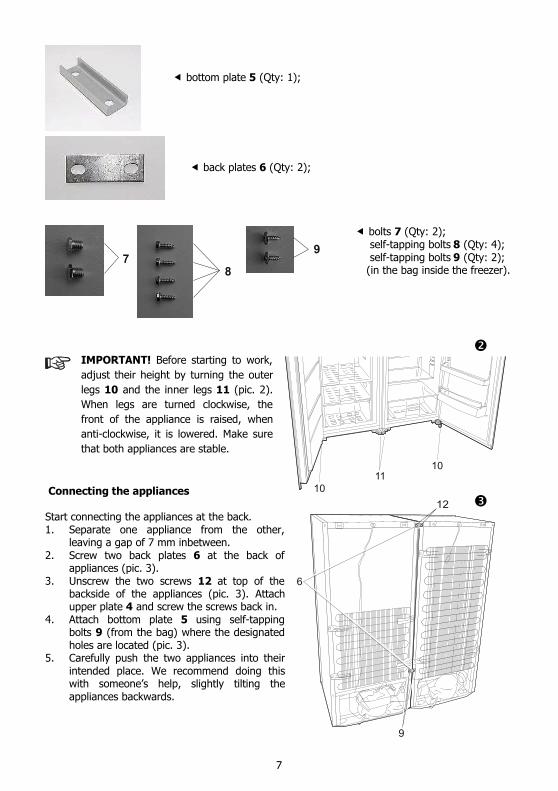
� bottom plate 5 (Qty: 1);
� back plates 6 (Qty: 2);
� bolts 7 (Qty: 2); self-tapping bolts 8 (Qty: 4); self-tapping bolts 9 (Qty: 2); (in the bag inside the freezer).
IMPORTANT! Before starting to work,
adjust their height by turning the outer
legs 10 and the inner legs 11 (pic. 2).
When legs are turned clockwise, the
front of the appliance is raised, when
anti-clockwise, it is lowered. Make sure
that both appliances are stable.
Connecting the appliances Start connecting the appliances at the back. 1. Separate one appliance from the other,
leaving a gap of 7 mm inbetween. 2. Screw two back plates 6 at the back of
appliances (pic. 3). 3. Unscrew the two screws 12 at top of the
backside of the appliances (pic. 3). Attach upper plate 4 and screw the screws back in.
4. Attach bottom plate 5 using self-tapping bolts 9 (from the bag) where the designated holes are located (pic. 3).
5. Carefully push the two appliances into their intended place. We recommend doing this with someone’s help, slightly tilting the appliances backwards.
�
�
8
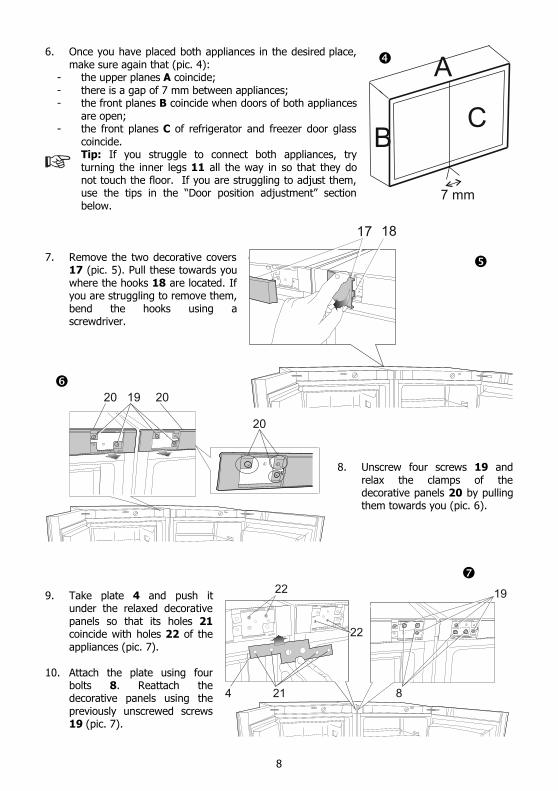
6. Once you have placed both appliances in the desired place, make sure again that (pic. 4):
- the upper planes A coincide; - there is a gap of 7 mm between appliances; - the front planes B coincide when doors of both appliances
are open; - the front planes C of refrigerator and freezer door glass
coincide. Tip: If you struggle to connect both appliances, try turning the inner legs 11 all the way in so that they do not touch the floor. If you are struggling to adjust them, use the tips in the “Door position adjustment” section below.
7. Remove the two decorative covers
17 (pic. 5). Pull these towards you where the hooks 18 are located. If you are struggling to remove them, bend the hooks using a screwdriver.
8. Unscrew four screws 19 and
relax the clamps of the decorative panels 20 by pulling them towards you (pic. 6).
9. Take plate 4 and push it
under the relaxed decorative panels so that its holes 21 coincide with holes 22 of the appliances (pic. 7).
10. Attach the plate using four
bolts 8. Reattach the decorative panels using the previously unscrewed screws 19 (pic. 7).
�
�
�
�
9
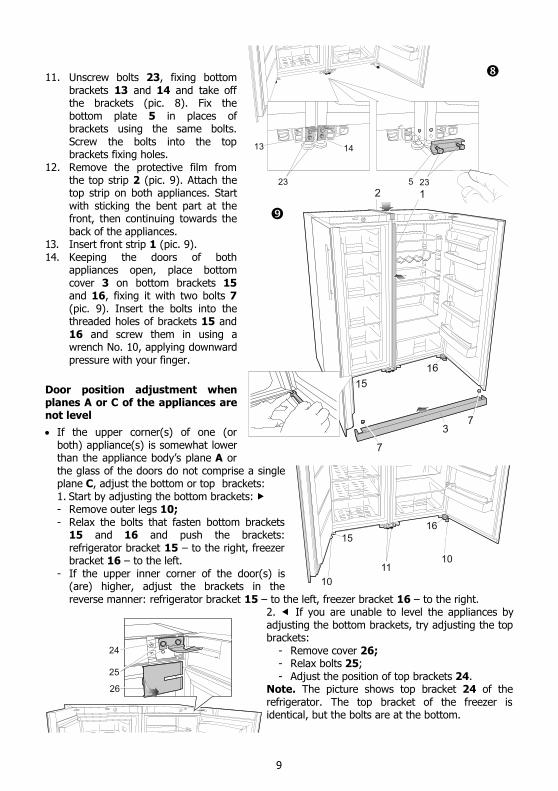
11. Unscrew bolts 23, fixing bottom
brackets 13 and 14 and take off the brackets (pic. 8). Fix the bottom plate 5 in places of brackets using the same bolts. Screw the bolts into the top brackets fixing holes.
12. Remove the protective film from the top strip 2 (pic. 9). Attach the top strip on both appliances. Start with sticking the bent part at the front, then continuing towards the back of the appliances.
13. Insert front strip 1 (pic. 9). 14. Keeping the doors of both
appliances open, place bottom cover 3 on bottom brackets 15 and 16, fixing it with two bolts 7 (pic. 9). Insert the bolts into the threaded holes of brackets 15 and 16 and screw them in using a wrench No. 10, applying downward pressure with your finger.
Door position adjustment when planes A or C of the appliances are not level
• If the upper corner(s) of one (or both) appliance(s) is somewhat lower than the appliance body’s plane A or the glass of the doors do not comprise a single plane C, adjust the bottom or top brackets: 1. Start by adjusting the bottom brackets: � - Remove outer legs 10; - Relax the bolts that fasten bottom brackets
15 and 16 and push the brackets: refrigerator bracket 15 – to the right, freezer bracket 16 – to the left.
- If the upper inner corner of the door(s) is (are) higher, adjust the brackets in the reverse manner: refrigerator bracket 15 – to the left, freezer bracket 16 – to the right.
2. � If you are unable to level the appliances by adjusting the bottom brackets, try adjusting the top brackets:
- Remove cover 26; - Relax bolts 25; - Adjust the position of top brackets 24.
Note. The picture shows top bracket 24 of the refrigerator. The top bracket of the freezer is identical, but the bolts are at the bottom.
�

10
TEMPERATURE REGULATION
Temperature set in the freezer by the manufacturer is -18 0C The temperature in the appliance is controlled using the thermostat knob 1 (fig. 1) by turning it to one side or the other. The temperature indication in digits is shown beside the thermostat knob. The temperature is regulated on the scale of seven digits. 0 = Compressor is switched off. WARNING! Electric current is not switched off. 1 = highest temperature (lowest cooling) 7 = lowest temperature (highest cooling) If food products in the refrigerator compartment are too cold, set the thermostat knob to 1, 2 or 3. If food products in the refrigerator compartment are not being chilled sufficiently, set the thermostat knob to 4 or 5 - 7.
Please set the desired temperature in the appliance according to your own requirements! THE TEMPERATURE IN THE REFRIGERATOR MAY VARY DEPENDING ON AMBIENT TEMPERATURE, THE AMOUNT OF FOODSTUFFS, THE TEMPERATURE OF THE FOODSTUFFS, AND HOW OFTEN THE APPLIANCE DOOR IS OPENED AND CLOSED.
Therefore we recommend: • locate the appliance away from heat sources, • food placed in the appliance should not be warmer than the room temperature, • appliance door must not to be left open, • the appliance door should not be open longer than it is necessary to take out or put in foodstuffs.
IF THE ROOM IS COOL, THE APPLIANCE COOLS LESS. THE TEMPERATURE IN THE APPLIANCE MAY THEREFORE RISE. Use the thermostat wheel to set a lower temperature.
STORAGE OF FOODSTUFFS IN THE REFRIGERATOR COMPARTMENT
The refrigerator compartment is intended for the short-term storage of fresh foodstuffs. • Do not put hot foodstuffs in the refrigerator compartment – they must be cooled down to room
temperature. • Strictly observe the foodstuff validity time indicated by the manufacturer on the product
packaging. • If on one of the shelves you have placed a lot of liquid filled dishes, a moisture may condense
and form drops, which may drip onto the shelf below. To avoid this, move some liquid filled objects to the other shelves.
FREEZING OF FOODSTUFFS IN THE FREEZER COMPARTMENT
In the freezer the fast-freeze section is marked with the symbol
In order to freeze fresh foodstuffs place the fresh foodstuffs in one or two rows in the fast-freeze section. When the foodstuffs are frozen should be removed from the fast-freeze section and placed in the storage section drawer(s). • DO NOT EXCEED THE MAXIMUM QUANTITY OF FROZEN PRODUCTS INDICATED IN THE
GENERAL DATA TABLE (see 3 page). • Leave a gap of not less than 2,5 cm between the foodstuffs being frozen
and the upper partition (see fig.).� • Do not place unwrapped foodstuffs in the freezer sections. • Fresh food for freezing should not touch already frozen foodstuffs. • Do not freeze foodstuffs that are warmer than the room temperature. • Do not freeze liquid foodstuffs in glass vessels or bottles. Do not freeze carbonated
beverages. • Strictly observe the frozen foodstuffs validity dates indicated by the manufacturer on the their
packaging.
11
• WE RECOMMEND THAT FROZEN FISH AND SAUSAGE SHOULD BE STORED IN THE FREEZER COMPARTMENT NOT LONGER THAN 6 MONTHS; CHEESE, POULTRY, PORK, LAMB – NOT MORE THAN 8 MONTHS; BEEF, FRUIT AND VEGETABLES – NOT LONGER THAN 12 MONTHS.
DEFROSTING OF THE REFRIGERATOR COMPARTMENT
The refrigerator compartment defrosts automatically. Drops of ice that form on the back wall of the refrigeration compartment thaw during the time the compressor is not working and the thaw water runs down the thaw water runoff channel to the tray on top of the compressor, where it evaporates.
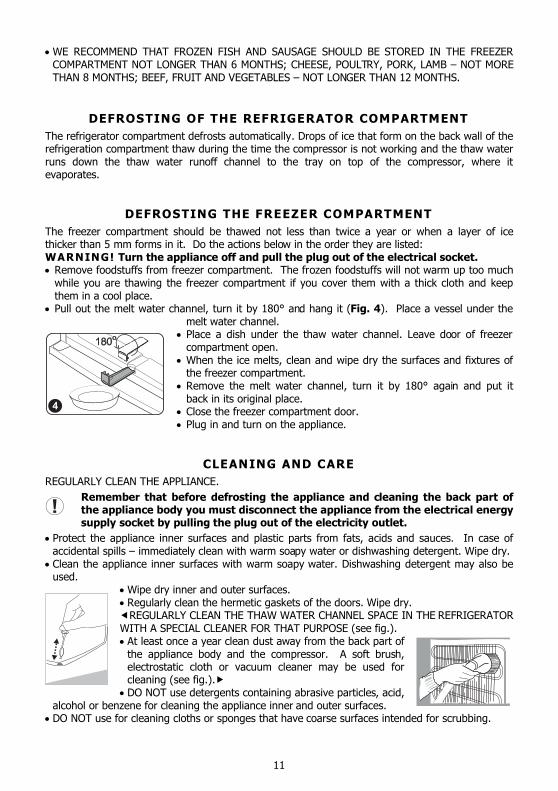
DEFROSTING THE FREEZER COMPARTMENT
The freezer compartment should be thawed not less than twice a year or when a layer of ice thicker than 5 mm forms in it. Do the actions below in the order they are listed: WARNING! Turn the appliance off and pull the plug out of the electrical socket. • Remove foodstuffs from freezer compartment. The frozen foodstuffs will not warm up too much
while you are thawing the freezer compartment if you cover them with a thick cloth and keep them in a cool place.
• Pull out the melt water channel, turn it by 180° and hang it (Fig. 4). Place a vessel under the melt water channel.
• Place a dish under the thaw water channel. Leave door of freezer compartment open.
• When the ice melts, clean and wipe dry the surfaces and fixtures of the freezer compartment.
• Remove the melt water channel, turn it by 180° again and put it back in its original place.
• Close the freezer compartment door. • Plug in and turn on the appliance.
CLEANING AND CARE
REGULARLY CLEAN THE APPLIANCE.
Remember that before defrosting the appliance and cleaning the back part of the appliance body you must disconnect the appliance from the electrical energy supply socket by pulling the plug out of the electricity outlet.
• Protect the appliance inner surfaces and plastic parts from fats, acids and sauces. In case of accidental spills – immediately clean with warm soapy water or dishwashing detergent. Wipe dry.
• Clean the appliance inner surfaces with warm soapy water. Dishwashing detergent may also be used.
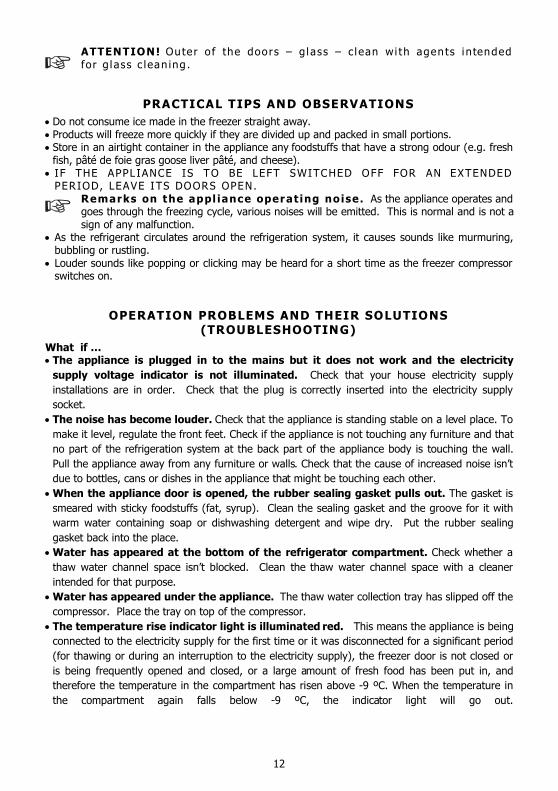
• Wipe dry inner and outer surfaces. • Regularly clean the hermetic gaskets of the doors. Wipe dry. �REGULARLY CLEAN THE THAW WATER CHANNEL SPACE IN THE REFRIGERATOR WITH A SPECIAL CLEANER FOR THAT PURPOSE (see fig.). • At least once a year clean dust away from the back part of
the appliance body and the compressor. A soft brush, electrostatic cloth or vacuum cleaner may be used for cleaning (see fig.).�
• DO NOT use detergents containing abrasive particles, acid, alcohol or benzene for cleaning the appliance inner and outer surfaces.
• DO NOT use for cleaning cloths or sponges that have coarse surfaces intended for scrubbing.
12
ATTENTION! Ou ter o f the doors – g l ass – c l ean wi th agen ts i n tended for g l ass c lean ing .
PRACTICAL TIPS AND OBSERVATIONS
• Do not consume ice made in the freezer straight away. • Products will freeze more quickly if they are divided up and packed in small portions. • Store in an airtight container in the appliance any foodstuffs that have a strong odour (e.g. fresh
fish, pâté de foie gras goose liver pâté, and cheese). • IF THE APPL IANCE IS TO BE LEFT SWITCHED OFF FOR AN EXTENDED
PERIOD, LEAVE ITS DOORS OPEN. Remarks on the appl iance operat ing noise. As the appliance operates and goes through the freezing cycle, various noises will be emitted. This is normal and is not a sign of any malfunction.
• As the refrigerant circulates around the refrigeration system, it causes sounds like murmuring, bubbling or rustling.
• Louder sounds like popping or clicking may be heard for a short time as the freezer compressor switches on.
OPERATION PROBLEMS AND THEIR SOLUTIONS (TROUBLESHOOTING)
What if … • The appliance is plugged in to the mains but it does not work and the electricity
supply voltage indicator is not illuminated. Check that your house electricity supply
installations are in order. Check that the plug is correctly inserted into the electricity supply
socket.
• The noise has become louder. Check that the appliance is standing stable on a level place. To
make it level, regulate the front feet. Check if the appliance is not touching any furniture and that
no part of the refrigeration system at the back part of the appliance body is touching the wall.
Pull the appliance away from any furniture or walls. Check that the cause of increased noise isn’t
due to bottles, cans or dishes in the appliance that might be touching each other.
• When the appliance door is opened, the rubber sealing gasket pulls out. The gasket is
smeared with sticky foodstuffs (fat, syrup). Clean the sealing gasket and the groove for it with
warm water containing soap or dishwashing detergent and wipe dry. Put the rubber sealing
gasket back into the place.
• Water has appeared at the bottom of the refrigerator compartment. Check whether a
thaw water channel space isn’t blocked. Clean the thaw water channel space with a cleaner
intended for that purpose.
• Water has appeared under the appliance. The thaw water collection tray has slipped off the
compressor. Place the tray on top of the compressor.
• The temperature rise indicator light is illuminated red. This means the appliance is being
connected to the electricity supply for the first time or it was disconnected for a significant period
(for thawing or during an interruption to the electricity supply), the freezer door is not closed or
is being frequently opened and closed, or a large amount of fresh food has been put in, and
therefore the temperature in the compartment has risen above -9 ºC. When the temperature in
the compartment again falls below -9 ºC, the indicator light will go out.
13
ATTENTION! If the temperature indicator light does not go out (for reasons other
than those listed above) for longer than six hours, the compressor is either working
constantly or is not functioning. You need to consult service people.
• High temperature in appliance, the compressor operation pauses are short. Ascertain
whether the appliance door are shutting tightly, whether the door wasn’t kept open longer than
necessary when taking out or putting in foodstuffs or whether a large amount of warm food was
placed in the appliance.
• The top of the appliance has condensation on it. The ambient relative air humidity is
above 70 %. Ventilate the room where the appliance stands and if possible remove the cause
of the humidity.
TRANSPORT
THE MANUFACTURER WILL NOT BE RESPONSIBLE FOR ANY DAMAGE OF THE APPLIANCE THAT RESULTS FROM NON-COMPLIANCE WITH THE INSTRUCTIONS FOR TRANSPORTATION.
• The appliance should be transported only in the vertical position. • When being transported, the appliance should be protected from atmospheric conditions (rain,
snow, dampness). • The appliance should be firmly secured in place while being transported, to avoid slippage or any
shocks in the transport vehicle. • If the appliance was transported not vertically, it may be connected to the mains after 4 hours at
least. If this is not done, the appliance compressor may fail.
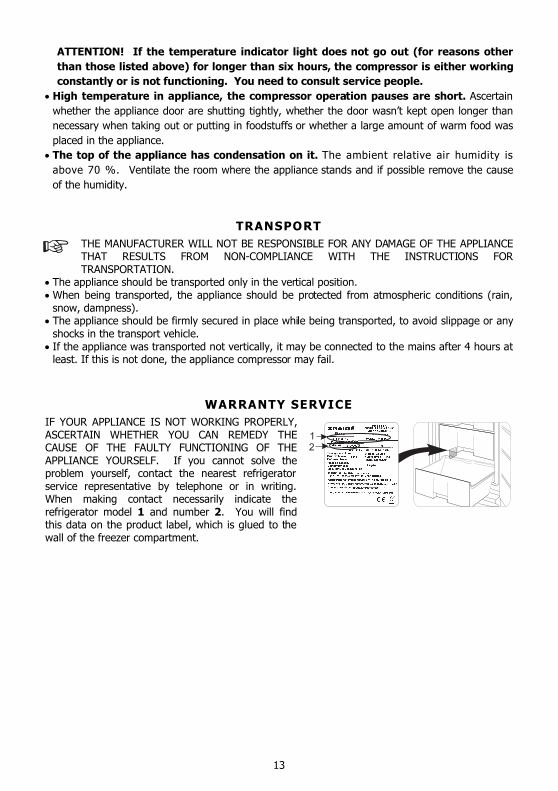
WARRANTY SERVICE
IF YOUR APPLIANCE IS NOT WORKING PROPERLY, ASCERTAIN WHETHER YOU CAN REMEDY THE CAUSE OF THE FAULTY FUNCTIONING OF THE APPLIANCE YOURSELF. If you cannot solve the problem yourself, contact the nearest refrigerator service representative by telephone or in writing. When making contact necessarily indicate the refrigerator model 1 and number 2. You will find this data on the product label, which is glued to the wall of the freezer compartment.