manual eng
TRANSCRIPT

English
INSTRUCTION MANUALFor all helmets except GP Models
Please read before wearing helmet

Notes
4
Product Warranty
We wish to take this opportunity to thank you for purchasing one of our ARAI helmets. Weare confident that it will meet with your satisfaction and we offer this booklet of informationto enhance your enjoyment of your new helmet. As the oldest manufacturer of safety helmets in Japan, ARAI has always been in the forefront of the helmet technology and wecontinue today as one of the leaders in the art and science of making helmets. However,even when built to the best of the current “state of the art”, no helmet can guarantee absolutesafety. Your helmet’s function is to reduce the chance or severity of injury in an accident.Some reasonably foreseeable impacts may exceed any helmet’s ability to protect againstinjury. Please bear this in mind when you ride and ride safely.
In order to come into consideration for the guarantee you are requested to return the enclosedform within ten days of purchase to Arai Helmet (Europe) B.V., P.O. Box 112, 3870 CCHoevelaken, the Netherlands. Please ensure that the form has been stamped and dated bythe dealer from whom the helmet was purchased. Your guarantee is only valid on ourreceipt of this form.
Every Arai helmet which, in the opinion of Arai Helmet Europe B.V., shows any signs ofmaterial or manufacturing defects within five years of purchase, will be repaired free ofcharge at the original purchaser or replaced at the discretion of Arai if it is sent carriagepaid in the original packaging to the importer in the country of purchase.
Any alterations effected by the purchaser or third parties invalidate this guarantee. Normalwear and tear of the painted surfaces and abnormal treatment or wilful damage of the interiorof the helmet is not included in the guarantee. Flaking, scratches or other damage to theouter shell of the helmet and painted surfaces which were caused by contact with a surfaceor object are excluded from the guarantee, unless these were caused by production faults.
This guarantee supersedes all other guarantees. Arai does not accept liability for any additional or consequential damage. This guarantee does not apply to accessories such asvisor, helmet peaks or chin protectors. The Dutch text of this guarantee shall prevail overthe translation. The Dutch text has been filed at the District Court Registry in Utrecht undernumber 30/92.
Parties declare that the Laws of the Kingdom of the Netherlands apply to this guaranteeand state that the Court at Utrecht in the Netherlands are exclusively competent to decideon any dispute.
Notes on use ARAI HELMET
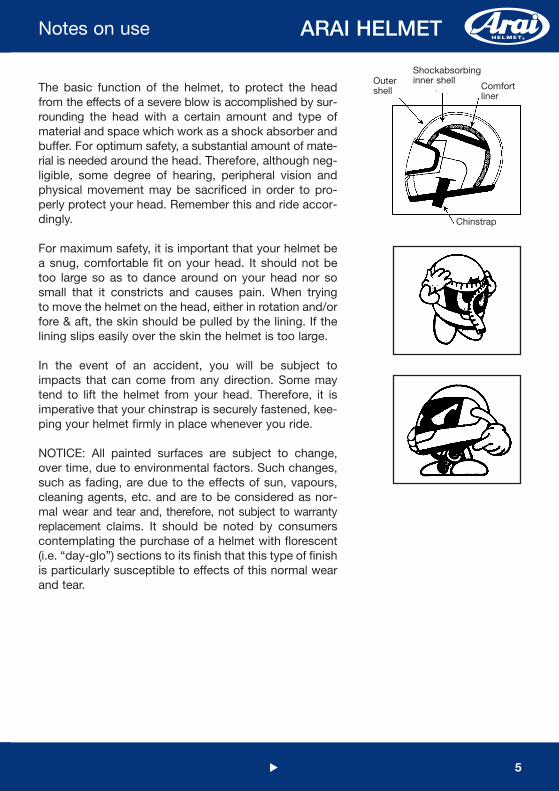
The basic function of the helmet, to protect the headfrom the effects of a severe blow is accomplished by sur-rounding the head with a certain amount and type ofmaterial and space which work as a shock absorber andbuffer. For optimum safety, a substantial amount of mate-rial is needed around the head. Therefore, although neg-ligible, some degree of hearing, peripheral vision andphysical movement may be sacrificed in order to pro-perly protect your head. Remember this and ride accor-dingly.
For maximum safety, it is important that your helmet bea snug, comfortable fit on your head. It should not betoo large so as to dance around on your head nor sosmall that it constricts and causes pain. When trying to move the helmet on the head, either in rotation and/orfore & aft, the skin should be pulled by the lining. If thelining slips easily over the skin the helmet is too large.
In the event of an accident, you will be subject toimpacts that can come from any direction. Some maytend to lift the helmet from your head. Therefore, it isimperative that your chinstrap is securely fastened, kee-ping your helmet firmly in place whenever you ride.
NOTICE: All painted surfaces are subject to change,over time, due to environmental factors. Such changes,such as fading, are due to the effects of sun, vapours,cleaning agents, etc. and are to be considered as nor-mal wear and tear and, therefore, not subject to warrantyreplacement claims. It should be noted by consumerscontemplating the purchase of a helmet with florescent(i.e. “day-glo”) sections to its finish that this type of finishis particularly susceptible to effects of this normal wearand tear.
5
Outershell
Chinstrap
Shockabsorbing inner shell
Comfortliner

Visor (Face Shield) maintenance instructions
6
On the Arai helmet you just purchased a visor (face shield) is installed. This visor is madeof high quality polycarbonate. To keep this important part of your helmet in good conditionand to enjoy your visor for a long time please see a few tips for maintenance below.
CleaningFor the best cleaning of the visor use soft cloth and clear, lukewarm water (preferably distilledwater) In case of a very dirty visor (f.i. insect remains) add some dish-washing liquid to thewater.
NEVER USE PETROL, THINNER, BENZENE OR ANY OTHER SOLVENTS AS THEYCAN ADVERSELY AFFECT THE QUALITY OF THE VISOR!Also products labelled as helmet/visor care/cleaner may have a negative effect on thequality of the visor!This also applies to the other (plastic) parts of the visor system (shield holders, base plates)and the ventilation devices on your helmet.
Before cleaning the visor remove the visor from your helmet (see the owners manual).Clean it and dry it by using a soft cloth, never any paper products, do not use any heaterfor drying the visor! After drying install the visor as described in the owners manual.
Tip: Clean the visor on a regular basis, preferably directly after use, in order to removeremains of insects and other dirt more easily.
The space between the shield holder (side-pod) and the helmet can also become very dirtywhich may have an adverse effect on the visor operation. Remove and install the holdersin accordance with the owner’s manual and clean the parts with lukewarm water.
ScratchesDo not use sharp objects to remove dirt from your visor: this may cause scratches! In caseof scratches on your visor do not polish it; as this may cause optical distortions!
StorageStore your visor in a dry and dark place, preferably in the original Arai helmet bag.
Eye-Opening trim rubberIn the helmet box you will find a small plastic bottle which contains liquid silicone. This fluidis to keep the eye-opening trim rubber in good condition. Apply (when necessary) just alittle bit of the silicone on the trim rubber, this provides a smoother operation of the visor.This silicone is also a lubricant for moving plastic parts (shutters on ventilation devices, redclip on the base plates). Lubricate these parts slightly, too much will attract excessive dirtand dust, when necessary.
Precautions on inadvertent damage to helmets
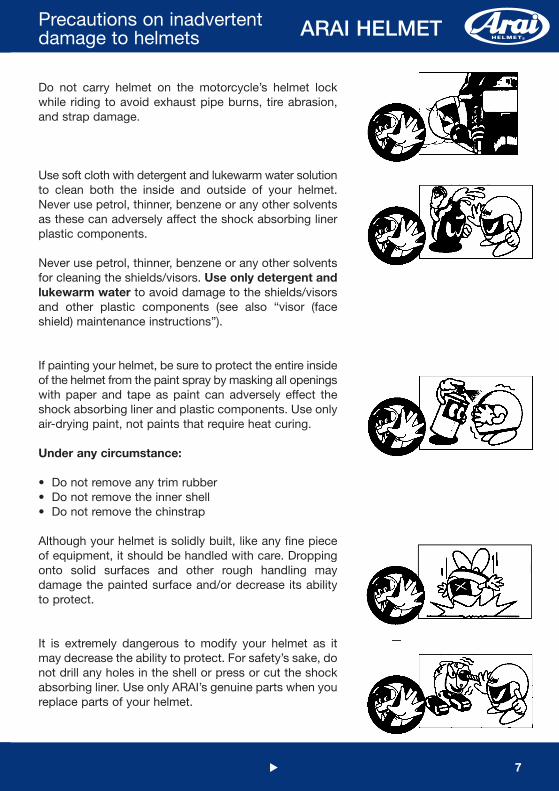
Do not carry helmet on the motorcycle’s helmet lockwhile riding to avoid exhaust pipe burns, tire abrasion,and strap damage.
Use soft cloth with detergent and lukewarm water solutionto clean both the inside and outside of your helmet.Never use petrol, thinner, benzene or any other solventsas these can adversely affect the shock absorbing linerplastic components.
Never use petrol, thinner, benzene or any other solventsfor cleaning the shields/visors. Use only detergent andlukewarm water to avoid damage to the shields/visorsand other plastic components (see also “visor (faceshield) maintenance instructions”).
If painting your helmet, be sure to protect the entire insideof the helmet from the paint spray by masking all openingswith paper and tape as paint can adversely effect theshock absorbing liner and plastic components. Use onlyair-drying paint, not paints that require heat curing.
Under any circumstance:
• Do not remove any trim rubber• Do not remove the inner shell• Do not remove the chinstrap
Although your helmet is solidly built, like any fine pieceof equipment, it should be handled with care. Droppingonto solid surfaces and other rough handling maydamage the painted surface and/or decrease its abilityto protect.
It is extremely dangerous to modify your helmet as itmay decrease the ability to protect. For safety’s sake, donot drill any holes in the shell or press or cut the shockabsorbing liner. Use only ARAI’s genuine parts when youreplace parts of your helmet.
ARAI HELMET
7

8
As is the nature of a good helmet, this helmet is so constructed that the energy of a severe impact is absorbedthrough partial destruction of the shell and/or liner. Suchdamage may not be visible to the naked eye. If the helmet suffers such an impact, and any doubt exists asto its further ability to protect, it should either be returnedto the manufacturer for competent inspection or discardedand replaced by a new ARAI helmet.
Do not “park” helmet on mirror stalks or sissy bars toavoid damage to liner.
Do not carry helmet on the motorcycle’s helmet lockwhile riding to avoid exhaust pipe burns, tire abrasion,and strap damage.
Keep helmet out of the reach of pets to avoid the interiorbeing chewed like a shoe, or scratched, like a sofa, asall too often happens. Such damage can be irreparable.
Do not expose helmets to solvents including gasoline, ortheir fumes to avoid damage to shields, small plasticcomponents and interior.

ARAI HELMET
9
Do not push the helmet straight down on the head, but:
• take left chinstrap in left hand, right chinstrap in right hand
• pull both chinstraps outwards• slide helmet from top backside off the head towards
front downside
To operate chinstrap
For proper fastening the chinstrap must be routed throughthe D-rings as illustrated <1> and pulled through themsecurely.
The end-strap snap is provided only to allow the wearerto prevent the end of the strap from flapping in the airstream <2>.
WARNING: It is not part of the retention system andshould not be relied upon even when carrying the helmetby the strap, as it will release under little stress.
A D-ring release tab is provided to make the looseningof the rings easier. Simply pull as illustrated in <3>.
Storage
Always store your Arai helmet at room temperatures inthe original cloth helmet sack when not in use.
• Do not store the helmet in a moist, damp or high-humidityenvironment
• Do not store in or near high temperatures or heat sources (such as a stove)
• Keep away from hot exhaust systems
How to put on a helmet
<1>
<2>
<3>

Operation instructions
10
To remove face shield
To remove the shield, first place it in the fullyopen position <1>.
NOTE: The shield cannot be removed fromany other position as the lock system will beengaged.
When the shield is in its fully open position,levers deploy from the front edge of theshield holders <2>. Pushing up on theselevers until a click is heard releases the shieldfrom the mechanisms <3>&<4>, (do not continue to push on levers), and the shieldcan be pulled straight out <5>.

Operation instructions ARAI HELMET
11
Recommended procedure: Place helmet on table or seat facing away from you <1>. Raiseshield fully upward to deploy the levers <2>. Using both hands at the same time, push upand release levers until a click is heard from each lever <3> and then grasp the shield’ssides and rotate your hands upward <4> and away from the helmet which will remove theshield <5>.
To replace face shield
To replace the shield, holding the shield inapproximately its fully open position. Slip thecomma shaped end of the shield into theside pod’s front opening, with the comma’slower edge riding on top of the wide whiteguide a top of the red latch fixture at the bottomof the side pod <1>.
NOTE: If the approach angle of the shield isincorrect, the shield cannot enter fully intothe side pod and thus cannot be installed<2>.
Push the shield further into the side pod untilthe stop-tab on the lower edge of the commashape goes over the white guide <3>. Workthe shield end up and down, in and outslightly and gently to settle all areas intoposition <4>. Repeat for the other side. TheLRS lever automatically retracts as the shieldis closed.
<1> <2> <3> <4> <5>

To operate DeMistLock
12
To operate the demisting feature of the SuperAdSis systems, simply push the DeMistLocktab firmly forward to accomplish the smallgap that will assist moisture disposal.
NOTE; To return the shield to fully closedposition, the DeMistLock tab must be pushedback. It is not sufficient to push the shielditself down. Reclosure must be made bymeans of the DeMistLock.
Adjustments
Almost all complaints about noise, drafts or misting are due to wrong fitment of the visoror the visor system. Do not adjust the visor or visor system yourself. Your official Arai dealeris trained to adjust the visor and/or the visor system for maximum performance, fit andcomfort and has the special equipment needed for this service.
Notes on racing shield with tear-off posts and instructionsfor tear-off (optional)
Arai racing shield with tear-off posts is availablefor racing use. In order to work with tear-offsthe shield is less curved than standardshields and thus less aerodynamic whichleads it to be noisier than standard shields forstreet riding use.
Proper tear-off (optional) is for racing use only.Never use for street riding.
Some tear-offs come with protective film onone or both sides. Be sure to remove any filmsthat may be present (<A>.
To install tear-offs, slip the hole of the shorterend over the right (throttle side as you sit onthe motorcycle) shield post. Lay the tear-offacross the shield and slip the other hole overthe left (clutch side) shield post <B>.

ARAI HELMET
13
Arai tear-off posts are eccentrically mountedso as to be adjustable to better accept looseror tighter tear-offs. Adjust both posts by rotatingthem so that the tear-off is taut across theshield but not too tight so as to rip or distortthe tear-off <C>.
Then tighten the posts from behind with aPhilips head screwdriver while holding theposts firmly in place with your, or an assistant’sfingers. The posts are loose when shipped,so be sure to tighten them before use even ifthe tear-offs fit without adjustment <D>.
If applying multiple tear-offs, fold the pull tabof the first tear-off so that the large grab holefits loosely of the shield post and crease thefold flat <E>. Install successive tear-offs inthe same manner as the first, fold the pull tabbetween each tear-off. Folding the last tab isnot necessary, but this will make grabbing iteasier.
Do not stack on too many tear-offs as thismay distort or diminish vision.
At high racing speeds, the pull tabs of thetear-offs may rip or fray, or the tear-offs mayfly off when turning your head. Therefore, asmall piece of tape at each corner of eachtear-off will hold it firmly to the shield untilyou pull it off <F>. Be sure to stagger thetabs of tape for each tear-off to avoid pullinglower ones off with the ones over them.

14
If replacing a racing shield (with tear-off posts) with a standard shield (no tear-off posts) itmay be necessary to adjust the shield position. The standard shield is curved top-to-bottomso as to be more aerodynamic. This may make it too loose if mounted in the same positionas the racing shield, which is less curved top-to-bottom.
If the standard shield is too loose when installed, loosen all four mounting screws on thebase plates, lubricate the eye port trim with the silicone provided, mount the shield andadjust so that the shield comes all the way of the locked down position and seals tightlyagainst the eye port trim. Holding the shield firmly in place tighten all four screws thenattach the side holders and test shield operation.
NOTE: The racing shield operation may be stiff compared to a standard shield, but shouldclose solid and tight. Routine eye port trim lubrication is recommended if shield operationbecomes stiff.
To operate brow vents
Type <A>; The Brow vents are operated fromfully closed through intermediate, to fullyopen positions by simply pulling the louvercontrol down to open, pushing up to close.
Type <B>; The Brow vents are operated fromfully closed through intermediate, to fullyopen positions by simply pulling the louvercontrol up to open, pushing down to close.
To operate top ducts(optional for NR-5)Simply push the switches on each duct toopen/close the ducts as illustrated.

ARAI HELMET
15
To operate mouth vent
The mouth vent is operated by simply pullingthe vent control down to open, pushing up toclose. When the chin vent is fully open, air isdirected up along the interior surface of theface shield to help prevent fogging and whenit is in its mid-way position air is channelledback to further enhance the chin vent’s airflowaway from the mouth and nose to help removehot, moist air faster.
To remove/replace cheekpads(not on all full face models available)
When first servicing the cheek pads, it is suggested that you do only one at a time so thatthe other can be used as reinstallation guide.To remove cheek pads first undo chinstrap.
NOTE: Before removing the cheek pads, besure to lift up the neck roll tab, which is insertedunder the black covering at the forward loweredge of the cheek pad assembly. This shouldbe re-inserted after reinstalling the cheekpad, except for G-type helmets such asSignet/GT and Maverick. Hereby the tabsshould not be removed at all!!
Pull pad toward the rear of the helmet, theninward to release and slide it off the strap.
Installation in reversed order, ensure thatchinstrap is in the correct position! WARNING:Never use petrol, thinner, benzene or anyother solvents as these can adversely affect theshock absorbing liner and plastic components.

To remove/replace earcups (only for open face models)
16
To remove ear cup, reach in next to chinstrapbase and grasp base of ear cup on one side,pull toward you until a ‘snap’ is heard, thendo the other side of the same ear cup <A>.
When both sides are free, pull lower part ofcup inward and down to release lower tab.Repeat for the other side <B>. In case youwash the ear cups, put them into lukewarmwater with small amount of laundry soap andwash gently by hand. Rinse well with freshwater and wipe off with a soft cloth. Dry themin the shade at ambient temperature.
WARNING: Never use petrol, thinner, benzeneor any other solvents as these can adverselyaffect the shock absorbing liner and plasticcomponents.
To replace air cup (note that the “L” & “R”embossed on the cup bases indicate Leftand Right side of the head when the helmetis worn), slide the lower tab into its receptacleand push home <C>.
Then, ensuring that strap is in the correctposition, place the two top tabs over theirreceptacles and push them home until a‘snap’ is heard from each. Now work thestrap fully into position <D>.
<A>
<B>
<C>
<D>

17
Helmet Specifications Subject to Change Without Notice.
Contact: ARAI HELMET, LIMITED12 Azuma-cho, 2-chomeSaitama City 330Japan
ARAI HELMET (AMERICAS), LIMITEDP.O. Box 9485Daytona, FL 32120U.S.A.
ARAI HELMET (EUROPE), B.V.P.O. Box 1123870 CC HoevelakenThe Netherlands